
HIGHLIGHTS:
- Learning Eclipse/PyDev IDE
- Rendering “Press Conference” on Celestia
- Finishing work on “Touring Baikonur” sequence shots
- Cleaned up computer workbench
- Organized computer books
- Rebuilt Giles with upgrades
- Purchased monitor replacement for Thinkpad T410
- Purchased books
Aug 2, 2019 at 4:00 PM
Render Server Tests
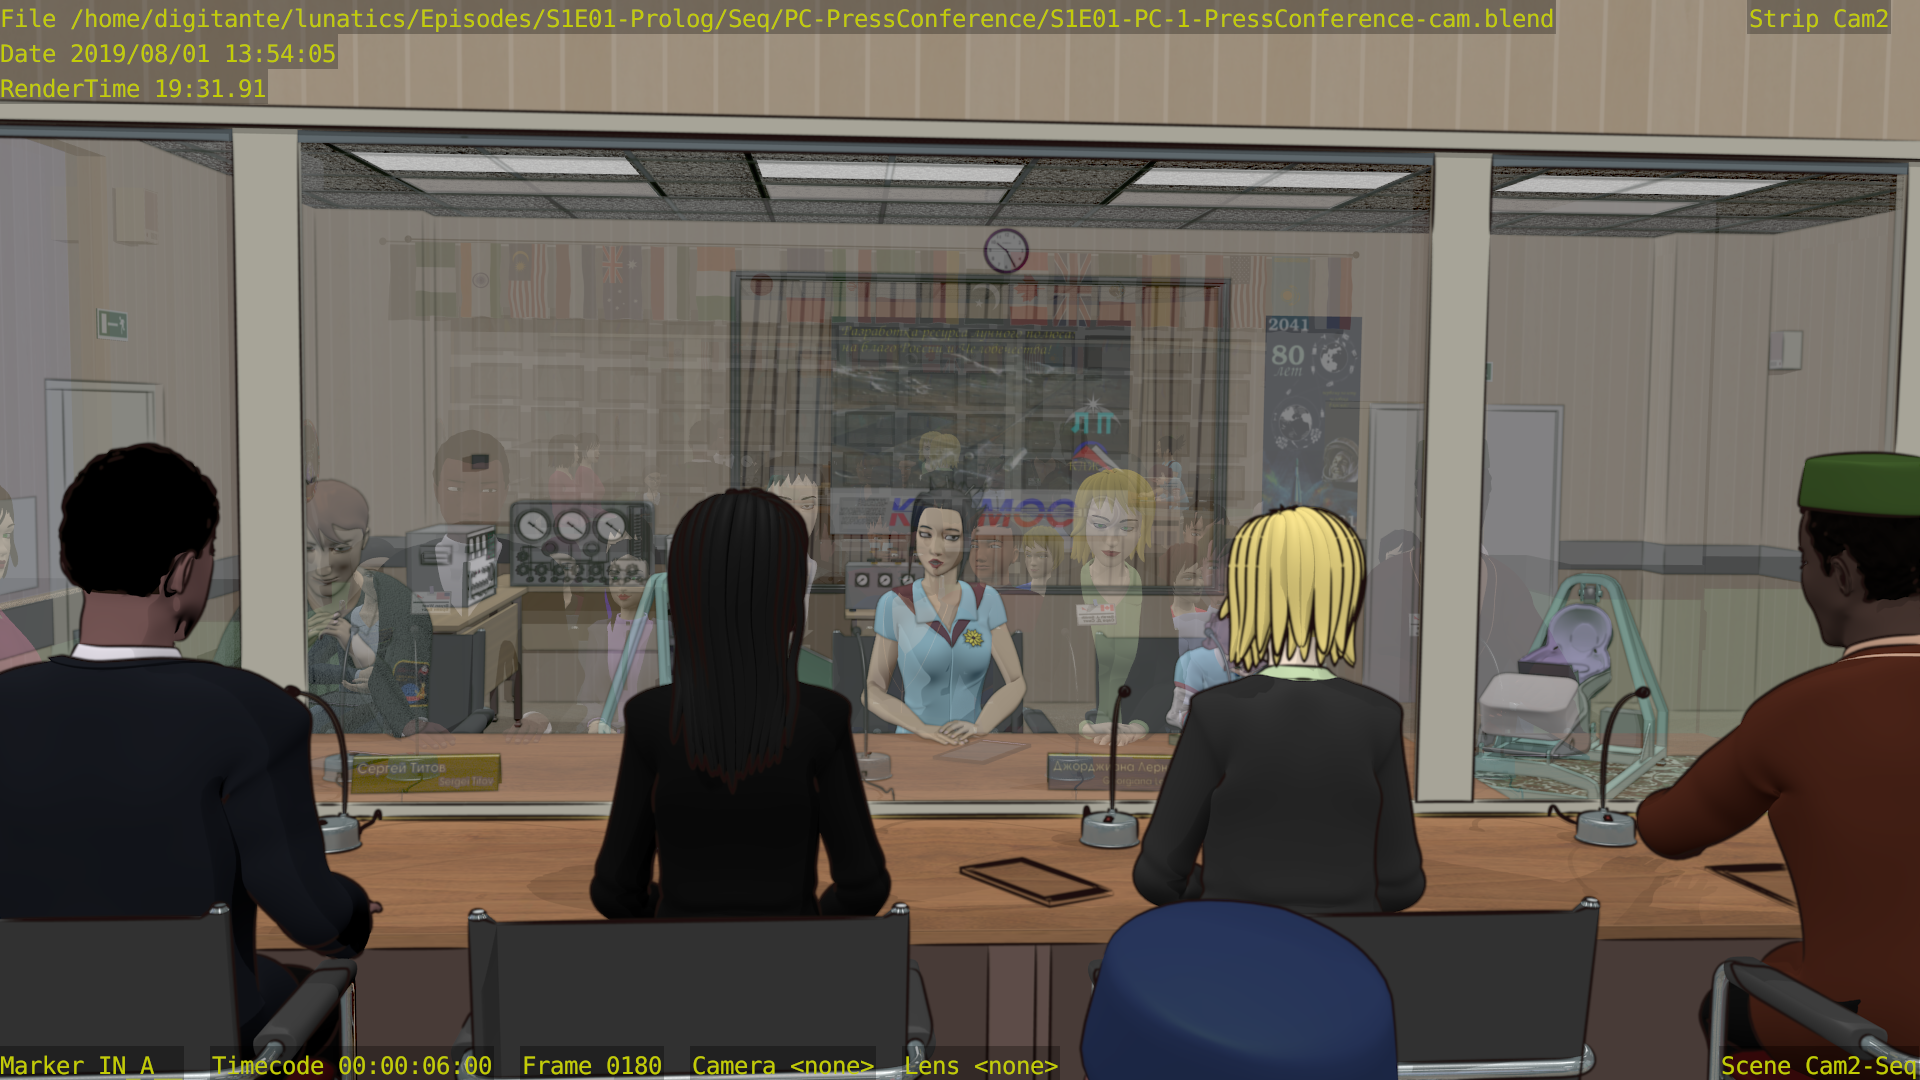
Today I’m running tests of the render server provided by Andrew Pam.
There’s not a lot new to see here (I’ve posted either this frame or one near it before), but the point is that this file was correctly rendered from a fresh checkout of the source files on the server, rendered with a freshly installed Blender 2.71 (this sequence had compatibility issues with 2.79, so I’m doing all rendering on it with 2.71).
In addition to this preview PNG image, there’s also two EXR images for each frame, representing the “Color” and “Ink” render layers. Final frames for the show will be recomposited from the EXRs, which allows for some tweaking of the images, but the PNG images gives us a very nearly final appearance.
The performance is not especially faster on a single image compared to rendering on my workstation (it’s about the same). But the big advantage is more RAM, so I can run more simultaneous Blender processes.
Freestyle in particular does not benefit very much from multi-threading, so it’s much better to run multiple processes rendering multiple frames at once, in terms of getting better performance. I estimate I can run about 12-14 Blender processes at a time (limited by available memory), with only a modest increase in total render time per frame (because fewer cores are available for each process). So although the render times per frame will be on the order of 20 minutes, the average render time, per total number of frames, will be more like 2 minutes.
At that rate, it should take about a week to render this “Press Conference” sequence, which is the most demanding render in the episode. And of course, because it’s on another computer, it won’t create any problems for work on my workstation, which I’ll be able to continue while it’s rendering.
I’m not using any render farm software at the moment. This sequence is simple enough that I can get away with just starting the Blender processes manually. I plan to work on the installation more, but I figured it’s better to just get this started rendering ASAP.
Aug 8, 2019 at 4:00 PM
Learning Eclipse/PyDev
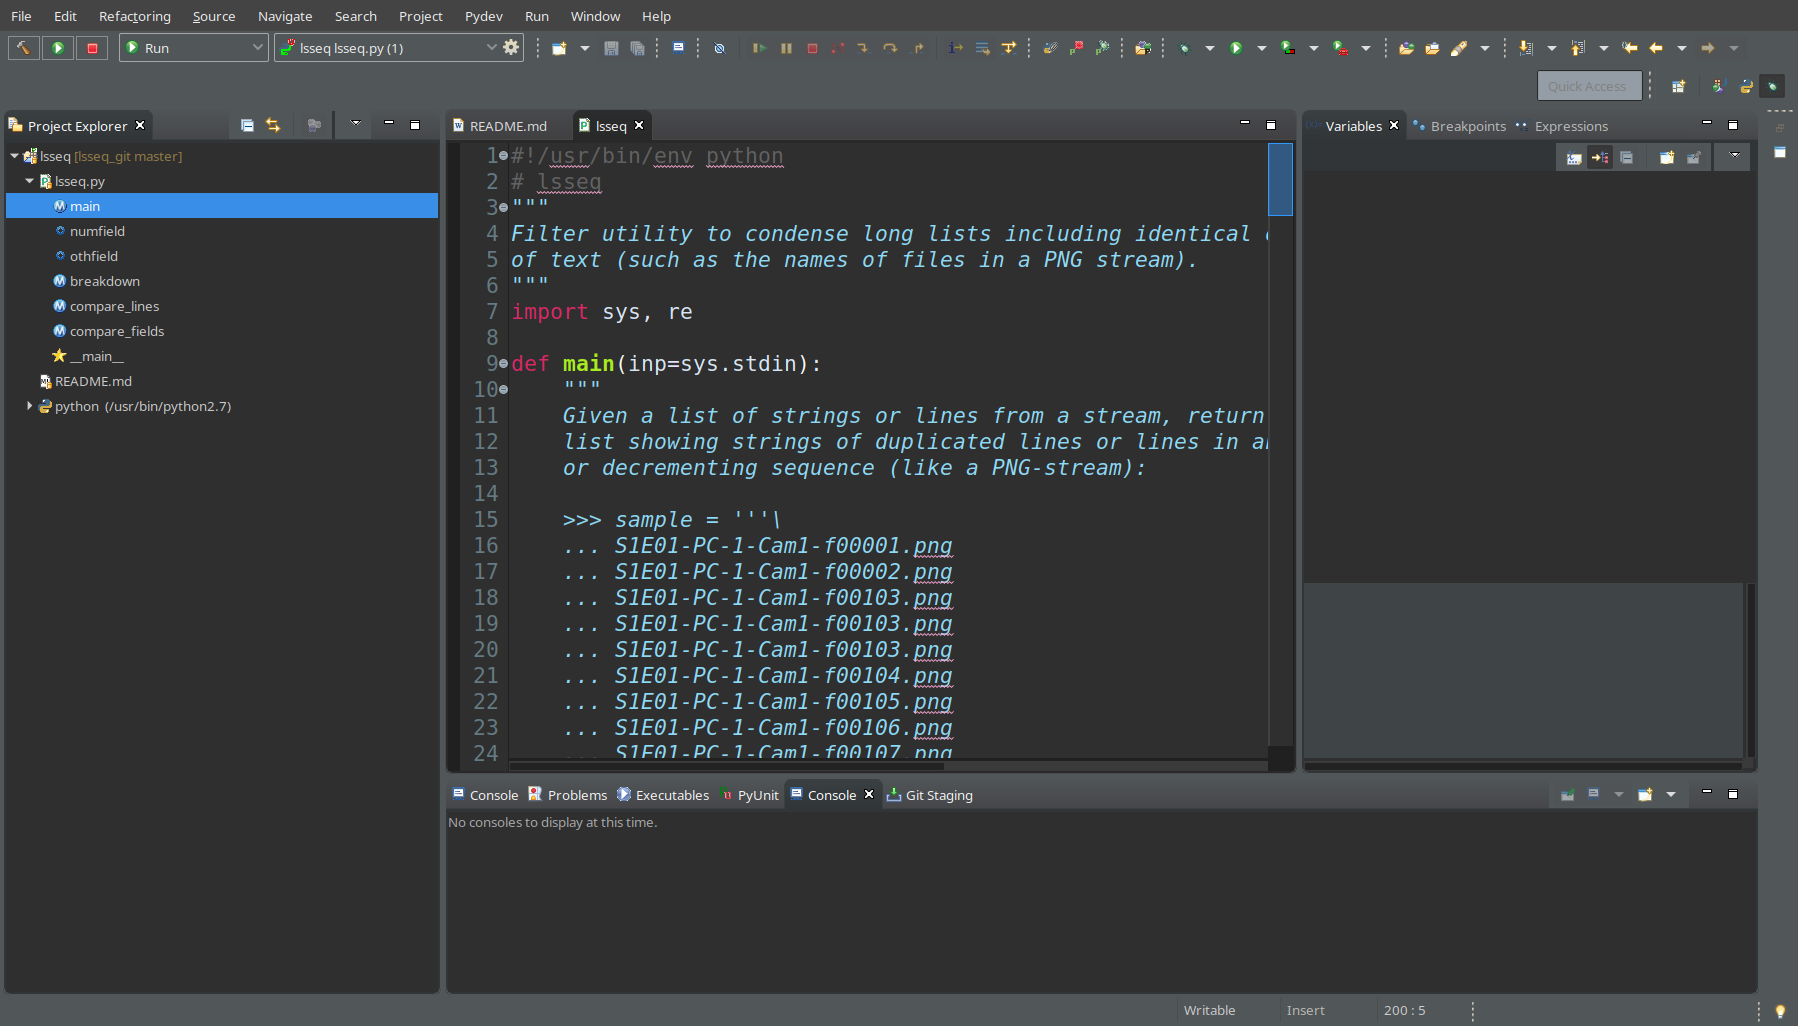
For the last week, I’ve been rendering the “Press Conference” sequence from episode 1 on the donated rendering server from Andrew Pam. That’s going pretty well, but I noticed during my inspections of the process that it would be useful to have a tool that made looking at listings of PNG streams (or EXR streams) a lot more compact and readable.
I knew that the GNU utilities included the “uniq” tool to take duplicate lines out of log messages, and I thought that I just need to add the ability to detect runs of files with an increasing index. I couldn’t find a standard utility that did that, and it seemed like an extremely simple thing to do in Python, so I decided to just write one.
Moreover, it was so simple, it seemed like an ideal project to use to learn how to use a proper “Integrated Development Environment” (IDE), which I’ve really never done before. I always just worked with editors and terminal shells to do programming, and I know this is not the way most professional programmers work.
Also, I have a HUGE backlog of development projects that I’ve written down requirements or descriptions for, and even partially written, but not got working, and my limited programming skills are a factor.
I made a decision that, since I was capable of doing this kind of work, getting someone else to do it is really expensive and unreliable, and I really need it done (not having these tools is holding me back), I’d just have to bite the bullet and learn to become a better programmer.
Learning to use an IDE is one part of that. I also have to learn to use Git (preferably learn to use it within the IDE), and I need to find solutions for my own information overload — I need to get the IDE to track information I can’t keep in my head.
So, while my renders were running, I decided to take this on, and I did it. It took about four days total: I installed Eclipse and PyDev (the Python view for Eclipse), Egit (integration for Git version control), and some other extensions, and then developed this simple filter utility. Not that bad, really — I might have expected it to take longer.
Naturally, this was accompanied by all the usual frustrations of learning a complex new application software. I made the mistake of complaining about this on social media, which (naturally) was met with a chorus of hate for Eclipse and “Why don’t you use PyCharm?” etc. Religious wars over software are just a thing a with programmers.
And of course, I still have a lot to learn.
The program itself is very simple, but kind of useful, and is on my Github now:
https://github.com/Digitante/lsseq/tree/master/lsseq
Aug 13, 2019 at 4:00 PM
Optimizing Freestyle with Camera Clipping Range
I’ve tried a variety of tricks for trying to keep Freestyle’s excessive use of memory and compute time in check, but somehow never tried this one, which works very well in cases where the view contains a “vanishing point” with lots of detail hidden in the distance.
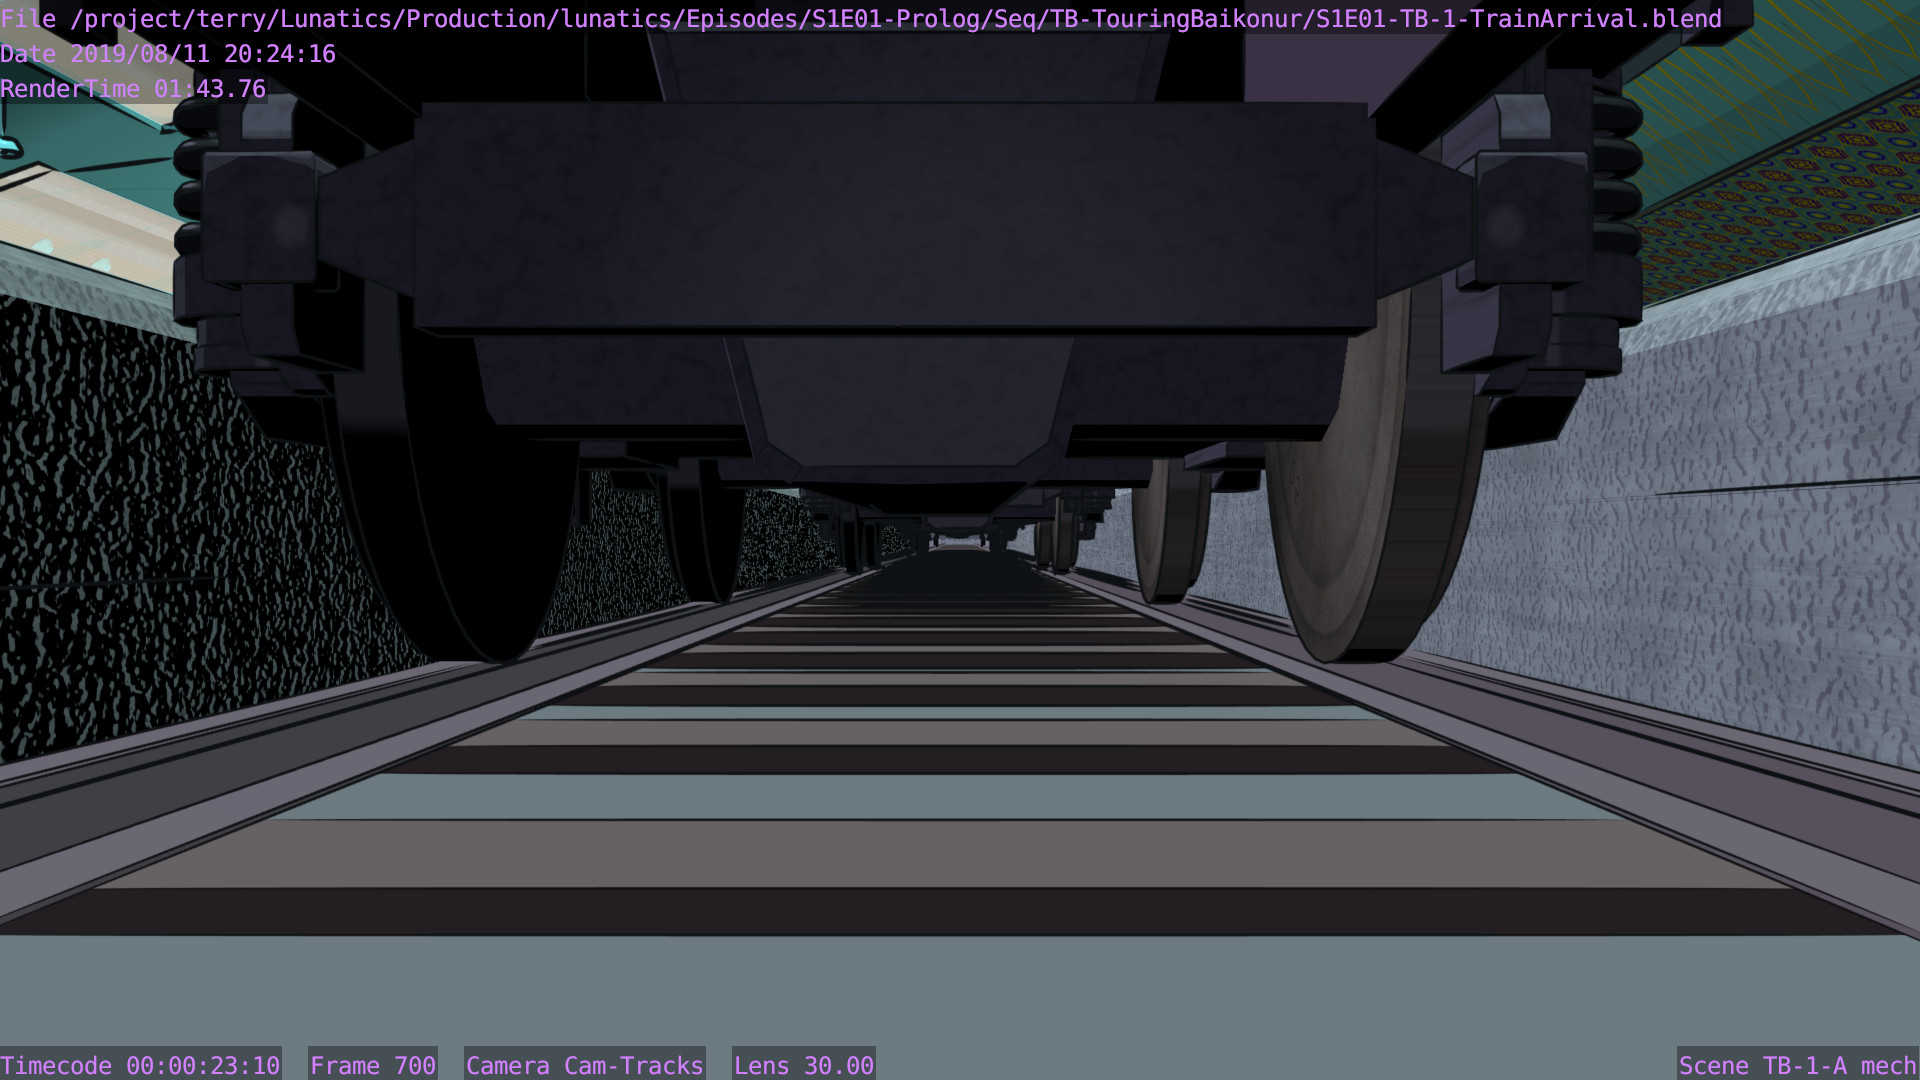
In this image, the train is moving away from the camera, and the further it goes, the more detailed 3D structure exists in the long regress into the distance in the middle of the picture. At the beginning of the shot the render time isn’t too bad — just about one minute. But as the shot progresses, the render time goes up to about 12-15 minutes.
This is because the detail in the distance has to be considered and then rendered by Freestyle, even though the result is an uninteresting blob of ink at the vanishing point.
What a waste!
My first attempt at a solution was to put a plane into the scene on my “Freestyle proxy” layer (a Blender layer I use for objects used only in my “Ink” Render Layer) to block the distant objects out. However, although this does get rid of the blob in the center of the image, it doesn’t really save much time, because Freestyle still does “visibility computations” on all those edges (it just finds that they are invisible — this does save a little bit during the “stroke rendering” phase, but it’s not a dramatic speed up overall).
What I really want is for Freestyle not even to consider them.
What turns out to work, though, is the Camera clipping range: Cameras in Blender always have near and far clipping limits that are properties of the camera. And if you simply reduce the camera range on this shot to render only the interesting ink, the rendering time goes down from 11 minutes to around 1 minute. Big improvement!
But of course, that also cuts off the color rendering in the distance.
To get the result I want, I want to set the range for Freestyle rendering separately.
For that, I need a separate Blender “scene”.
So I copied my existing scene with the “LInked objects” option. This produces a copy where all the objects actually are the same (so changing them in one scene changes them in the other), but the scene settings: rendering camera, render range, compositing nodes, and so on are all new.
I then duplicated the camera object (which also copies its animated movement), so now I have a duplicate camera (rather than a link). I can then change the clipping range separately on this camera, which I marked as the “Ink” camera, and set as the rendering camera for the Ink scene.
In the compositing node tree for the original render, I changed the scene source for the Ink render layer to be the newly created “Ink” scene.
I then deleted the Color render layer from the Ink scene, and vice-versa. I also went ahead and deleted the entire node tree in the Ink scene (irrelevant now, since it’s only used to render the ink for the main scene).
I then decided to extend the camera range just a bit to get a better look. For aesthetic reasons, I also added a “distance from camera” modifier to taper the line thickness off smoothly, rather than just ending it abruptly near the vanishing point. This made the render time a little longer again, but still under two minutes.
I like the fact that I can now see the light coming under the front of the train (no longer obscured by the blob of ink). However, if I had wanted the ink to fill the vanishing point, I could of course have simply added a black object there in the distance to stand in for it, and the result would be the same, but with much less computation.
Even after adding those tweaks, the resulting render time is (as you can see in the stamp data ) about 1:40 on this frame, which is near the end of the shot, where I was getting about 11 or 12 minutes before.
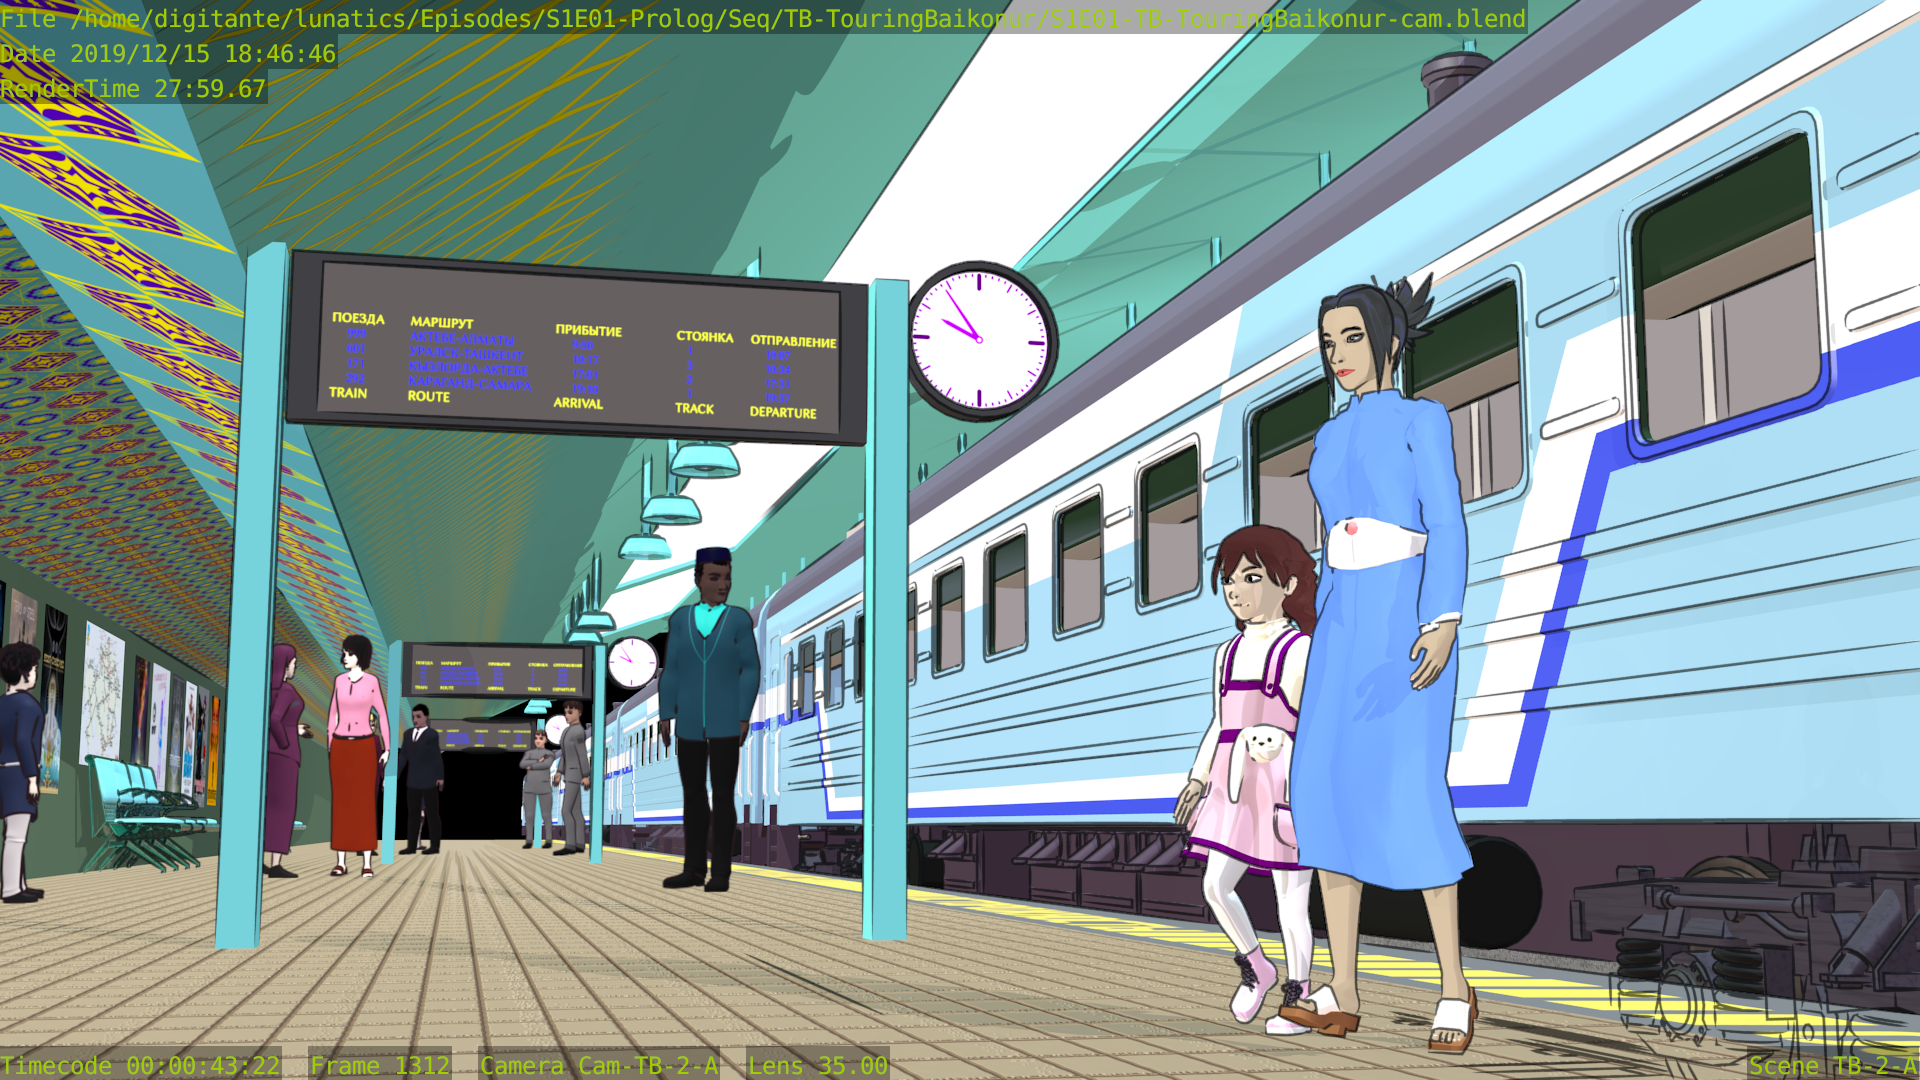
Having discovered this, I know there are a number of other troublesome shots that this technique can save (including the shot on the train platform that I used before to demonstrate combining “Edge Node” with “Freestyle” for inking due to render times around 30 minutes — this should be an effective alternative to doing that).
Another shot this technique should help with.