

HIGHLIGHTS:
This month went almost entirely to ABX development.
FILM-FREEDOM
Create a ‘filmfreedom-org’ GitHub account for Film Freedom software repositories. Currently has only ABX, but it should host KitCAT and Lib-Ray as well. I think the ‘filmfreedom-org’ name will be easier to remember than ‘digitante’.
PEPPER & CARROT DUB
Terry Hancock and Ariel Hancock helped out Morevna Project’s new “Pepper & Carrot” production by providing English dubbing for their first “Pepper & Carrot: Backstage” video.
ABX DEVELOPMENT
This month, I implemented the project data system. This turned out to be much more complex than I imagined. But the idea is fairly simple:
The program gleans information from the file system, including file and directory names, and data stored in YAML files in the project source tree.
Started documenting the process.
Started the GitHub repository for ABX and checked it in.
LIB-RAY
I worked a little more on setting up the testing fixtures.
FILM-MAKING FOR LUNATICS
I wrote up a book-plan for the FM4L book, with a rought outline of topics, and I started collecting illustrations and doing research for it.
May 4, 2021 at 4:01 PM
Revised Ink/Paint Composite
Some time ago, I published my process for combining ink and paint renders to get the “ink” and “ink through transparency” effects with Blender and Freestyle.
I also published a process for handling pre-rendered billboards so that they get correctly inked.
I may have mentioned that I was having some serious trouble with the correct way to composite the “shadow” layer from my paint renders — the sky was being darkened much more than I wanted. I came up with a dodgy work-around for that, just using the Z-Depth to filter the background, but it had problems.
I have just this week learned a compositing method for fixing the sky problem properly, which turns out to be to render the paint layer transparent, and then render the sky as a separate render layer (adds complexity, but a sky-pass-only render is very fast).
I added both techniques to my ABX “Ink/Paint” configuration script, but then I discovered that my “Billboards” and “Ink-Thru” solutions did not play well together, and that in order to get it right, I needed separate billboard masks for the “Ink” and “Ink-Thru” effects.
This made me realize I needed to change the architecture and EXR storage system a bit — the “billboard” masks, I realized are really about drawing ink correctly, so they really should be moved into the “Ink” EXR.
I also decided that what I had been labeling the “Color” EXR really should be called “Paint” to match the terminology and avoid collisions with using “Color” to mean simply a color, rather than “the color layer”.
You might ask “Why use separate EXR files for ink and paint at all?” In fact, I could include both Ink and Paint elements all as layers in one EXR document, but in the production process, it’s often desirable to separate them. The Paint render tends to be much faster than the Ink render, and so I often create preview renders with only the Paint layer, reserving the Ink rendering until I’m sure I’ve worked out the problems. Then I do a few “Check” frames with full Ink & Paint to make sure everything is working, before setting up the animation renders, which can take many hours to run (or alternatively, many computers on a render farm, etc. — but the point is, you want to be sure you’ve got it right before doing that).
The “Ink & Paint” terminology is a reference to the process for traditional cel animation: the “Ink” is put on with felt-tip pens on one side of the cel, while the paint is put on the other side, so that it shows through (but the ink controls the exact boundary). This compositing technique mimics that, by putting the “Ink” in a layer above the “Paint” when it is composited. When this is done manually (as in Krita or Gimp or Inkscape), that art technique is called “Digital Ink & Paint”.
Finally, I discovered I can color-code my compositing nodes, which helps to distinguish the different elements.
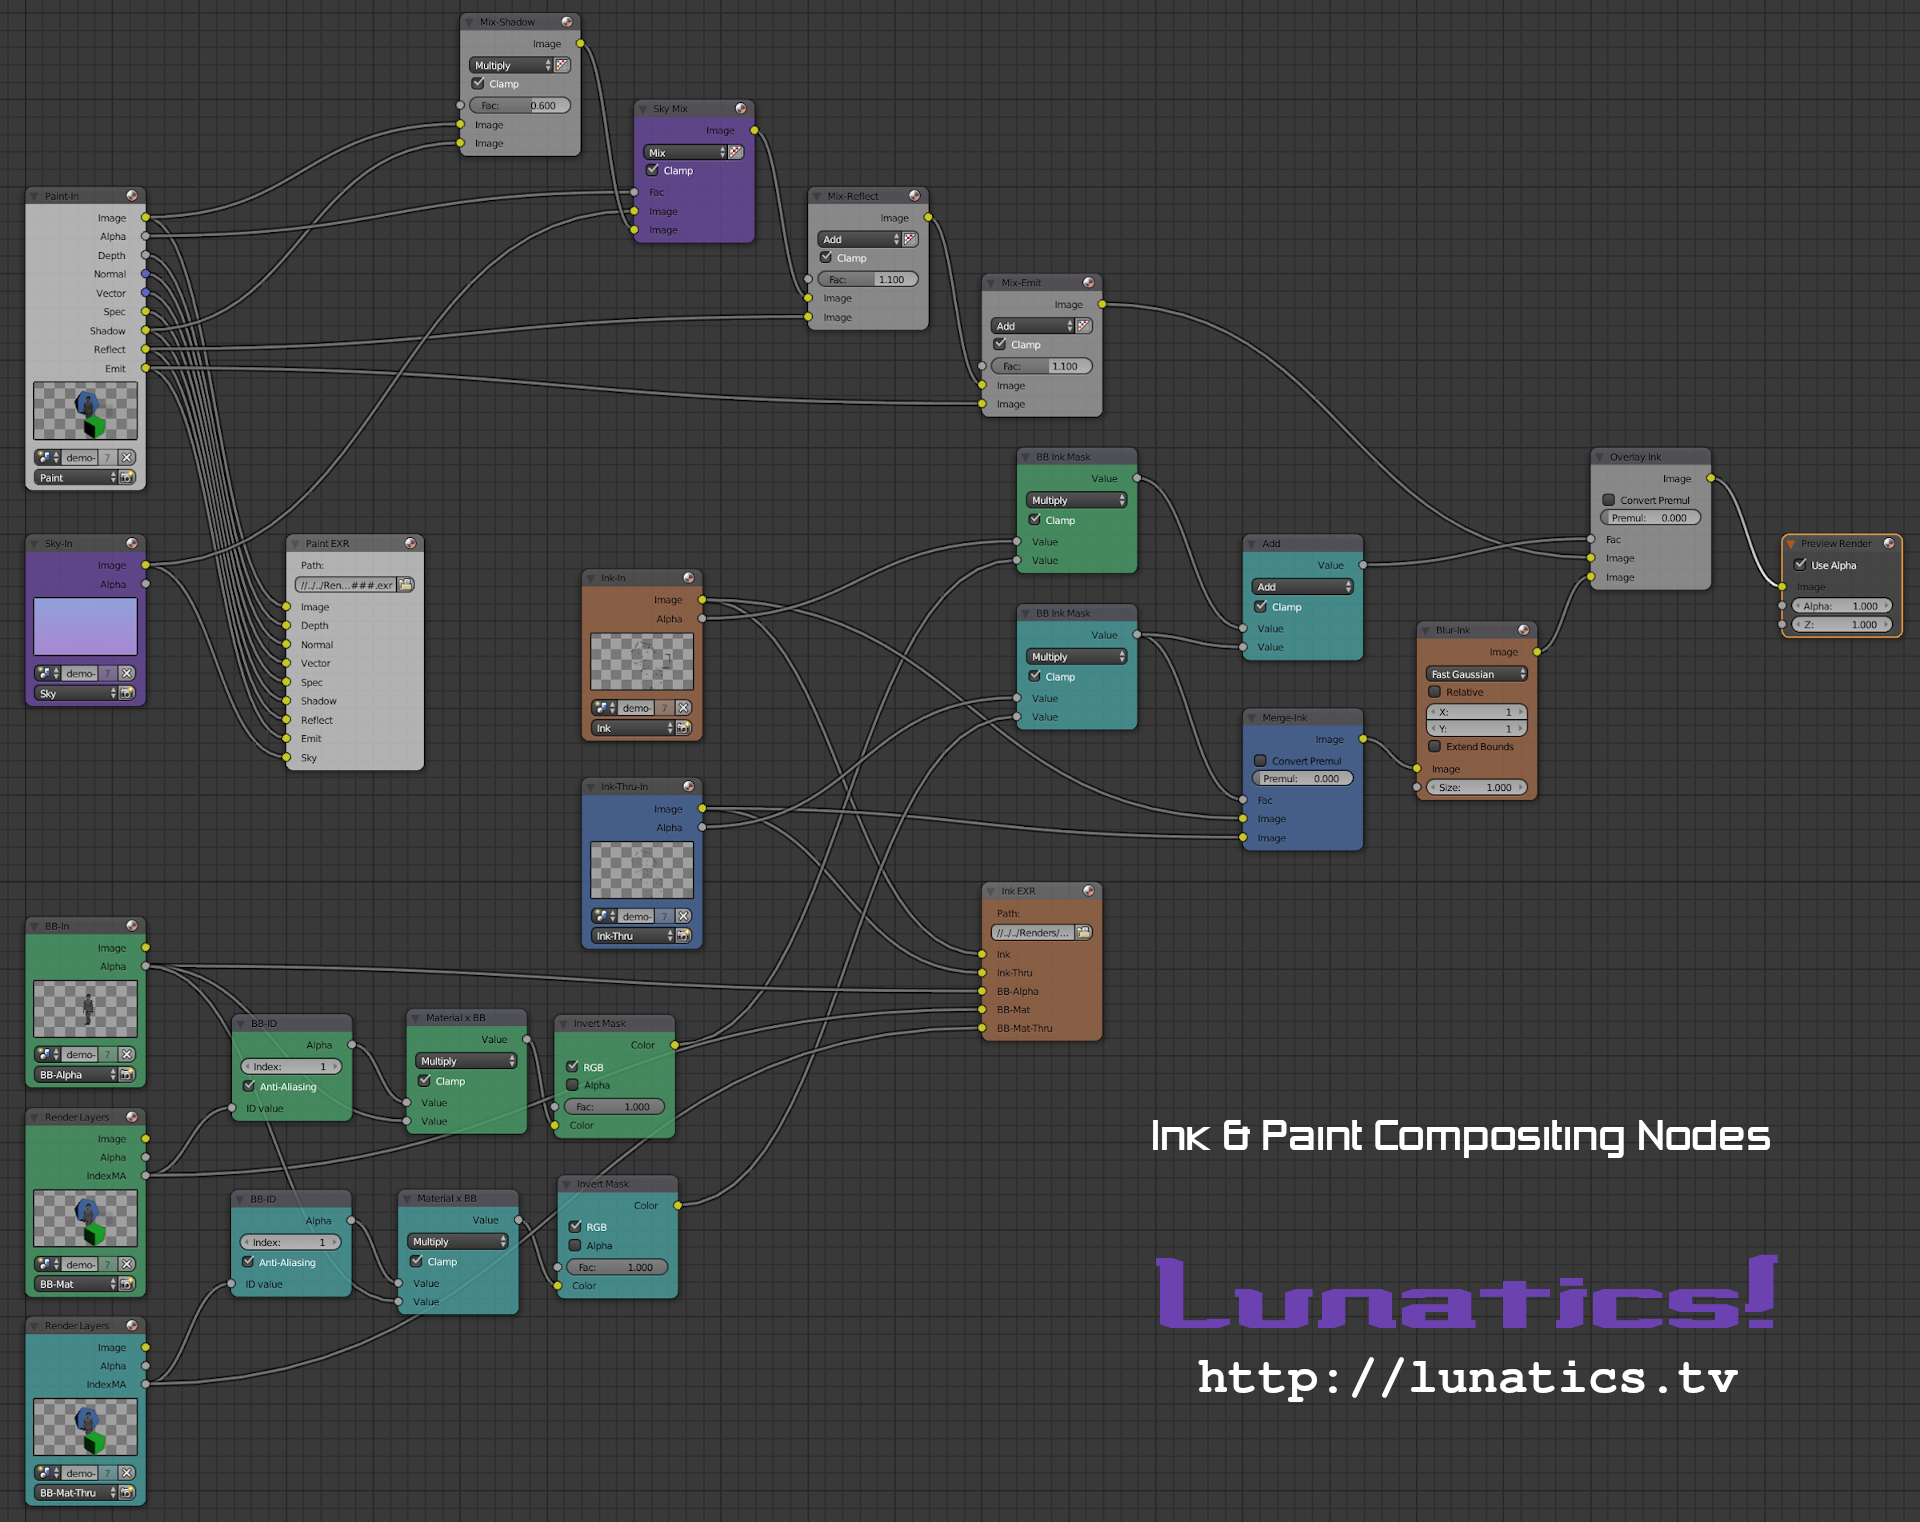
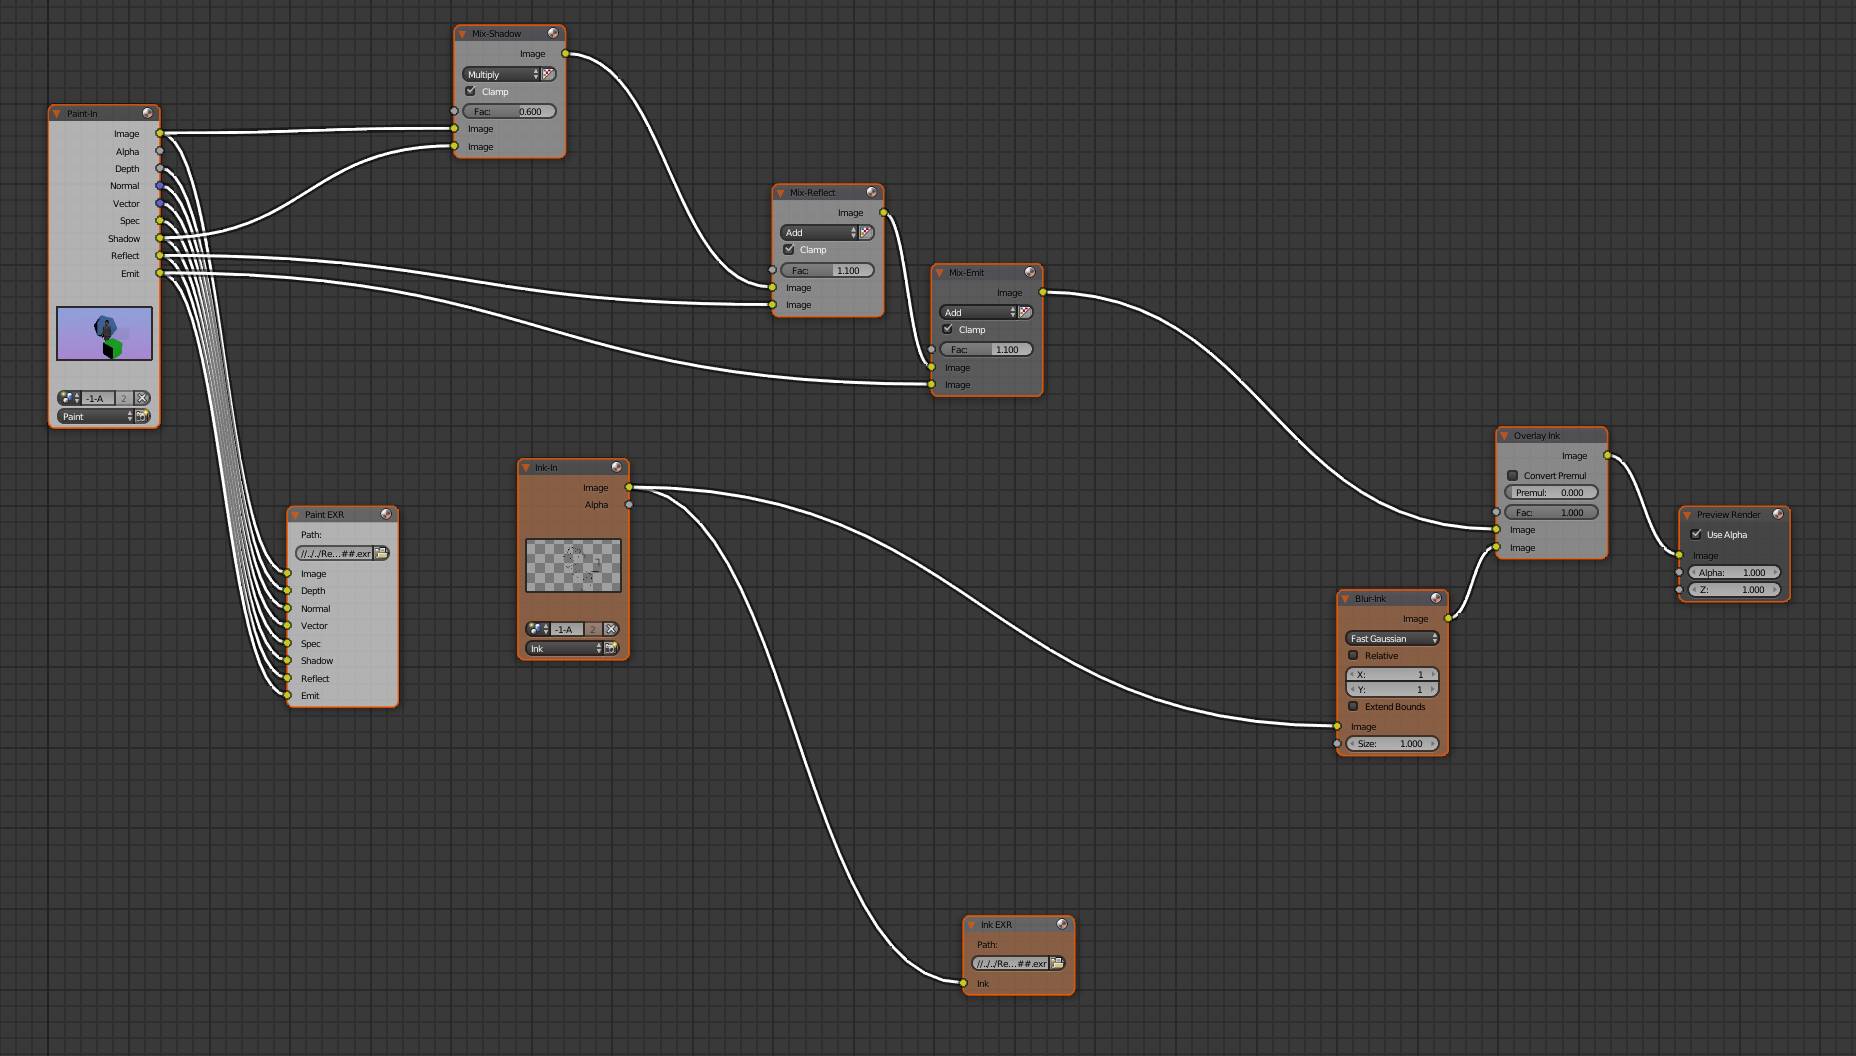
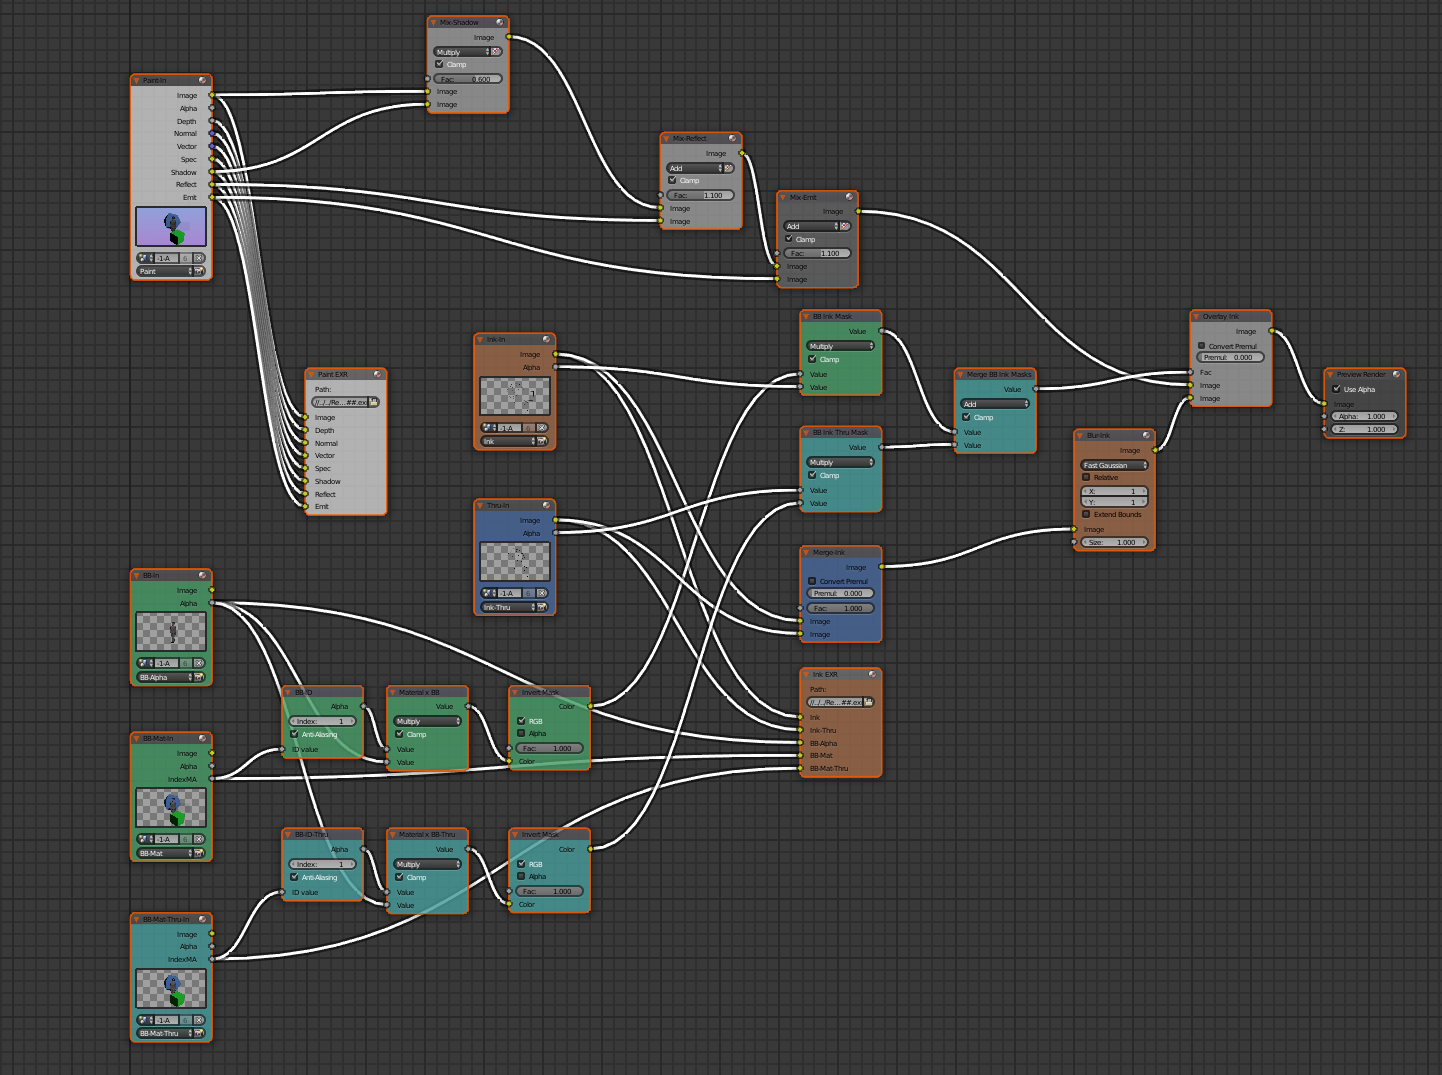
Now of course, it’ll be a rare shot that needs to combine the sky fix, the ink-thru, and the billboards compositing techniques all at once. My new “Ink/Paint” operator in ABX takes each of these as a checkbox, and the layout looks simpler when they’re not all checked. But this is what it will do when it’s all turned on.
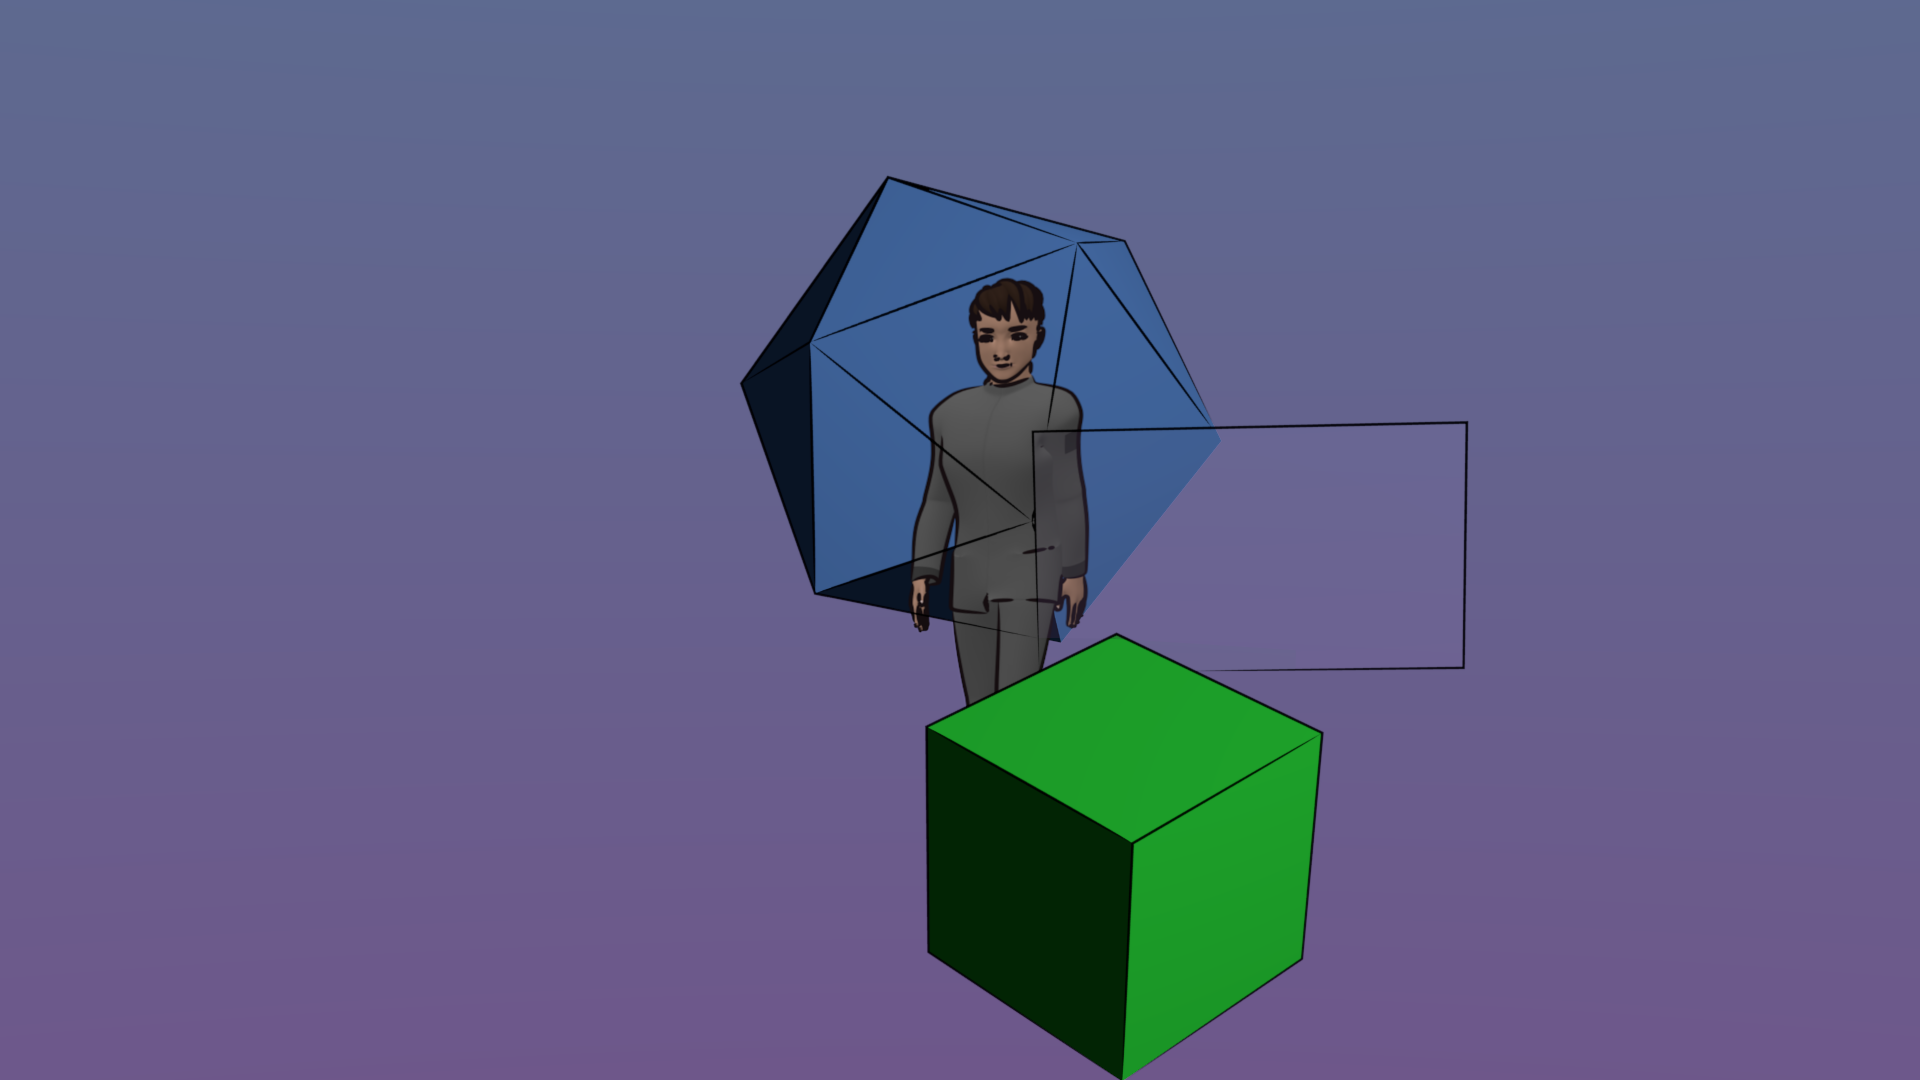
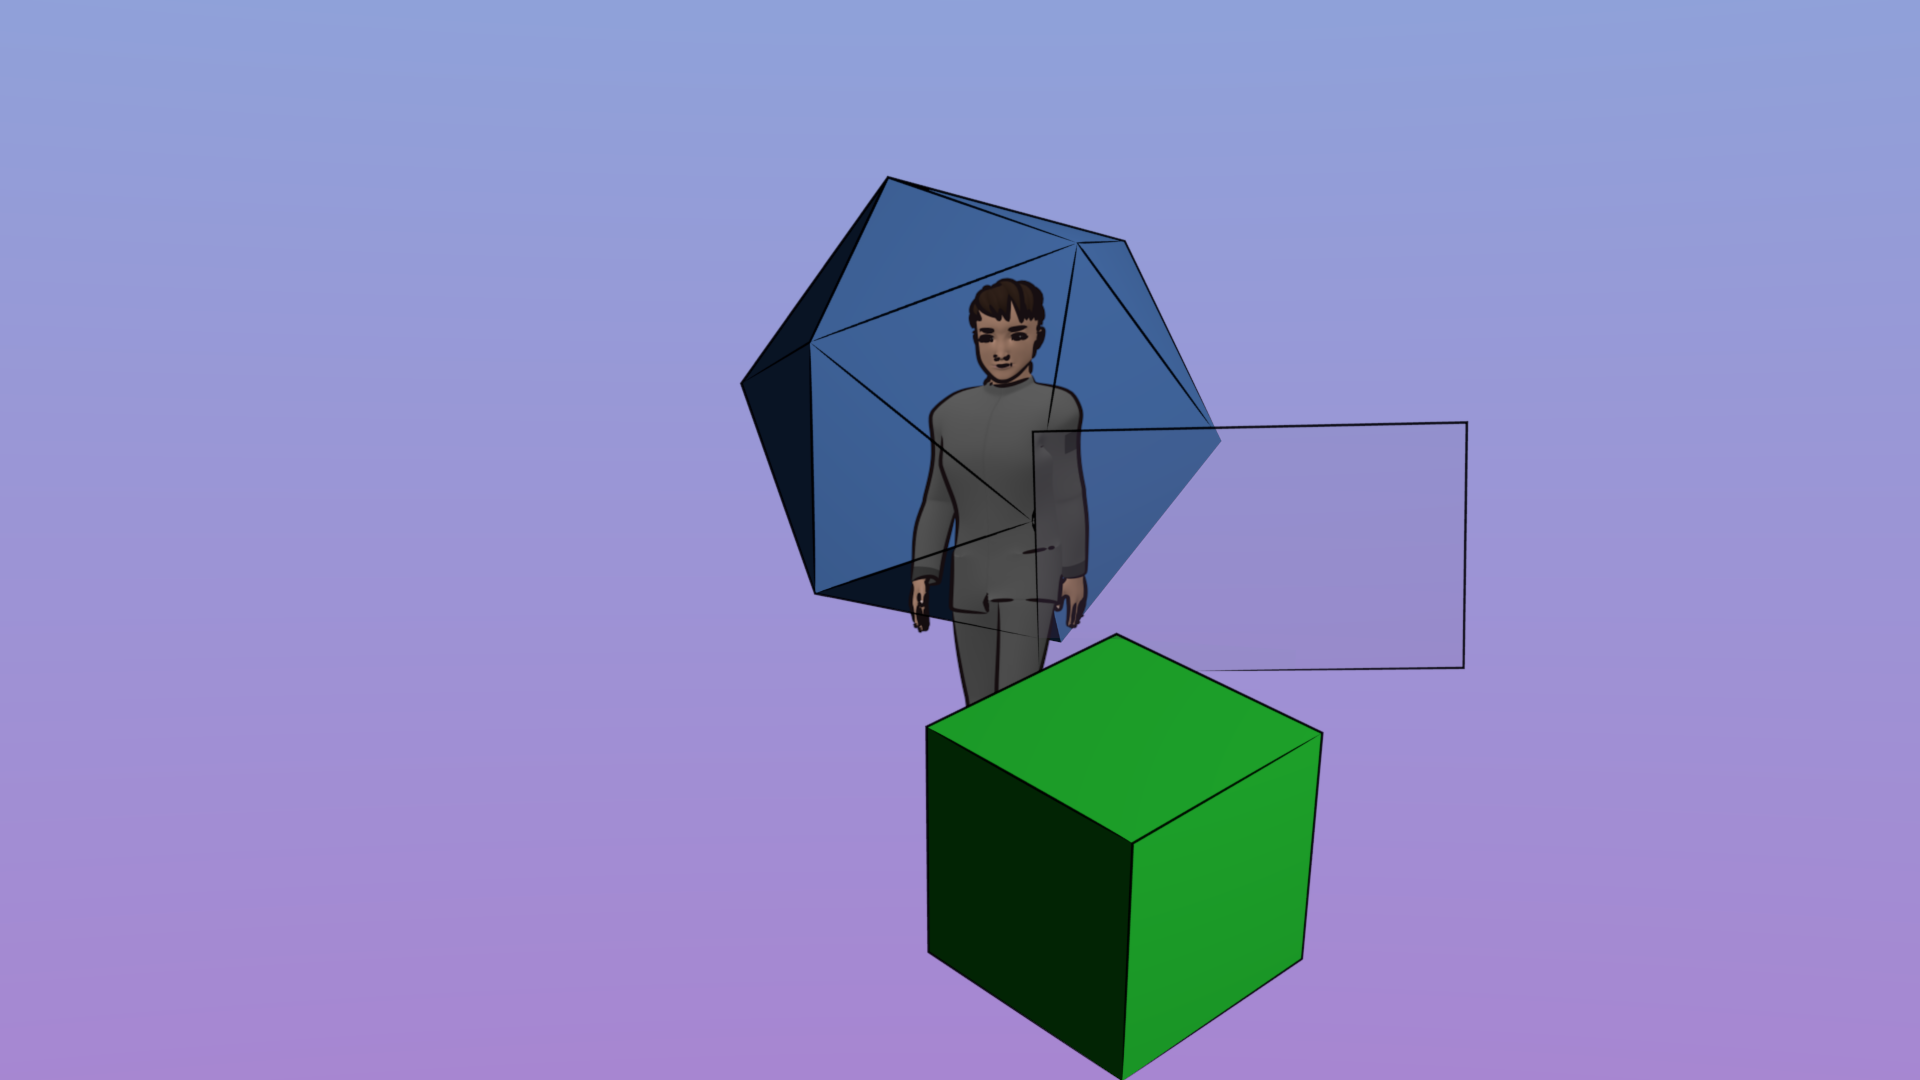
As I write this, I have prototyped this technique in my test Blend file, which generates this render:
This demonstrates all the features working together and interacting with each other, to prove the ink is being handled correctly.
Now, I just need to update my ink/paint module in ABX to generate this node tree automatically.
May 5, 2021 at 6:17 PM
ABX Development from April 2021 (Film Freedom)
This the development status of Anansi Blender Extensions, as of May 1.
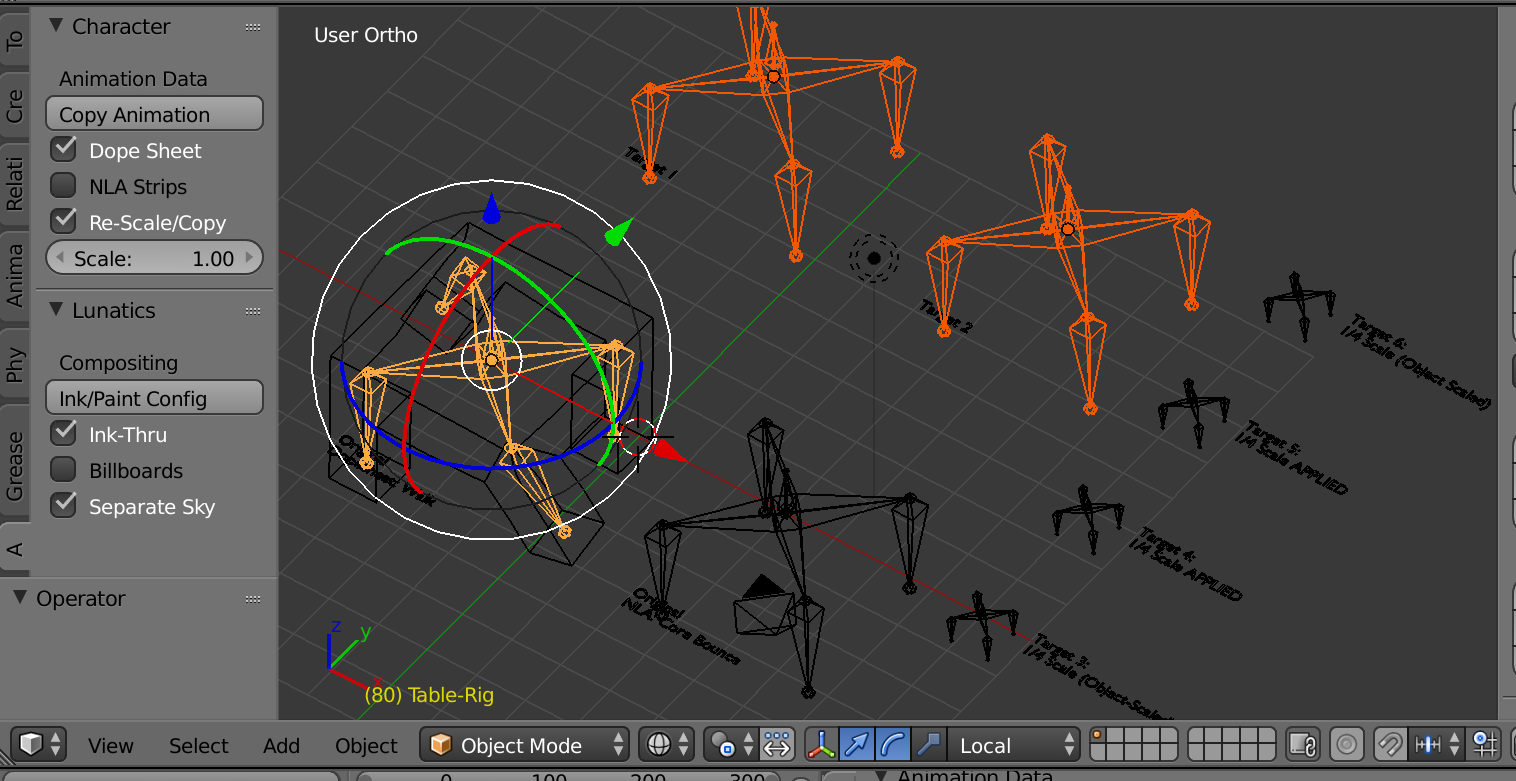
Copy Animation
I expanded the “Copy NLA” feature into a new “Copy Animation” feature, which will copy all the animation, including the NLA and the “active action” (which is what appears in the Dope Sheet). It also supports an option to re-scale the animation, allowing animation to be correctly rescaled and applied to a similar rig at a different scale (there’s actually two meanings of “scale” here, this is the trickier one, which is if all the bones have been rescaled inside the object in “Edit Mode”, or if the object scale has been “Applied”).
This is mainly a tool for fixing broken armature animation due to project refactoring.
I might try to record a demo video on using this tool for May. It’s kind of hard to get the idea from a still image.
Ink/Paint
I have greatly expanded the Digital Ink & Paint compositing system for “Lunatics!”
Originally, I had a button cryptically labeled “L.Ink Compos” which set up the “Freestyle with transparency” configuration that I was using. It was a pain to setup the nodes manually for each shot, so I wrote a script and triggered it from this button.
Now, the “Ink/Paint Config” button can do the same thing, but can also setup several different configurations, to support complex effects where needed, but without weighing down shots that don’t need them:
Basic Ink/Paint
Ink/Paint with no special handling. Lines aren’t drawn behind transparent objects. Billboards are ignored (which means lines get drawn across them). Despite the limitations, most shots in “Lunatics!” are setup this way.
The nodes (white nodes handle Paint, orange nodes, Ink — the others created the preview-composited PNG output):
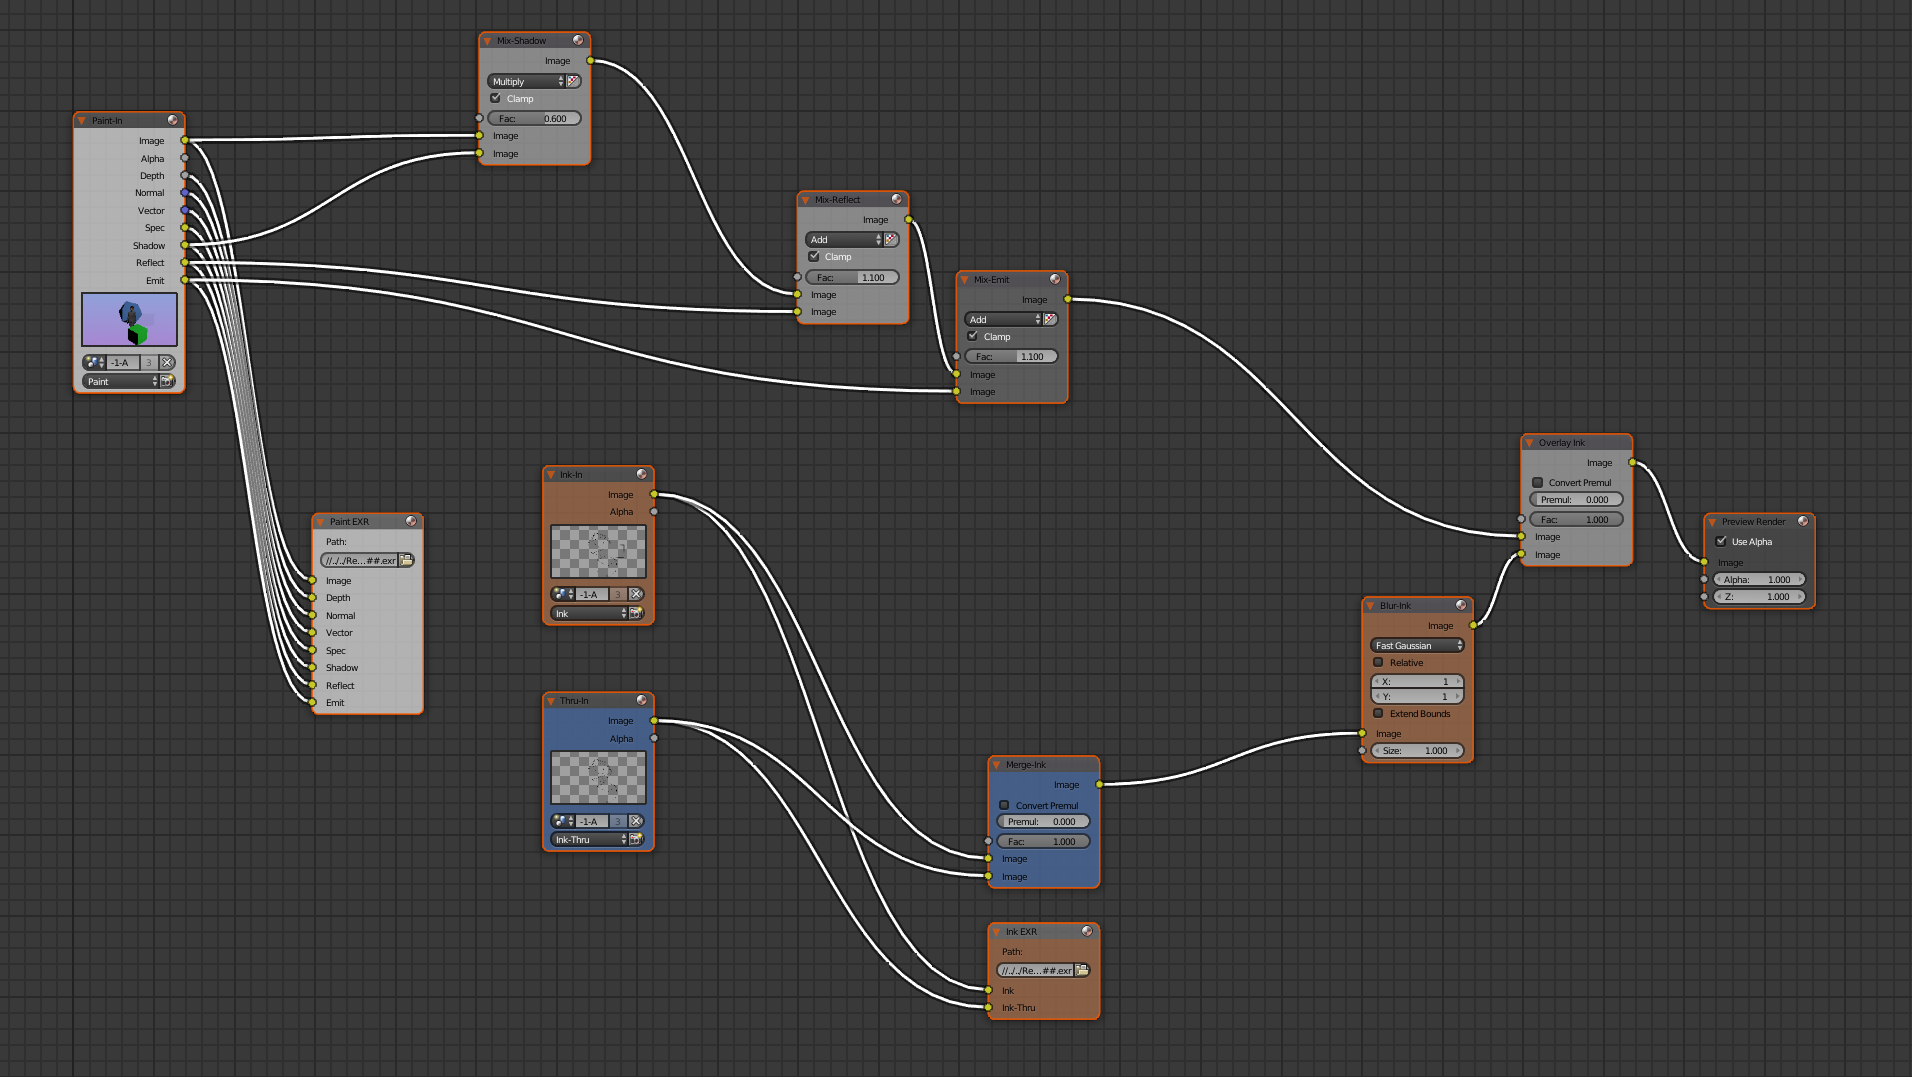
Freestyle Transparency (Only) – “Ink-Thru”
This is the case I originally wrote the script for. It supports drawing lines behind objects on the “transparency” layer (Layer 5) in Blender:

Nodes (“Ink-Thru” render layer and nodes are in blue):
Billboards Only
Support for correctly drawing billboards (without the Ink-Thru feature). Now background ink lines aren’t drawn over the billboard character (but notice the line on the background object behind the “glass” is missing:

The green nodes provide the billboard handling:
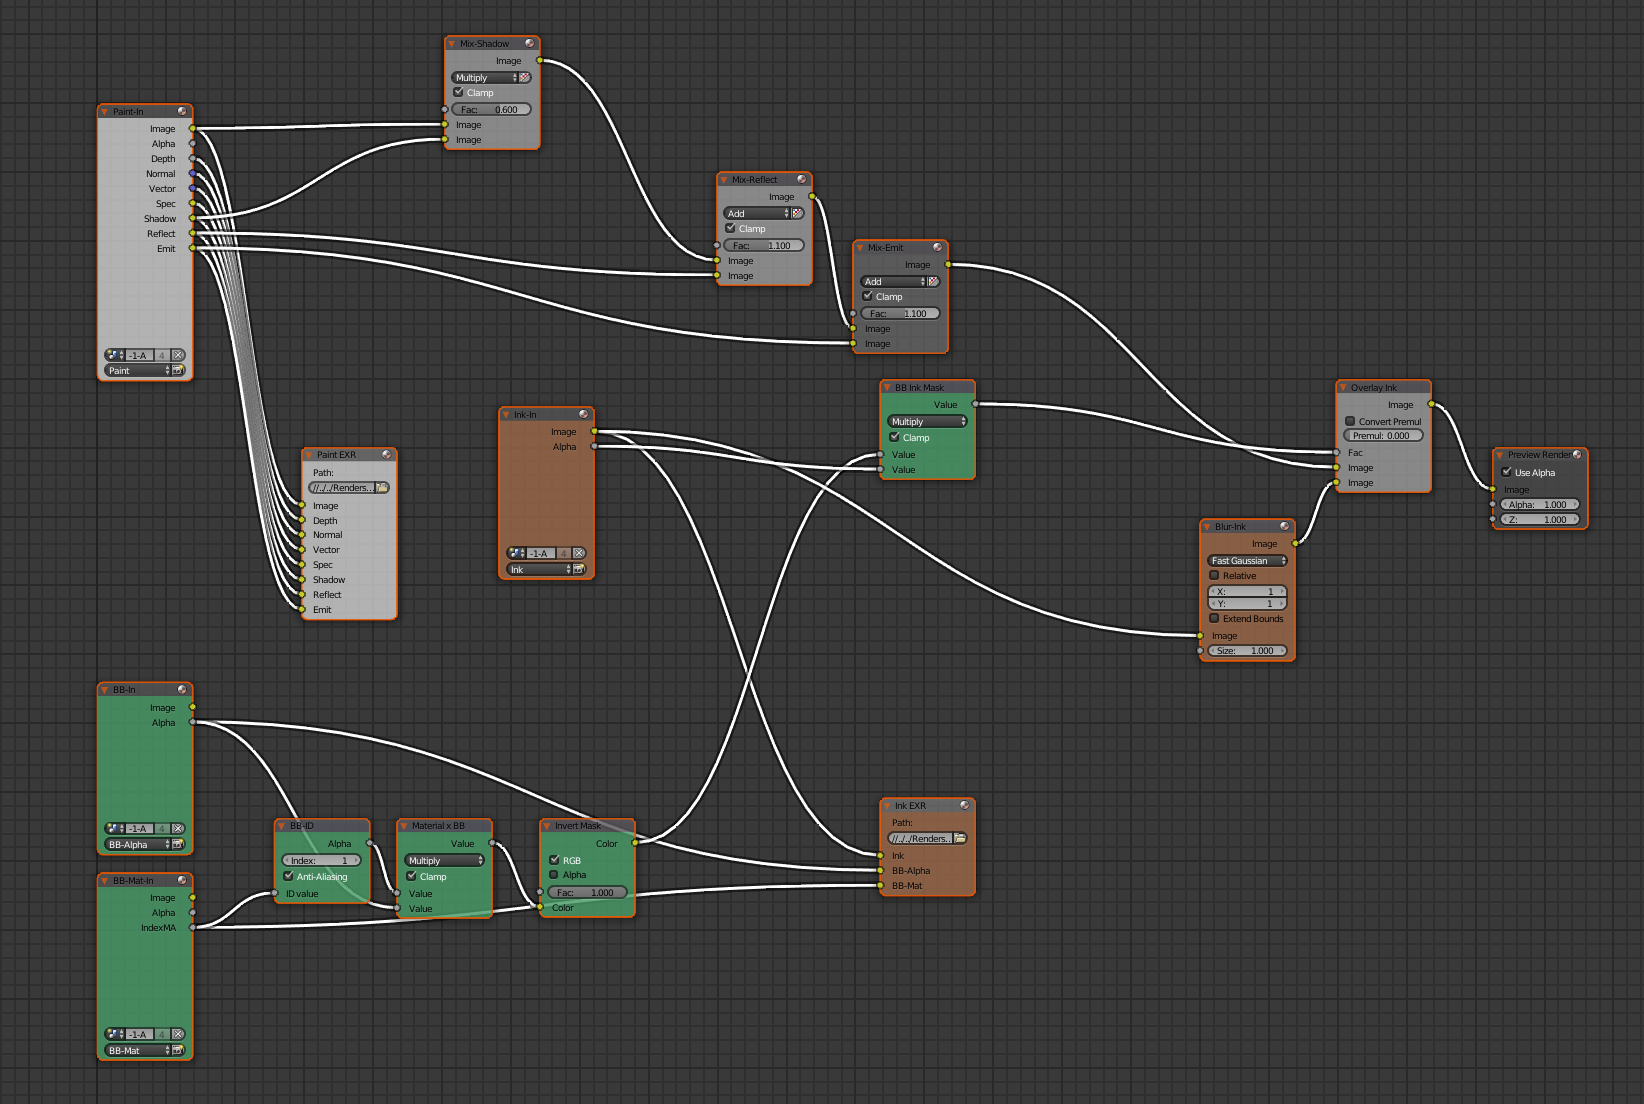
Billboards and Ink-Thru
Combining this with the Ink-Thru effect is pretty complicated, because I have to generate separate billboard masks for both sets of ink lines, but it looks good and it doesn’t take significantly longer to render, because the extra render layers for the masks are very quick:
Nodes. Note the extra chain of transparency-handling billboard nodes in blue-green:
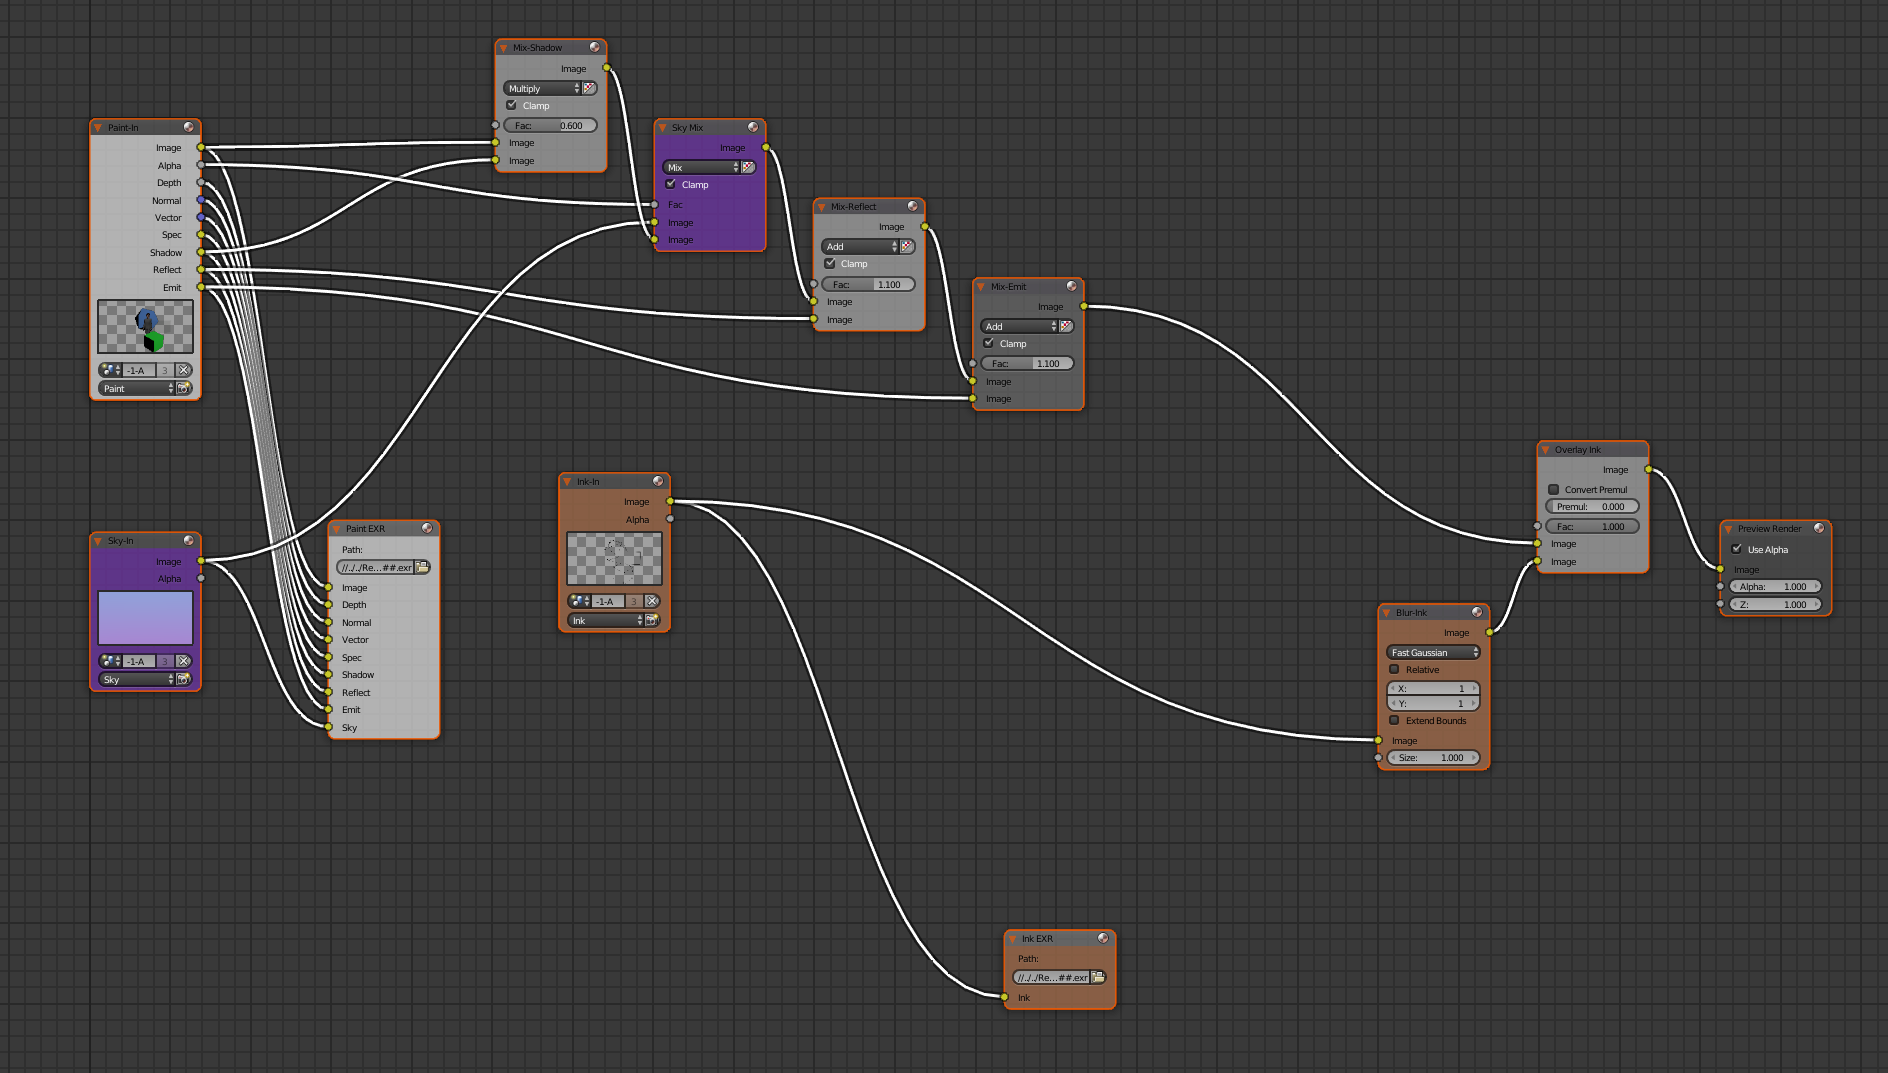
Separate Sky Layer
To solve the problem with the shadow pass interacting badly with the sky background, we need to generate the Sky in a separate render layer pass (this takes almost no time, of course — there are no objects in it!), and generate the scene with a transparent background. These are then combined in compositing:
The sky is now rendered a little brighter, because it’s not being darkened by the shadow layer compositing. Really, any shot with visible sky should be done this way, but I only just learned the technique from an old forum post.
This leaves out the Ink-Thru and Billboard handling, so you can see the ink behavior is back as in the “Basic Ink/Paint” configuration.
Nodes — the sky nodes are in purple:
Fortunately, the sky fix doesn’t interact much with the transparency or billboard features. Here’s the Billboards with Separate Sky:

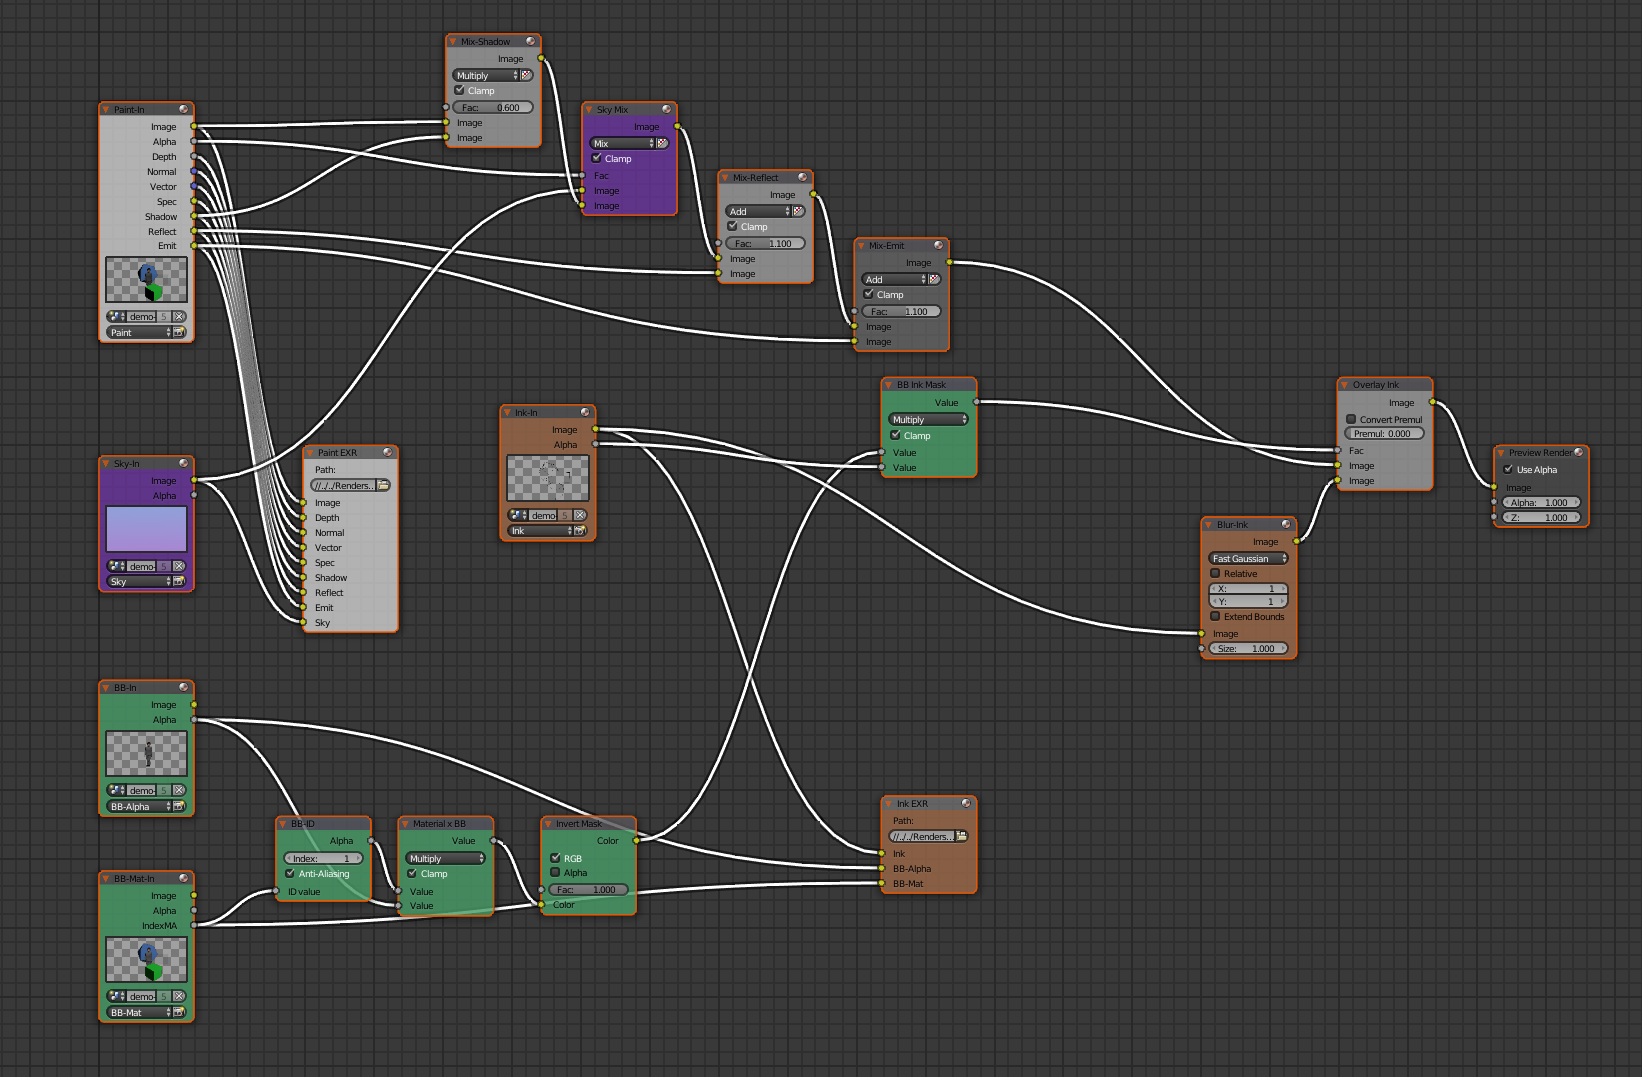
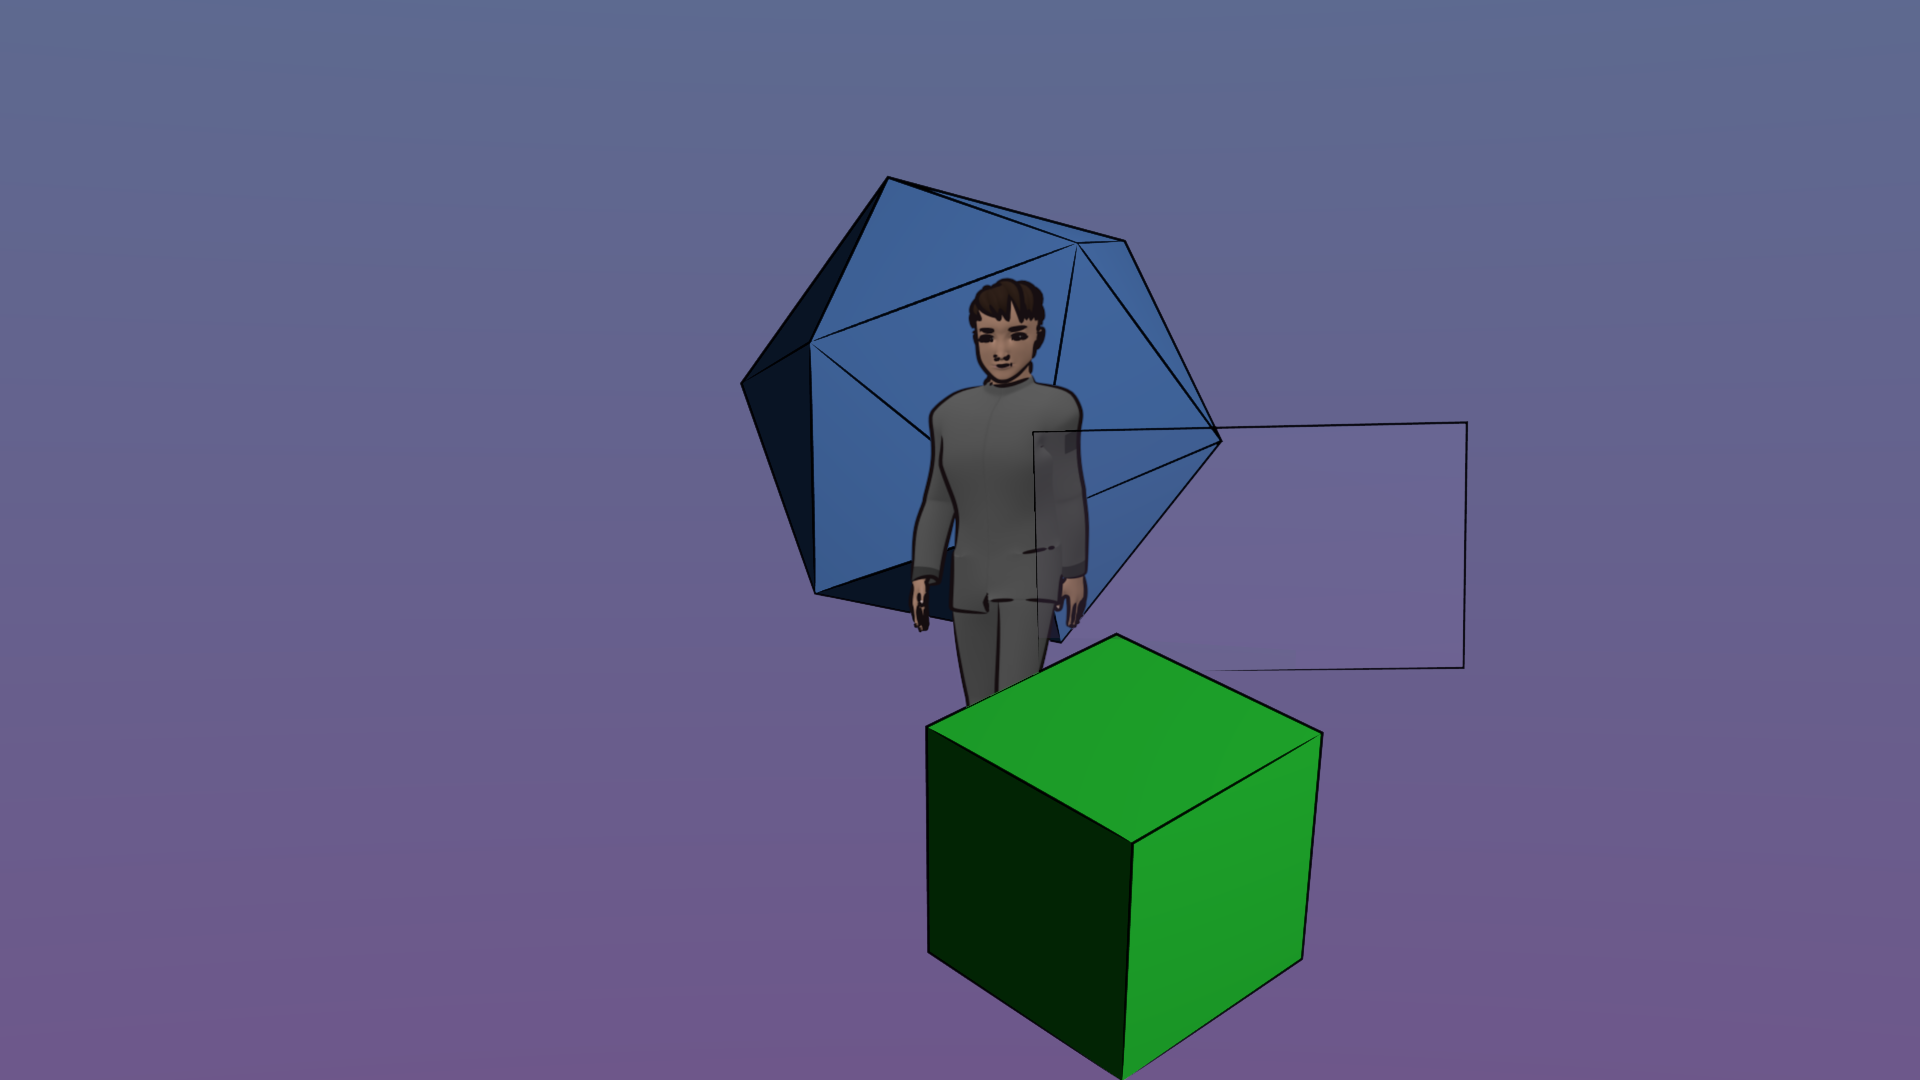
All Features: Separate Sky, Ink-Thru, and Billboards
It’s gorgeous, though usually overkill:

The whole smash of nodes at once:

It’s a total of seven render layers, though the extra layers rendered for sky and billboards are so fast they don’t make much practical difference on render time. The time-consuming CPU-eaters are the two Freestyle render layers, with the Paint layer sometimes also contributing.
Setting this up by hand for every shot adds hours and hours to my workflow, and a great possibility of errors leading to inconsistent results. With ABX, I click a couple of checkboxes and push a button — this already saved me a lot of time, and I expect the update will save even more.
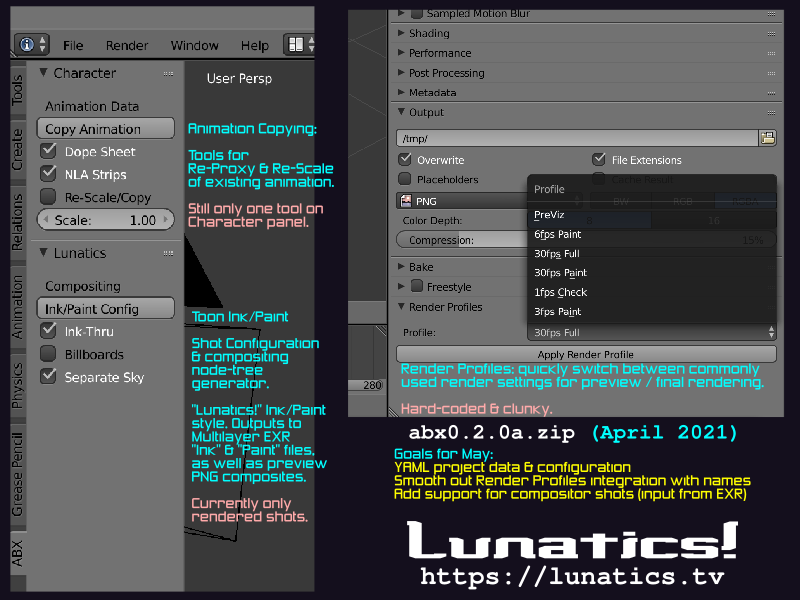
Render Profiles
I’ve just barely started on this feature, so it’s currently pretty clunky. I plan to smooth it out in May. This is not so much about speeding up workflow as about eliminating errors. It takes a very long time to render the Ink/Paint configurations above at a full 30fps with Freestyle ink, and is not generally something I want to do on my animation workstation, anyway.
So, for most of the production process, I generate various kinds of previews renders. The simplest are the GL viewport animations. These are good for checking animation, because they render at the full 30fps, albeit in an extremely simplified way. They are not generally “real time” on my system, due to complex rigging (and also because my video card does not have a very fancy GPU), but they generally render frames in less than a second, or about 30X longer than the shot. That’s usually pretty manageable — a 20 second shot takes 10 minutes to render with the GL preview.
I generally send that output to an AVI file. It’s much more convenient than a PNG stream, and it won’t overwrite properly-rendered frames, which would be tragic.
That’s “PreViz“.
Then I render a few individual frames, with all the features turned on, in order to see what individual frames will look like. I call that a “Check” render. In practice, I usually wind up rendering about one “Check” for every second of animation, so it’s roughly 1fps, if considered as a video. These I save to PNG files, but in a special directory away from the real PNG streams, and I probably want to name them differently so I don’t get them mixed up.
That’s “Check“.
Then I have a few intermediates, where I want to see what’s going on with the animation, materials, lighting, and so on — but I don’t need to see the ink lines, which take up most of the rendering time.
Those I call “Paint” renders. I generally also do them at a reduced frame rate — sometimes 3fps or 6fps, but also sometimes at the full 30fps. And I turn off other bells and whistles that slow down the render, like ‘antialiasing’ and ‘motion blur’ (which renders the same shot multiple times to interpolate between them to create more realistic blur than the ‘vector blur’ method, which is done in compositing).
For the “Full” renders, I need to turn these fancy features back on, as well as sending the output to a PNG stream for preview (EXR renders are created from the node tree, as set up by the “Ink/Paint” configuration above — currently I don’t worry about the stray EXR frames that get generated by my Check and Paint renders, because the Full renders will overwrite them later).
The main risk is that in all of this process, I turn off features and then need to make sure they are turned back on for the Full render. If I don’t get that right, then I could waste a lot of time (and potentially money) on renders I have to repeat.
Ideally, I’d have a quick way to switch back and forth between these options, setting the appropriate render settings and differentiating the output file names.
So I created this “Render Profiles” feature with a drop-down and a few settings. Currently, the options are hard-coded in the Python source for ABX, so they can’t be changed.
In the future, I want to set these up with YAML configuration files stored in the animation project directory. This would mean the named profiles could be set up per-project to whatever settings the animator liked.
Which connects with a larger problem I want to work on in May:
YAML Data System
My roadmap for ABX is to collect project structure and settings from YAML files stored in the animation project. This would determine the hierarchy of shot names and the available options for them, so that systematically naming shot files is just a matter of selecting from some drop down fields. I have a limited, hard-coded version of this that is setup specifically for the first few episodes of “Lunatics!” (this is at the bottom of the “Scene” panel):
But it only works for “Lunatics!” and for that matter, only for the first three episodes and the Library. This structural naming system should be something specified in the animation project files, not in the ABX program.
I’ve come up with several ideas for how to specify this and written some sample YAML control files (some are already checked into the “Lunatics!” source tree). But nothing is using them, yet.
It’s not a terribly difficult problem: I just need to write a module to scan up the project tree from the current working file’s directory, find all the appropriate YAML files, and then overlay the data in a sensible way. It’s similar to Zope’s “object acquisition” or the CSS “cascade”. But it does have the same kinds of programming challenges with data potentially clobbering other data.
To start, I created some Python data structures, “RecursiveDict” and “UnionList” which serve to collect data from more-heavily embedded structures (like you tend to get from JSON or YAML documents). With a conventional Python dictionary, if you have something like {‘config’:{‘opt1’:1, ‘opt2’: 2, ‘opt’:3}} to setup a configuration option and then you try to update it with something like {‘config’:{‘opt4’:4}}, you will get {‘config’:{‘opt4’:4}}, because the dictionary “update” method just replaces values. It doesn’t recursively update them!
A similar thing happens with lists. With my configuration options, I don’t just want the closest list of options to replace the higher one, I want it to extend it — but not if it’s just repeating the same information. The result is a weird hybrid between a “list” and a “set”, but it gets the job done. And my RecursiveDict/UnionList implementation treats all lists and dictionaries this way, pulling them all up to this behavior.
Earlier this year I wrote this module, and in April, I wrote proper ‘unit tests’ for them. What remains for May is to set the actual policy for finding and loading the data from YAML files.
After all this work, the “Lunatics Project” panel will probably just become the “Project” panel — or possibly actually load the project name from the project root’s YAML control file.
I will also probably support this same system in KitCAT, and indeed, I plan for ABX to read the KitCAT project metadata files (probably “kitcat.yaml” files, though I’ve considered other naming schemes). The KitCAT files will determine the project file-naming scheme, the project name and title, and other structural details.
The ABX-specific stuff will have its own “abx.yaml” files — this is where the “render profiles” will be defined, for example.
Road Map
Another goal for May:
- Compositing Shots: Expand the Ink/Paint Config to handle the “shot compositing” scenes (the current setup is only for the rendering phase). In compositing, the input will be from the EXR files generated in the rendering step, while the remainder of the compositing is much the same. I may support more sophisticated compositing controls, though.
Other features I’m planning, but probably not for May:
- Add Character: do all the steps to correctly insert a character in an animation file. Not a big priority now, because it’s all done for “Lunatics!” Ep. 1.
- Compare Rig: report the bone name and parent relationship differences between two armature rigs. For synchronize character rigs and making it easier to transfer animation between them.
- Freestyle Camera Config: For some shots, it’s useful to create a linked scene with a new camera object with a different clipping range. This is a complex and error-prone setup that I’ve used for a few special cases. It would be really nice to automate.
- Additional Scene Asset Classes: so far the focus has been on shot files, but I’d like to normalize naming and shot setup for character animation, mechanical animation, properties, sets, and characters. It’s not yet clear what features would help most with them.
Attachments
This may be the last version I distribute in this informal way. Things are getting settled enough that I should probably move this Add-On onto GitHub and release that way. But I’ve attached the zip archive below, if you want to try it out. The other attachment is the Blend file used in the tests above.
When you install this script in Blender, it will immediately make Blender unstable. I don’t know why that happens — I must not be initializing something correctly. Exit Blender and reload — after that, it seems to work fine. If somebody wants to tell me what I’m doing wrong, there, I will be grateful. However, having to reload isn’t a terrible work-around to live with.
This is ONLY for Blender 2.79. It will NOT work in Blender 2.8. I have not even tried to port it to the new version, yet. I suspect it will be possible, but I know there are several things that will break. It MIGHT work in earlier 2.7x versions, but I’m really not sure. Also, of course, the Eevee Ink/Paint system will probably be different.
May 6, 2021 at 6:01 PM
Lib-Ray Development for April 2021 (Film Freedom)
In April, I converted my functional tests for Lib-Ray to the Python unittest format, but there are some serious challenges in testing software like Lib-Ray that is mostly about user-interface and visual appearance, so I’m going to have to expand my testing capabilities.
To this end, I spent some time this month researching the various Python libraries available to me, including “Willow” (which combines “Wand“, “Pillow“, and “OpenCV” tools into a single Python library) and PySSIM, which I think will be useful for making fuzzy image comparisons, possibly even matching to video.
I also expect to need this video for testing the Lib-Ray creation utilities. I’ll need to create a tiny Lib-Ray volume — just big enough to demonstrate the features, but small enough to distribute.
The lossless version of this video is about 7GB, and it’s about 500 to 700 MB when compressed with H264, VP8, or VP9 lossy codecs. Still pretty large, but feasible, and it’s long enough to demonstrate features like “chapter select”.
It was also fun to assemble samples of some of my favorite free / open productions, as a way to have some “normal” video to verify playback looks reasonable.
Breakdown of the test video:
- Black – 1s
- Countdown with 1s/1kHz sound-sync beeps (4s)
- Black – 1s
- Lib-Ray cover slide (this is the first opportunity to do a simple image-capture test to automatically verify playback), 4s.
- Shots from “Sita Sings the Blues” (2009) by Nina Paley. The “fuzz-ball explosion” plays merry-hell with compression algorithms, so this shot is also a stress test. I haven’t noticed any problems with the “heartbeat” shot, but it’s a sequence of very-distinct frames, so it seems like a candidate for causing compression problems.
- Clip of “Embroidermation” from “Chad Gadyah” (2018) by Nina Paley, mainly because it’s very cool — every frame is embroidered.
- Clip from “Caminandes 2: Gran Dillama” (2013) by Pablo Vazquez, including sync sound.
- Clip from “Big Buck Bunny” (2008) by Blender Foundation/Institute, not synced, partly because it was made at 24fps, and this is 30fps video made directly from the PNG stream (very high quality original).
- Clip from “Elephants Dream” (2005) by Blender Foundation, not synced, for the same reason. Has a very different visual texture.
- Clip from “Sintel” (2010) by Blender Foundation/Institute with source audio added back in. I sped up the audio 25% to match the video, so it’s a little rushed. The chase scene is presented without the original audio. I have original PNG streams on the Blender movies, this is a particularly-good quality test.
- Clip from Morevna Project’s “The Beautiful Queen Marya Morevna / Demo” animation (2012), another major tone change.
- Clips from the Tube Project / Urchn.org‘s “Wires for Empathy” project. I really want to see this finished someday, but it’s been in production for years, not unlike “Lunatics!” Somebody should give them some money, maybe? These are correct speed, because they’re from video originals, but of course, that also means they are interpolated and also the original video source was lossily compressed.
- Clips from my own “Lunatics!” project, also still in production. These are direct from PNG streams, but “Lunatics!” is produced at 30fps originally. The letterbox cropping is a little silly. It’s actually to cover up the timing stamps on top and bottom of these preview renders!
- “Lib-Ray” custom test pattern slide, 5s, starting at 00:06:34:17 / Frame 11837.
The next 20s are audio and video test patterns. Audio:
- Increasing-frequency tones (one step each second): 50 Hz, 100 Hz, 500 Hz, 1 kHz, 5 kHz, 10 kHz, 20 kHz. The 50 Hz is challenging for sound systems. The 20 kHz is challenging for your ears — I can barely hear it, myself.
- One second each, 1 kHz stereo tones panned middle, left, and right.
- Countdown sync with five rising tones, using Audacity’s “Pluck” generator.
- White noise for one second each at -60 dB, -40 dB, -20 dB, and -10 dB (0 dB was kind of painful, so I didn’t use it).
During the same 20s, there is video, including an overlay of the countdown timer in the upper left from 19-0s, and an overlay on the upper right describing the audio tests.
- PAL 100% colors – 4s (Generated by Kdenlive).
- FuBK test pattern – 2s (Generated by Kdenlive).
- SMPTE HD 16×9 color bars – 8s (Wikimedia Commons).
- Black – 1s.
- White noise (‘snow’) – 4s.
- Credits for clips and music – 8s
- Film Freedom title card with the By-SA license notice – 4s.
Plans for May
I’m going to have bite the bullet and test librocket and libvlc next. I’ve been kind of dreading that they’re just going to fail, because I haven’t tested them in so long and my computer has been upgraded in the meantime, and of course, that will mean troubleshooting.
Another potential complication is that I have since moved to a two-monitor setup on my workstation. It’ll be interesting to see how RocketStandalone copes with that.
I also need to make sure I can build the C/C++ libraries from source code.
It’d be nice to fix the bug in the RocketStandalone code that results in it crashing Python when it exits. Something is clearly not right there, although I’m still planning to use a manager script to recover when it crashes. It’s a work-around, but the real world of video playback is messy, so this kind of robustness is probably a very good idea, anyway.
What I’d like to do is to recover all the pre-existing code and tests and get them ported to the unittest framework. and my Eclipse IDE workspace.
At that point, it might be time to post the project up on GitHub and then continue working on the player.
Book: The Complete Guide to Lib-Ray
I did also start up again on writing the “Complete Guide to Lib-Ray” again, starting with the chapter “Lib-Ray from Scratch”, on how to create a Lib-Ray volume using pre-existing tools. In the process, I looked up the current status of the software I need for that.
My concept for the book was basically to write it backwards, starting with the lowest level of existing tools, then writing and explaining how to use command line scripts for creating Lib-Ray and keep working back to the beginning, where I’ll simply talk about how to play the volumes on your computer. This way, when you’re reading forwards, each chapter will be a deeper dive into how Lib-Ray works.
May 8, 2021 at 10:29 AM
Lunatics/Film Freedom April 2021 Summary
Here is the newly-posted activity summary for “Lunatics!” and “Film Freedom” projects in April on our Production Log. We got a lot done this month!
In fact, there are already “Lunatics!” monthly summaries going all the way back through 2019 on our Production Log. These are accumulations of the Patreon posts for those months, along with occasional supplemental materials and highlights from my worklogs.
“Lunatics!” is still charged by the episode, not the month. These summaries are collections based on posts that have all already gone public.
Thank You to New Patrons!
We’ve gotten a couple of new patrons in the last few months, and I want to say THANK YOU!
And a big THANKS also to all of the rest of you who’ve stuck with me over the last few years. It really does encourage me to know there are people waiting to see the result of my hard work!
Some Structural Changes
I’ve begun posting reports on my general infrastructure work (“Lib-Ray”, “ABX”, “KitCAT” software development) and film-making tutorials, reviews, and tips on my monthly “Film Freedom Project” page. There will also be occasional small production projects posted there that aren’t related to “Lunatics!” (In the past, I’ve done some tie-in work with local community theater groups and other fun projects).
Behind-the-scenes production posts specific to “Lunatics!” will continue on this page, and of course, the episode releases will still occur here.
When is that episode coming?
After making many overly-optimistic estimates, I feel really timid about promising any release date, but most of the episode is mostly complete at this point, so I’m optimistic that I’ll be releasing later this year, at long last!
The final article in the linked summary has more detail (and a current animatic, if you don’t mind spoilers).
The scariest parts are the “rework” scenes, which require that I either recreate shots with new assets or do extensive repair work to the existing Blender files. These are scenes that have fallen far out of sync with the rest of the project — they are going to be a major focus of my work this Summer, and a motivation for a lot of the infrastructure work I just completed, because I need the tools for the repairing broken proxy rigs and other problems.
If that fails, I’ll be stuck having to re-animate those sequences, which could be very hard and take longer to finish. But I think I have a good chance now of being able to do the repairs.
May 10, 2021 at 4:01 PM
ABX Development from April
I was very productive in April. not only on animation production work, but also on software development. As per my plans, I’m putting the full updates on the software infrastructure work on my monthly “Film Freedom Project” account, so as to keep this one focused on the actual “Lunatics!” show production, but it’s essential work which has already saved me an enormous amount of time in production, and the new changes should have an even greater payoff. The intro picture summarizes the new work in April 2021:
Copy Animation now handles Dope Sheet (“active action”) animation as well as the NLA, and the ability to scale animation. I expect to need this for the rework I need to do on the “TR-Train” sequence in “Lunatics!” which has orphaned proxies and animation that was created at the wrong scale.
Ink/Paint Config now provides a fairly complete and customizable ink/paint configuration that solves several outstanding problems. This clears the way for finishing up the “billboard extras” as well as fixing the skies in TR-Train, SR-SoyuzRollout, and LA-Launch sequences (which are all outdoors). It would have been useful for the TB-TouringBaikonour sequences, but I’ve already completed the rendering on those, and I don’t want to rework them.
Here’s the demo showing the most complete node system for Ink/Paint, supporting transparency and billboards correctly for inking and the the updated method for handling the skies.
The complete node system for this composite looks like this:
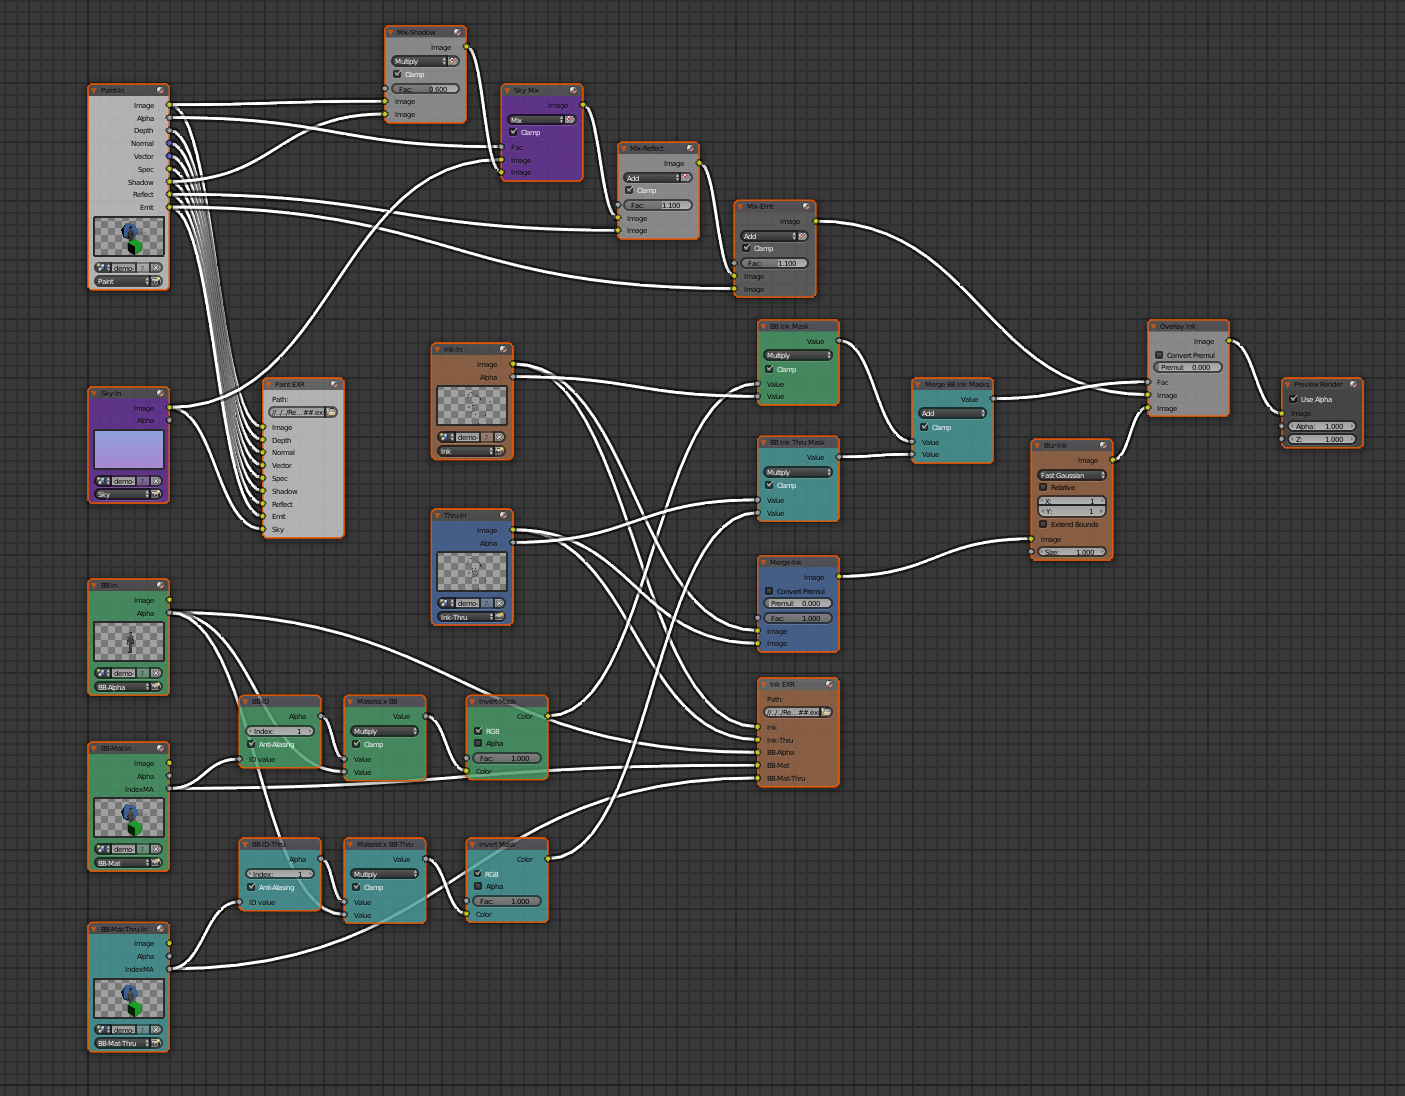
Of course, this is approximately the image from my previous post — the only difference is that that one was the prototype carefully set up by me manually, representing two or three hours of work, whereas this one was generated at the push of a button in less than a second.
Which, of course, is the point of ABX.
Part of the rationale for taking time on this development work now, is that I expect to immediately reap the benefits in speeding up my production work on the remaining parts of episode 1.
Other infrastructure work that I expect to continue in May:
- Compositing configuration in ABX. The current Ink/Paint is for the render files, the composite files will read input from EXR images and composite the final PNG stream shots for the episode.
- YAML project data system for ABX (and KitCAT – I plan to use the same modules for both). This isn’t strictly needed for episode 1, but it makes everything else easier.
- Render Profiles in ABX, for quick switching between various previsualizations and full renders. This is a priority for avoiding mistakes in the rendering and compositing stage.
- Installing the updated Papagayo-NG and re-adding my Japanese language support to it. I need this to fix some of the existing lipsync and add some new lines that haven’t been synced yet.
At the same time, I plan to start applying the new ABX features to finishing up the unfinished sequences in episode 1 of “Lunatics!”
May 12, 2021 at 10:24 AM
Activity for April 2021 in Nine Minutes
Screencast logs of April, sorted out by project. At 60X this would take over an hour, so I sped it up to 600X, which takes just under nine minutes. Sorting out the activity by project and sub-project like this makes it easier to follow my process, and I can easily measure the amount of time I put in by just measuring in Kdenlive.
38.6 hrs on “Lunatics!” Production: mainly the “LA-Launch” and “SF-SoyuzFlight” sequences, and then constructing a new whole-episode animatic.
25.3 hrs on Anansi Blender Extensions add-on (ABX): this month, I extensively modified the “Copy NLA” feature which has now become “Copy Animation”; and I expanded the “L.Ink Compos” feature into “Ink/Paint Config”, with options for handling transparency, billboard objects, and fixing the sky background compositing.
15.1 hrs on Lib-Ray media format: setting up unit and functional tests and creating a small test article video to use in more tests. Also came up with a plan for how to integrate visual testing (I had some visual testing working a long time back, but I got the test code muddled up with the application code pretty badly — a lot of my current reorganization is just trying to sort that out).
3.0 hrs on Primera Bravo II for “Bunsen”: collecting the codes for automating the robotics on a disk publisher that I purchased recently. I put this under a new project “Bunsen”, which is very experimental right now, but I might be writing about it — it’s a studio utility to run disk burning on my file server through a web interface from my workstation. It’s sort of a learning project, but I also hope to put it to use publishing short runs of M-Disc DVDs or other optical disk archives.
Altogether that means I worked about 82 hours on what would be “billable hours” if I were doing this on a consulting basis, out of a total of about 115 hours, which includes another 35 hours of “overhead” work (which includes things like writing posts about the work, general internet research, purchasing, maintenance, paying bills, filling out tax paperwork, and other general business I have to take care of). It doesn’t really include the work I do off the computer, like fixing the building or cleaning. I also stopped recording the process of making worklogs sometime back, which is kind of a recursive hell.
April was a very productive month — more than most so far — and a pretty good model for what this would be like if I were truly doing this full-time.
I’m extremely happy to have worked my way to the end of the pilot episode for “Lunatics!”, even though I still have to go back and rework or finish a lot of it. And I have finally gotten rid of the last third-party storyboards I was keeping in my animatics (a bit of a RosCosmos animation I had used as a stand-in for a long time).
There are still a few original storyboards standing in for shots I haven’t animated properly yet. And some of the animation is actually the old animation from the 2013 Teaser Trailer, which essentially has to be completely redone with the new assets. On the other hand, I’ve already started on the reworked shots.
One nice thing: I am not the person I was at the beginning of this project. I know a great deal more now about how to do the animation tasks I was struggling with before. So the rework tasks aren’t as scary as they were to me even a year ago.
ABX has been a really good investment of time so far — the old Ink/Paint feature (“L.Ink Compos”) saved me many many hours of tedious work with the Node Editor in Blender to set up correct rendering of EXR files and composting of preview PNG images in shot files (not just because it does the work instantly, but also because it avoids the many mistakes it’s easy to make in the process, which could require rework to fix). The new extensions will make it easier to handle additional special cases without spending time on customization, as well as finally solving a persistent problem I noticed in the SR-SoyuzRollout sequence of the sky becoming extremely dark in compositing.
The Copy NLA feature has allowed me to save broken proxies in animation files before, and the new features in Copy Animation will extend that ability as well as allowing me to fix scale errors in rigging configurations.
May 12, 2021 at 4:00 PM
ABX Data System Testing
There’s an old joke that says “There are just two big problems in programming: naming things, cache invalidation, and off-by-one errors”.
Well, I don’t know a lot about cache invalidation, and thank-goodness Python mostly handles that stuff for you. But I can vouch for the other two.
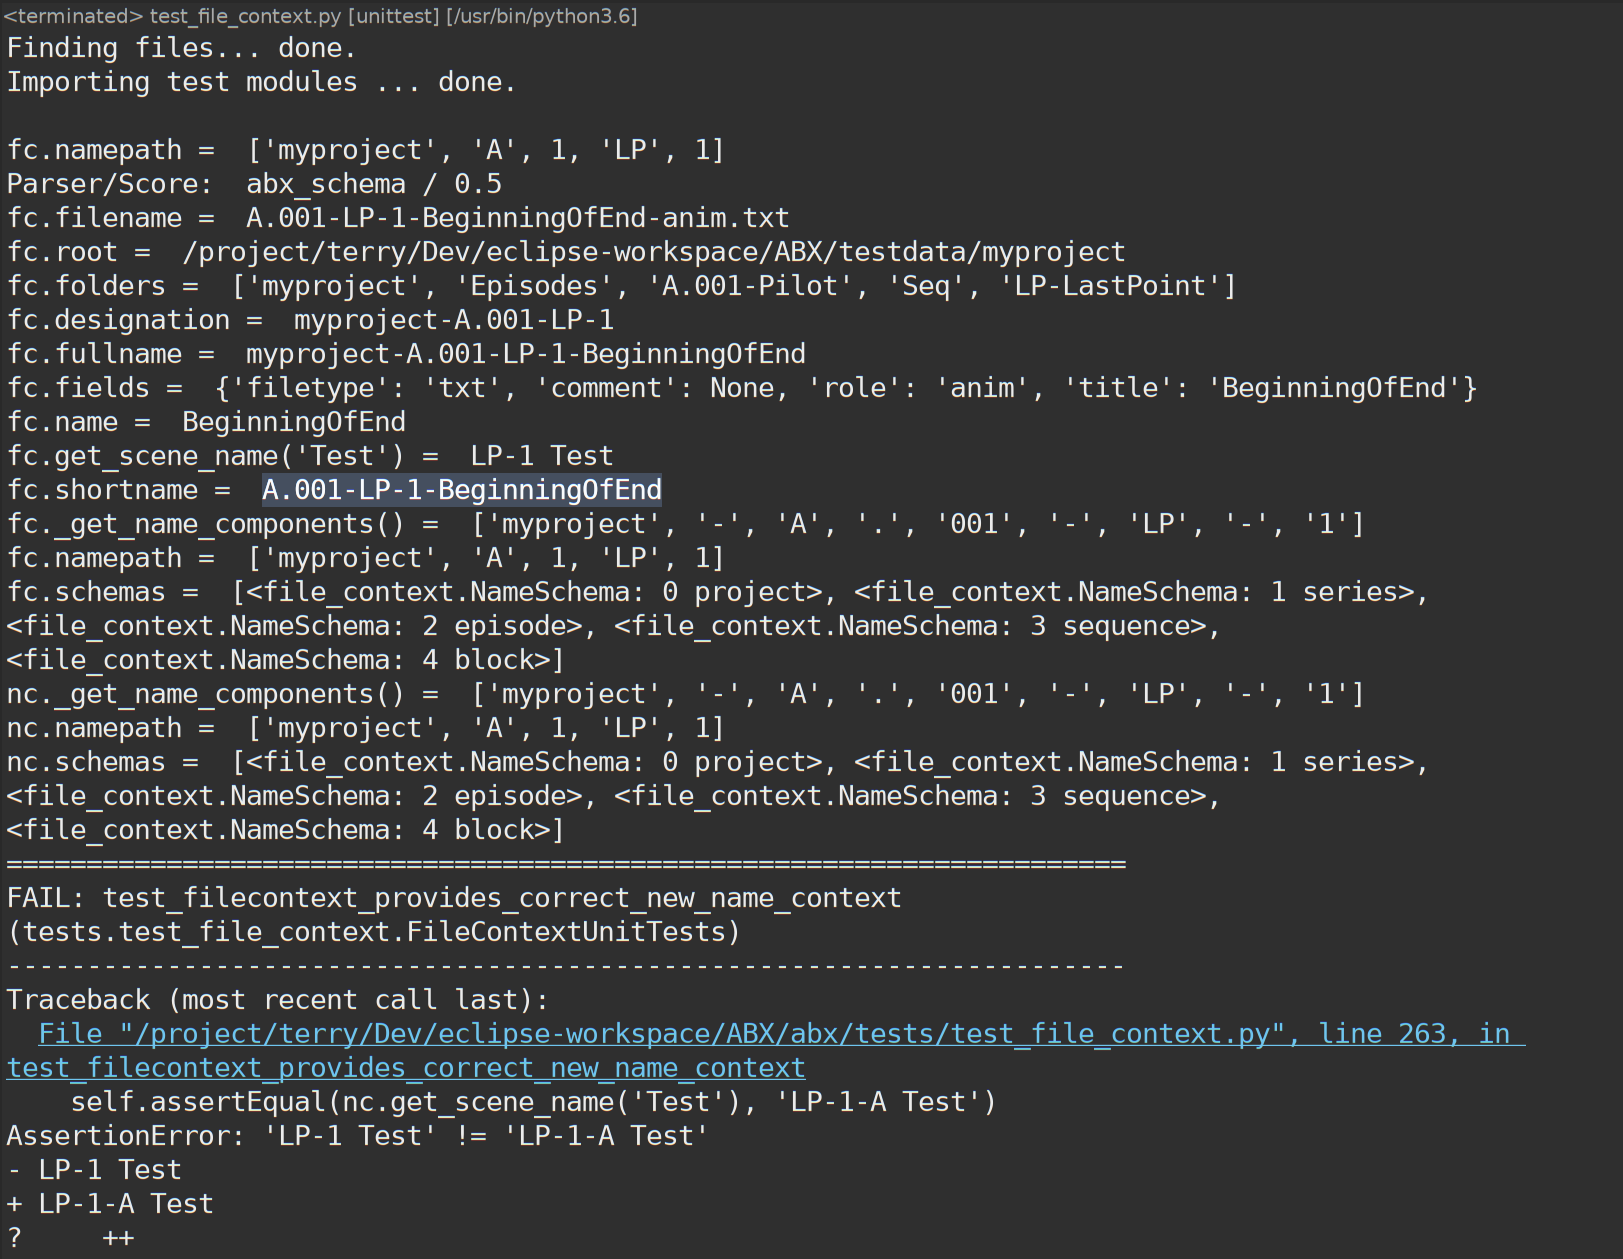
I had this notion I’d whip this “file context” parsing and naming module out in a day or two, but I’m now about a week into unit-testing, and as you can see, it’s still not quite passing all the tests. This turns out to be quite a bit harder than automating the compositing node trees!
I haven’t even started integrating it with the “Project Properties” or UI in Blender! But that’ll come after I get it working internally.
Basically, what it will do is use some YAML files in the project directories in combination with the file and directory names to figure out how things are named in the project — project files and directories, Blender scenes, and render destinations.
Then it’ll make sure they all match up as expected — generating appropriately matching names as needed. This reduces the opportunities for errors in the production process. But it does turn out to be pretty complicated.
Most of what you see here isn’t on the “Lunatics!” project, but on the test-article project I have included with my unit tests for ABX.
Lunatics! Project
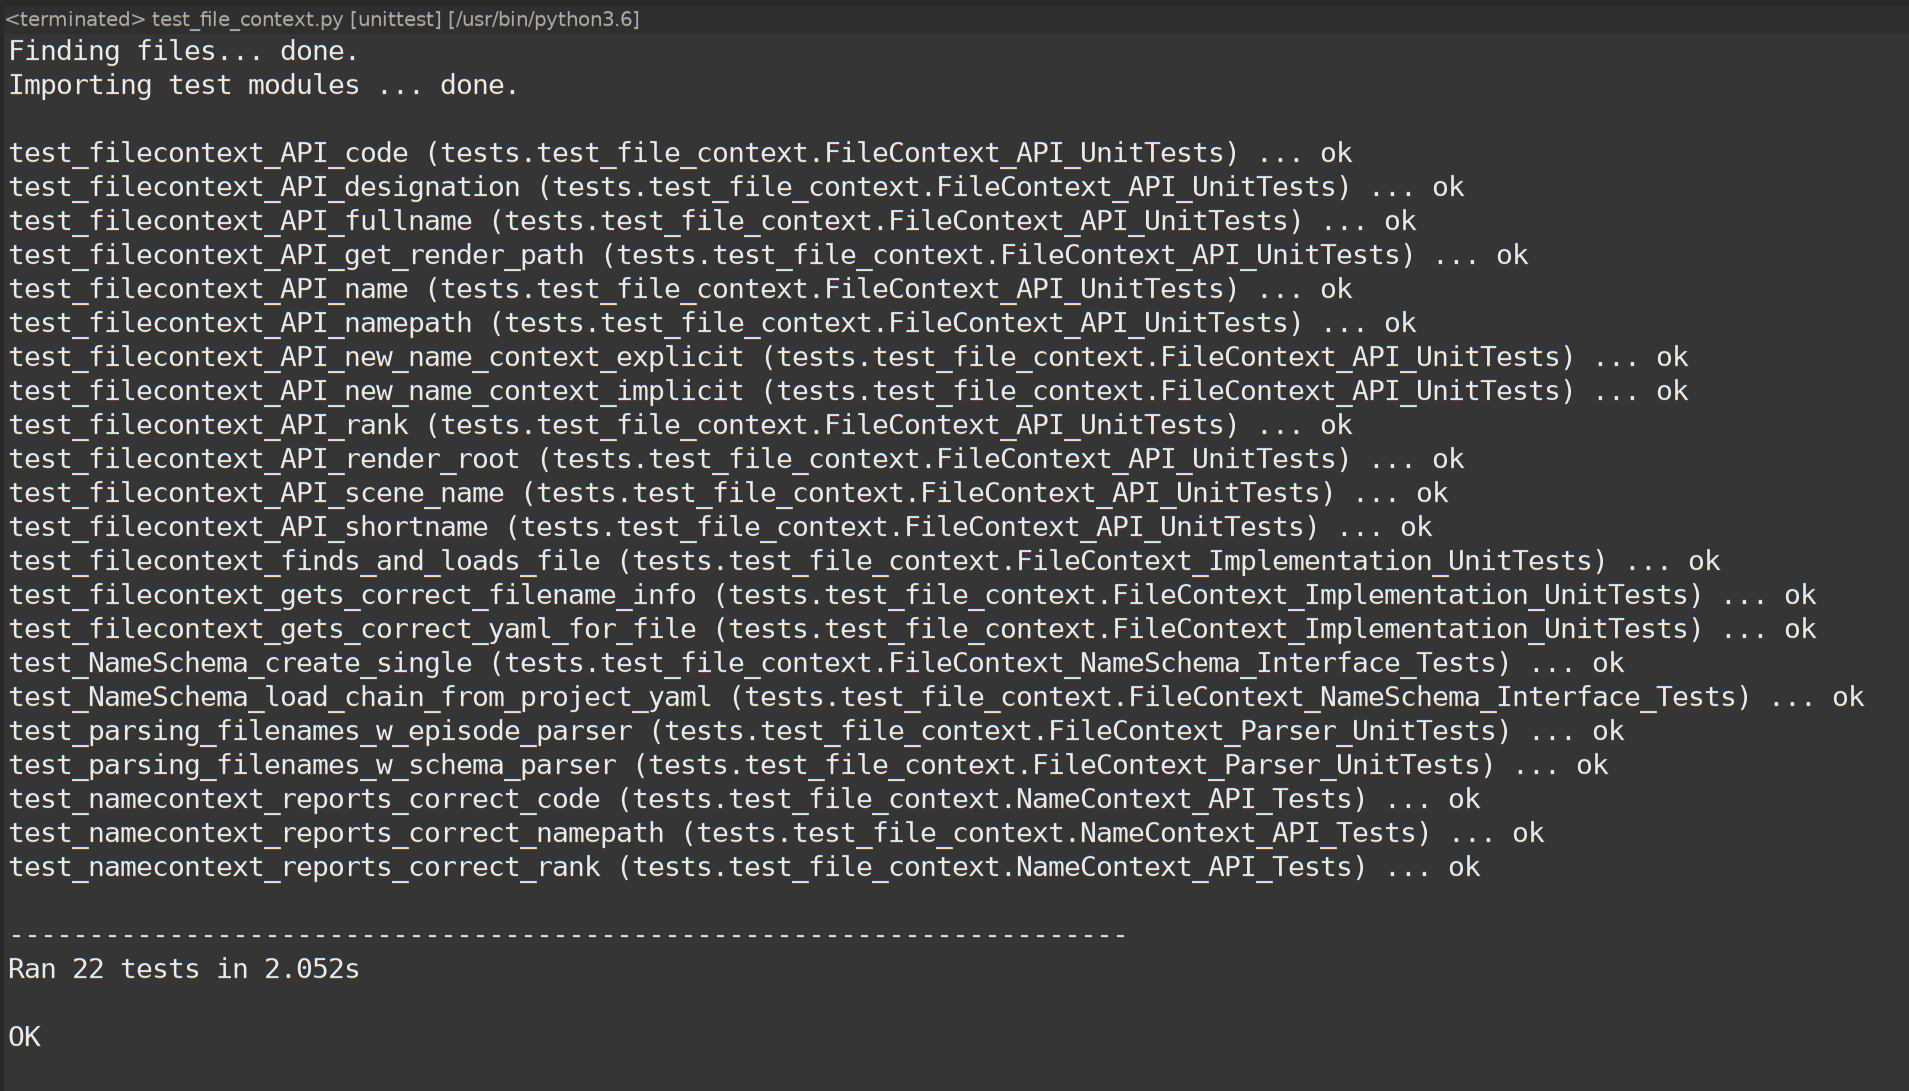
FWIW — it’s passing all these and a few more now. I’m focusing on refactoring and cleaning up the API a bit and then using it in ABX for its intended purpose. This should eliminate the specific dependencies on Lunatics assumptions, because now I can move those into a YAML file stored with the project.
May 13, 2021 at 6:38 PM
KitCAT and Keeping Track of Context
I wrote most of this back in March (2021), but set it aside before posting it.
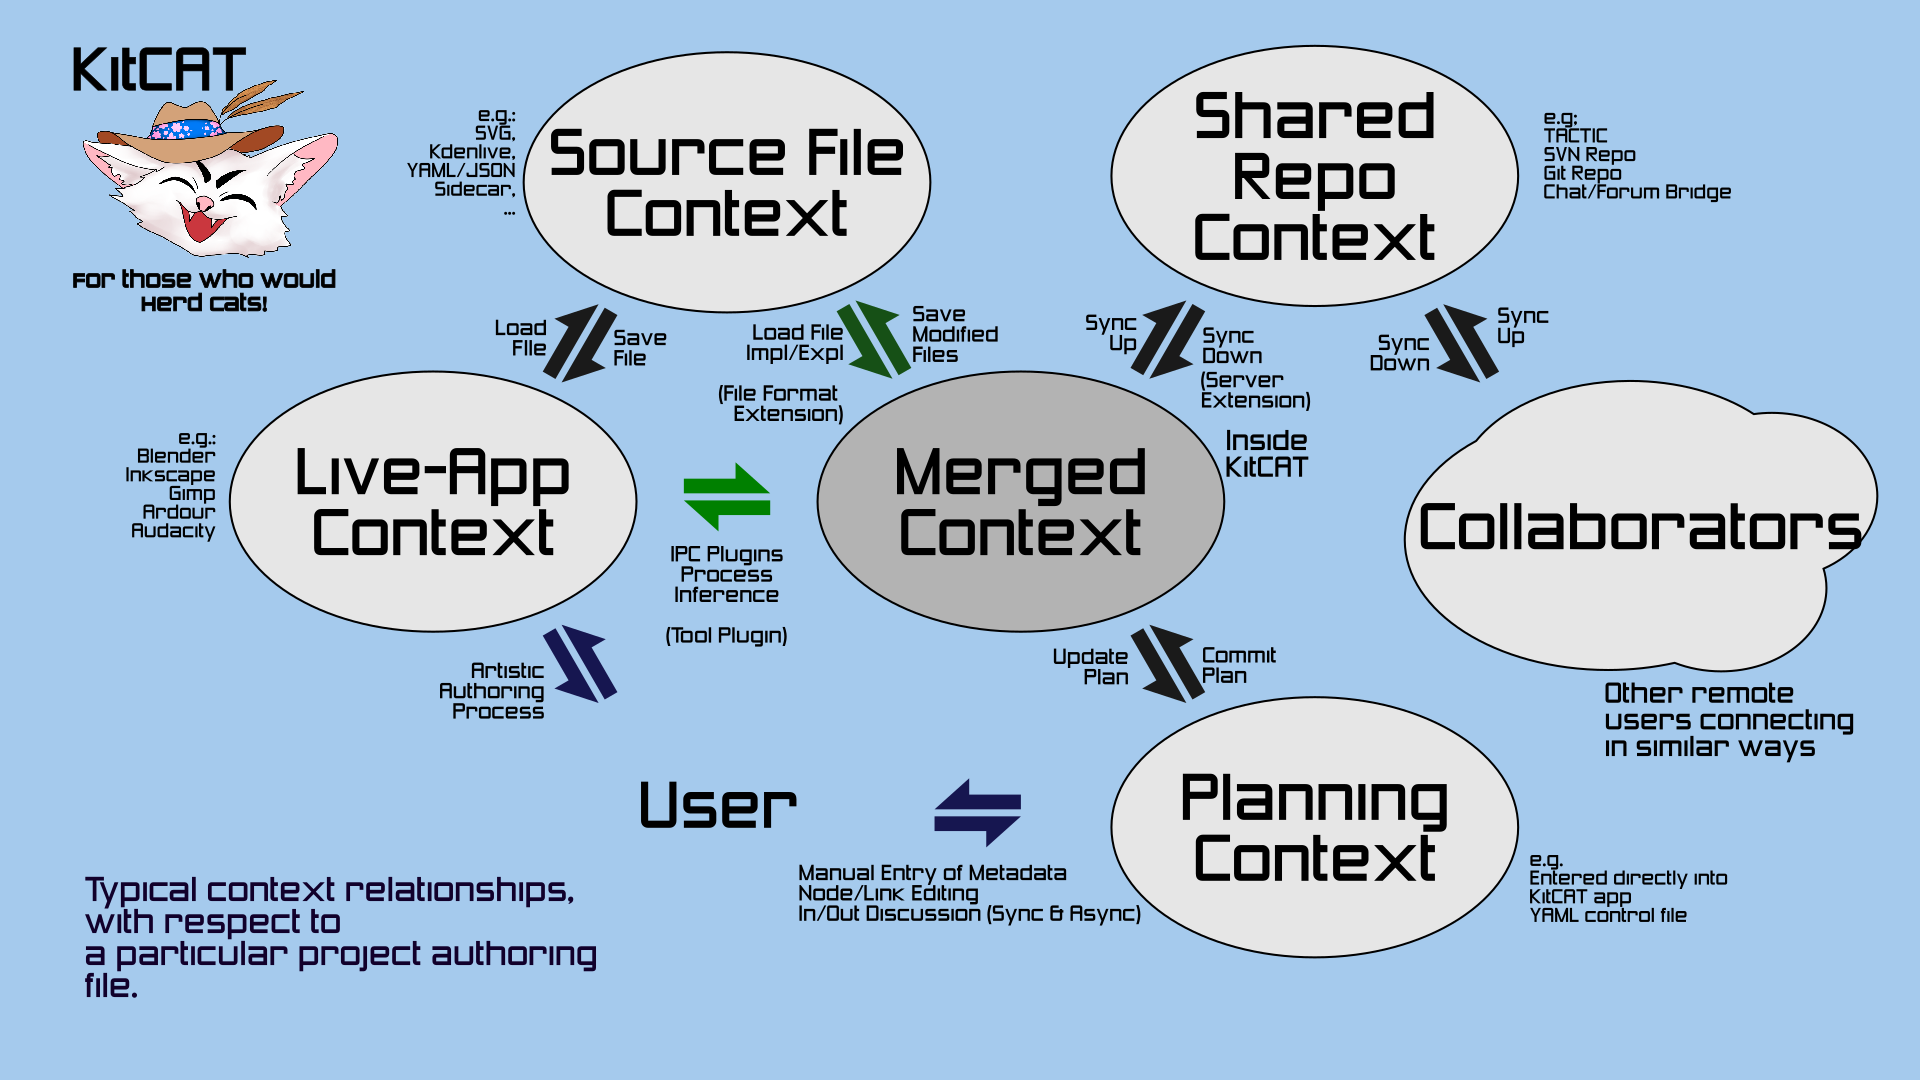
What KitCAT is supposed to do is to collect all of the context for an asset into a single integrated representation for the user who is typically working on authoring the asset, and needs to communicate with other people who are working on that or on related assets that need to interact. Or they might simply be working with a director or client who wants specific changes to the asset.
This is not really a solution so much as it as an expression of the problem that the proposed “Kit for Creative Arts Teamwork” needs to be able to manage. What I’ve been thinking about is the object/data structure for representing a “Context”, which is essentially a data structure — like an extended Python dictionary, with the contents being “fields”, each containing a key and a possibly complex value. Another possibility is a “triple store” for “semantic triples”. And there will likely be “discussion logs” as well, which would record conversations that may have happened in multiple context, or directly through the KitCAT application itself. Now of course, each of these contexts can get out of sync, and so there will be very needs to synchronize them, which I’ve marked with the two-way arrows on this chart, along with vocabulary we might use to describe each of those read or write operations from one context to another.
Not all of them will be possible in all cases. A specific embedded plugin will typically be needed to get live information directly from an authoring application (I have plans to make such a plugin for Blender, and then possibly for other programs that provide an easy way to embed such a plugin: Krita, Gimp, Inkscape, and Ardour all have scripting interfaces that appear to be powerful enough to do this with varying degrees of difficulty).
A different kind of extension — not to the authoring tool, but to the KitCAT application — will be needed to scan and collect context from file-based content. This is similar to what RenderChan does when deciding how to build a project.
And yet another sort of extension or module will be needed to talk to the server (originally conceived to be TACTIC, but in principle there’s no reason that other kinds of servers, such as Subversion or Git or discussion forums couldn’t be adapted to work in the same way).
Of course, the user also creates new context by interacting with the authoring software (e.g. when modeling in Blender or editing an SVG drawing in Inkscape). And then the user also triggers “context read” and “context write” operations by saving and loading their project file on the filesystem, also from within the authoring program. KitCAT has no involvement in that — but it needs to be aware that it can be happening (so that the two contexts won’t necessarily agree all the time).
For example, if you have opened a drawing in Inkscape and worked on it for awhile, the SVG in memory doesn’t match the one on disk. If you call KitCAT from a plugin within the program, it will pipe the in-memory SVG to the extension which relays it to KitCAT, so you’re getting context from the live, in-memory drawing. But if you only have an SVG extension for KitCAT, it can only read the file on disk, and thus may be out of date (you’d need to manually save your work before using KitCAT on it).
Nor will every context support every kind of information. It’s unlikely that a discussion thread from the server will be stored inside the SVG file. Nor is it likely to be useful to store the “currently active object” in Blender, though the Live-App Context could include this information.
Meanwhile, although it would likely be useful to store the resolution of an image file being worked on in Gimp in the uploaded asset database in TACTIC, it obviously does not know this information with the surety that the Gimp application does. It’s just a copy of that information. It may even have changed since the last load of the program from the disk — but the live value is clearly the correct one.
On the other hand, it may not agree with the resolution requested by a planning document (perhaps representing what another asset object expects the resolution to be). Or the plan may not specify this value at all.
Finally, some formats will have no way to represent a certain field of context information, either because the format provides no way to do it, or because the extension used to read and write the format doesn’t support it. So, for example, some older formats like WAV audio or raw image files may have no generic place to store comments or attribution data.
What this brings me to is a concept of “authority”, applied to context objects. That is to say, the degree to which a particular source should be trusted for the correct value of a field. Some possible values to use:
- Unsupported (No read or write possible)
- Read-Only (Can read but not write — such as directly-measured metrics)
- Empty (No value, can be overridden).
- Inherited (Value exists, but is copied from another source)
- Get / Current (Value represents the current state)
- Set / Planned (Value represents an intended state)
This, combined with “currency” — or the time stamps on the information — is enough to intelligently merge context objects. The difference between the “Get” and “Set” values could be used to generate a “to-do” list for updating the asset, or with sufficient automation, simply be used to make it so.
An empty field can be tagged “empty”, in which case an existing value can be copied to it or replace it. But if the field is empty, but also has “Get” authority, then it will delete prior values in that field for representation. And if it has “Set” authority, then it will cause deletion when the plan is committed.
May 17, 2021 at 2:01 PM
ABX Versions and Road Map
Now that I’ve got the “file context” data system passing unit tests, I’m starting to plan out what I’m going to do with it.
I also decided I’d better get a little more serious about versions. So I started a document to describe the existing versions, and also to give a roadmap for what I plan to do in upcoming versions.
I make no promises about completion dates, but a lot of these are features I’d really like to have while finishing the pilot episode for “Lunatics!”, so I’m hoping to get to them in 2021, possibly this Summer — at least to “0.5.0” on this road map.
VCS and Online Access
Right now, ABX and the LibRayPlayer projects are still just sitting on my hard drive. I have some packaged snapshots, and that’s it. I’m hoping to get these checked in at a public repo. By default, I’m considering putting them up on GitHub, though I may still consider other options. I plan to make a firm decision on that this Month.
Existing Versions
I have snapshots for ABX for these versions:
0.1.x (<2021):
Versions before 2021, with “Copy NLA” and “L.Ink Compos” and not much else.
There were some experimental version of context.py, file_context.py, and blender_context.py in the source, but they were unused and buggy or incomplete.
0.2.0 (2021-02 to 2021-05):
Versions from April/May 2021, with major design changes:
- “Copy NLA” became “Copy Animation”, and acquired new options:
– NLA (Old NLA behavior)
– Dopesheet (copy the “active action”).
– Copy/Rescale (copy animation, possibly rescaling)
– Scale Factor (if other than 1.0, the animation is scaled when copied) - “L.Ink Compos” became “Ink/Paint Config”, and also got new options:
– Ink-Thru (Freestyle ink workaround for transparency,
can now be turned off)
– Billboards (Accurate alpha-billboard ink masking technique)
– Separate Sky (Generate sky on a separate render layer
for accurate compositing) - “Lunatics! Properties” got a new field for the scene “suffix” or title, used exclusively to give some extra information in the scene name. This was to accommodate short shot codes I was using, like “G.PoV” meaning “Georgiana point-of-view shot”, to clarify the letter-codes for the shots, especially since I was changing some of them around.
0.2.5 (2021-05):
The last version before introducing the file_context data system into the main functions of the program. It contains fully-working and tested file_context.py and accumulate.py, but they haven’t been updated with specific changes to accommodate the Blender UI yet, and the abx_ui.py module doesn’t use them.
I made this version as a stable fallback for production with all of the recent bugfixes, but none of the new (and likely buggy) data system features.
Includes:
- render_profiles feature in the Render panel. This is a quick select for changing the render settings and output filepath to be named consistently and use the correct settings for the most common pre-visualization renders I make, and the full PNG stream render.
– The profiles are hard-coded, because no data system.
– EXR files may be generated from previz
(could cause data loss if you run previz again after final renders!)
Road Map (for 2021?)
0.2.6:
The first attempt to incorporate YAML configuration into the program.
- Introduce better fallback behavior when project YAML files aren’t found, and give informative messages to the user about them.
- Move program defaults into abx.yaml and project.yaml files in the ABX source code. Load these before project files to guarantee default requirements are met.
- Use abx.yaml ‘render_profiles’ block to set options for render_profiles
0.2.7:
Replace “Lunatics! Properties” with “Project Properties” (the project name will be one of the properties, and probably read-only). Parse the “role” field.
Generate read-only data from file_context and appropriate data-type fields for unspecified ranks.
0.2.8:
Fix the schema override issue to allow for use with library assets or other hierarchy besides episodes. Improve the handling of “rank” (possibly refactor the code to make rank-handling more intuitive?)
0.2.9:
Write / save / update to filepath to allow changing the name based on the input from the Project Properties (Not 100% sure I want this — YAML files are easy to edit!).
0.3.0:
Full contextual data support driving the program features.
0.3.1:
Pop-up report generation? I had this working experimentally, years ago, and it’d be useful to generate pop-up reports for some of the introspection features I want to add.
0.3.x:
Improvements to data system and other capabilities.
- Name context by group, rather than scene? Would be handy for library assets.
- Possible integration with KitCAT? There’s significant overlap between ABX and KitCAT and I already call the metadata files “kitcat” data in the sources.Will they be merely interoperable, or should I actually make ABX into the KitCAT plugin for Blender?
- Port ABX to Blender 2.8+, keeping 2.7 support, if possible. If I’m really going to use 2.8 for compositing, I will need this.
0.4.x:
New features. Hopefully:
- Recognize/use “role” field.
- Ink/Paint Config for compositing (as opposed to rendering)
- Appropriate config tools for anim, mech, etc — other roles
- Automate Freestyle “Ink-Camera” clipping system.
- Character Armature comparison (find misnamed or extra bones)
- Insert characters into an animation file
- Find/report broken dupligroups and/or animation proxies
- Generate linking report(s) — information to support correct linking diagrams, or possibly source for auto-generating them?
0.5.x:
Integration with Papagayo / Lipsync data for animation?
Maybe find the appropriate data files and run the lipsync importer on them?
Or perhaps incorporate the lipsync importer code?
0.6.x:
Automated management of credits & licensing?
(Or does this all fall under the heading of KitCAT?)
Completion Targets
I am working on 0.2.6 this week, and I aim to get at least to 0.2.8 by the end of May (0.3.0, preferably).
It would be highly desirable to reach the 0.4.x goals this Summer, as they would be directly useful to finishing the “Lunatics!” pilot episode.
As for 0.5.x and 0.6.x, these are a little more “pie in the sky”, and they’re not urgent, so that’ll depend on how my other obligations work out and how difficult this turns out to be. It’s probably more important to get the LibRayPlayer and KitCAT projects on track than to finish these.
The “file context” system surprised me for how long it took. It didn’t seem like that complicated of an idea, but I took about two weeks to get it working, and it still needs refinement. There were a lot of conceptual problems with getting the right relationships between the data structures, even though it was “just pushing text around”.
On the other hand, just tacking new features for the “Ink/Paint Config” and even the “Copy Animation” went faster than I expected.
I expect a bit of a struggle to make my file context data play nicely with Blender’s custom properties and UI code. The “.draw” method for the new “Project Properties” will have to be dynamic, getting information from the project schema to decide what asset codes are needed in the interface.
Being able to popup a new window with Blender is a bit hacky. I did this as a demonstration a few years ago, but I’ll have to dig to find that code, or else just reinvent it. It’s not a well-documented process — I get the impression it’s not something the developers had in mind, and I don’t know if they would approve. But I think it is reasonable to want an editor window to pop up with the long-form reports that I want to generate through introspection, rather than having to go and find the textblock in your Blender file.
After that, though, I suspect just adding new tools will be relatively easy.
Attachments:
abx-0.2.5a.zip – Just the Add-On (can be installed with “User Preferences”. Requires Blender 2.7. Only tested with 2.79. Not expected to work in 2.8+, due to changes in the add-on API.
ABX-0.2.5–2021-05-15.zip – Snapshot of my ABX project in Eclipse/PyDev. This includes project documentation, unit tests, and development scripts.
May 21, 2021 at 2:01 PM
ABX Initial Check-In on GitHub

After some waffling over options, I decided to create a new GitHub account for Film Freedom Project, which gives us a fairly easy-to-remember name: “filmfreedom-org”, and I have posted the ABX project.
I will be regularly pushing my changes to the GitHub repository from now on.
I also expect to start posting repositories for my other FF projects soon.
May 27, 2021 at 1:00 PM
ABX Unit Testing in Blender

I had been limiting my unit tests to modules that had no dependencies on Blender, so I could just run them using the operating system’s Python installation. But I am now able to run unit tests in the Blender environment for modules that require access to the Blender ‘bpy’ API to work.
This has been kind of slow-going this week, but I got my Eclipse / PyDev environment for Blender Add-Ons fully configured again, and I have now got a test runner script that runs my tests inside Blender.
The way this works is that there are actually two scripts: the one I click on to do the tests is actually the “injector” script: it runs Blender using a “subprocess” call, and then injects the actual test runner using the “-P” command-line option for Blender. Since this is meant to be fully-automated testing, I also use the “-b” option so that Blender runs without the UI. So, the injector looks like this:
ABX_PATH = '/path/to/dev/folder/' # Specific to my computer
import os, subprocess
subprocess.call(['blender279', '-b', '-P', os.path.join(ABX_PATH, 'scripts', 'TestInBlender_bpy.py')])
Then the actual test runner is something I got from a Stack Overflow answer:
ABX_PATH  # same as above

import os, unittest
loader = unittest.TestLoader()
start_dir = os.path.join(ABX_PATH, 'tests')
suite = loader.discover(start_dir)
runner = unittest.TextTestRunner()
runner.run(suite)
This discovers all the unit test modules in the ‘tests’ directory and runs them.
When finished, Blender exits and the output is flushed to the console in Eclipse.
Now I just have to figure out what tests to run!