
HIGHLIGHTS:
- Email from Keneisha Perry about leaving animation after Ep 1.
- Ad for Southwest Reprise Theatre’s “Alice In Wonderland” program booklet
- “Alice in Wonderland” performance video (film & edit)
- Template research for static webpage design and website generator options
- Investigating lighting / shadow problems with Lunatics shots.
PRODUCTION SNAPS:
Jun 17, 2019 at 4:00 PM
Render Benchmarking
Unfortunately, the “Peak Memory” consumption that Blender reports is only accurate for the regular color rendering. It does not report the memory consumed by Freestyle. So the only way to measure that is apparently with an external utility like “time”.Last week, I did a series of benchmark tests to figure out our requirements for rendering. I had originally assumed that we could simply run multiple Blender processes in parallel to get the maximum speed for rendering a lot of frames.
This is a reasonable assumption, because rendering is not a perfectly parallelizable computation — and Freestyle in particular, does not benefit from multi-threading. However, individual frames are computed separately, so they are completely parallel. Thus, it’s more efficient to use 8 CPUs to compute 1 frame per CPU in parallel than to use 8 threads for rendering each frame in sequence.
Except for one problem: actually trying to do this with this shot crashes all but one of the Blender processes! Why?
I was quite baffled at first. The obvious answer is that it runs out of RAM, but Blender only reports about 2.8 GB of RAM used for this frame (which is one of the most intense Freestyle renders in the whole episode). But if that were the only limit, I expected it to be able to run at least four processes successfully on my 16 GB machine.
At first, I thought maybe there was some kind of weird limit to keep more than one Blender from running at once (I’d never heard of such a thing, but what else could it be?).
But no. The real problem, it seems, is that Blender LIES.
I discovered that the GNU “time” utility can, in addition to measuring the time a process takes to run, also tell you other things, including how much memory it takes up. And that utility reports that this frame requires a little over 10 GB to render. Which means obviously, I can only do one at a time with 16 GB.
So much for that 8X speed-up I was hoping for!
But at least it solves the mystery!
This also unfortunately means that my render cluster spec is not ideal for this shot, since the blades in my cluster are basically very similar to my desktop. Adding more RAM would help, but it’d be expensive, and even going to 64GB will still leave them RAM-limited.
I’m now thinking that using cloud computing services will likely be the best solution for the intensive Freestyle shots like this one. I did a bit of shopping around and found that Linode offers a pretty good fit in it’s “high memory” plans. These are 1 CPU, but with 24 GB of RAM, costing about $0.09/hour. Simply using many of these is likely the most efficient way to render this shot — I estimate based on my benchmarks that it could be done with 600 servers in about 3 hrs, so it’d cost about $180 for the scene. Not trivial, but not that expensive and very fast. Of course, I’m just assuming one can actually provision 600 high-memory servers from Linode, but I guess we’ll see. If not, then it’ll take a little longer, but it’ll still be much faster than doing it on our machines here.
For other shots that are not so intensive, it may be cost efective to just increase the RAM I’m using in the cluster, or to simply run fewer processes, and let them use more threads (which will speed up the color part of the render, at least).
I’ve also now firmly decided that our workflow will include rendering to EXR files and then compositing those in a separate stage. This gives much more flexibility. We tried it out on our recent VFX project, and it was extremely helpful. I’ll post more about this workflow later.
Jun 18, 2019 at 3:51 PM
Open Source Journeys Interview
“Lunatics!” producer/director Terry Hancock was interviewed by Marcel Gagne for the Linux Professional Institute’s “Open Source Journeys” podcast earlier this year.
This is an extensive, two-hour interview, so get comfortable or put it on the stereo for your commute to listen. Marcel was interested in the whole project, from story concepts and origins to technical details about the software we use, so it really covered a lot of territory!
Thanks so much to Marcel Gagne for giving us this opportunity!
Jun 22, 2019 at 3:59 PM
Single-Episode Sponsorships on Gumroad

We now offer both the “Individual” sponsor tiers (“Patron”, “Silver”, “Gold”) and our “Commercial” sponsor tiers (“Commercial Sponsorship” and “Logo Sponsorship”) on an up-front, single-episode basis through our Gumroad storefront.
There is also a simple “One Time Donation” option, to allow any amount at any time.
In addition, we’ve eliminated the commercial sponsorship tiers from our Patreon rewards.
This is because we feel it’s probably not that reasonable to expect a sponsor to sign up for an unspecified future payment that may come as a surprise when our episode is released.
The Gumroad storefront approach provides a much more predictable case of being charged up front when you sign up, with no future commitment at all (except in providing graphics for the “Logo” sponsorships).
Of course, another advantage for us, is that this money would come now, when it can be used to help us actually produce the episode, instead of afterwards.
However, the money will be accounted in the same way — as revenue for the episode.
We’re also considering a simple monthly subscription with monthly summary updates, but we have a few details to work out.
Jun 24, 2019 at 4:00 PM
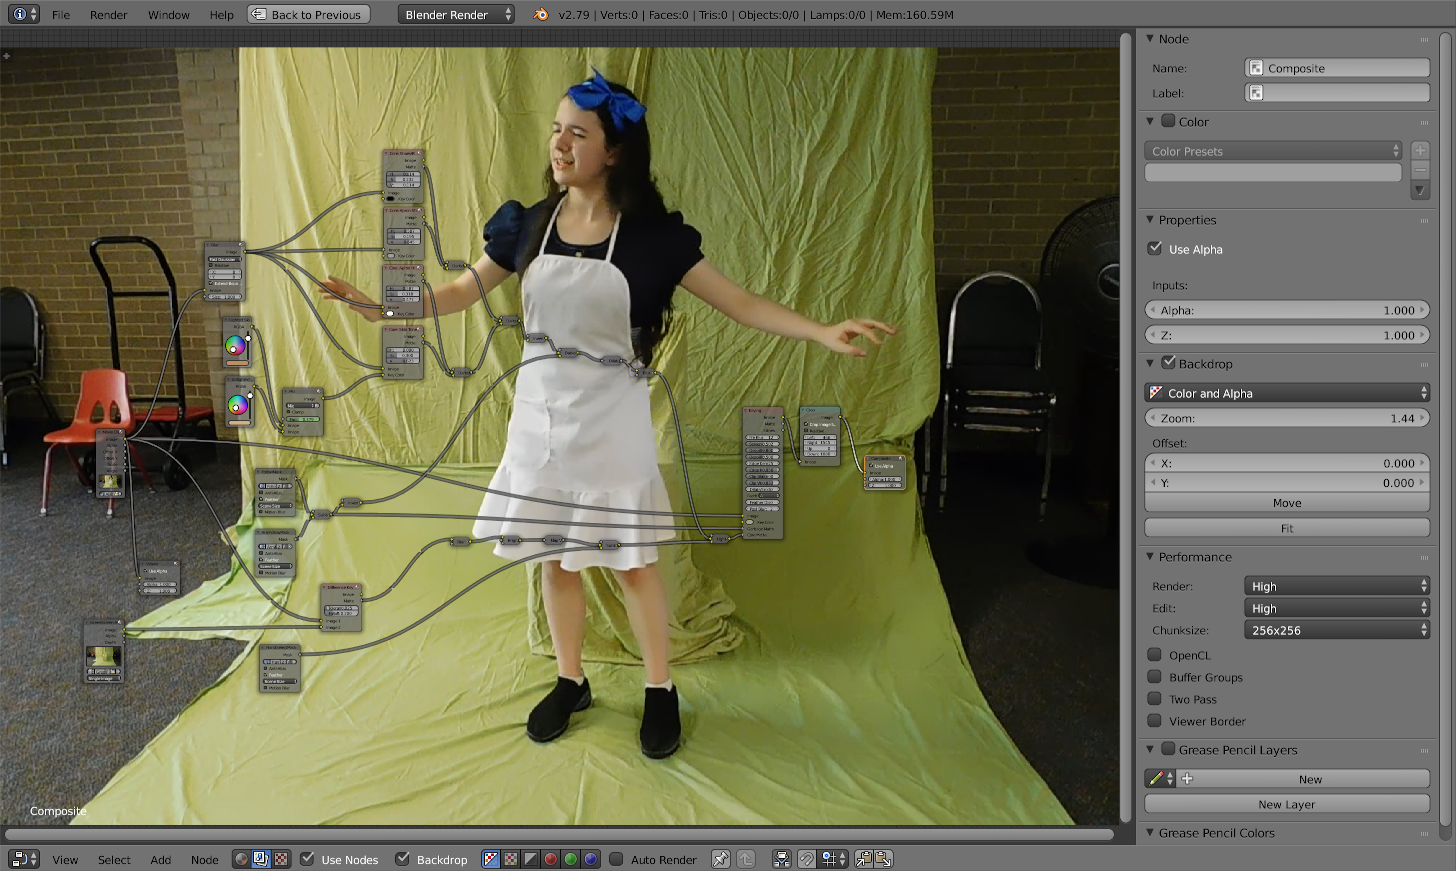
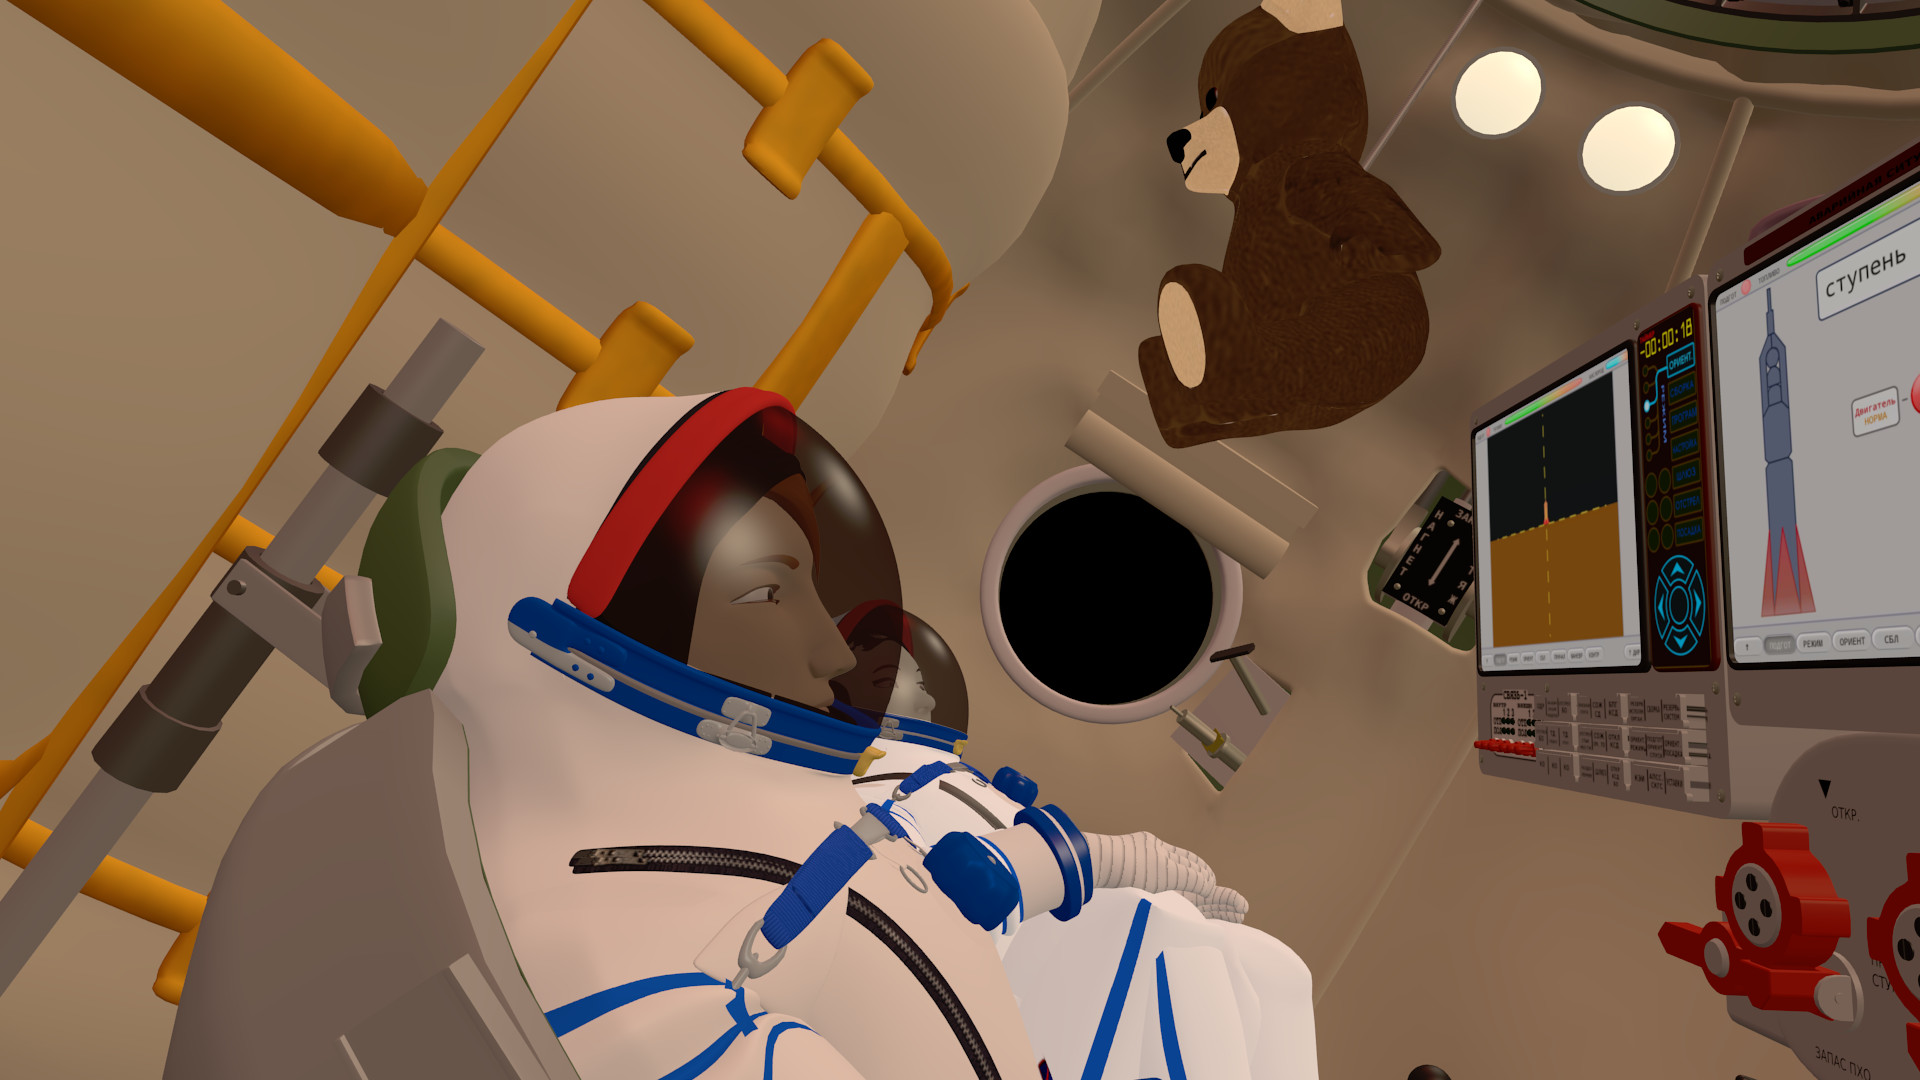
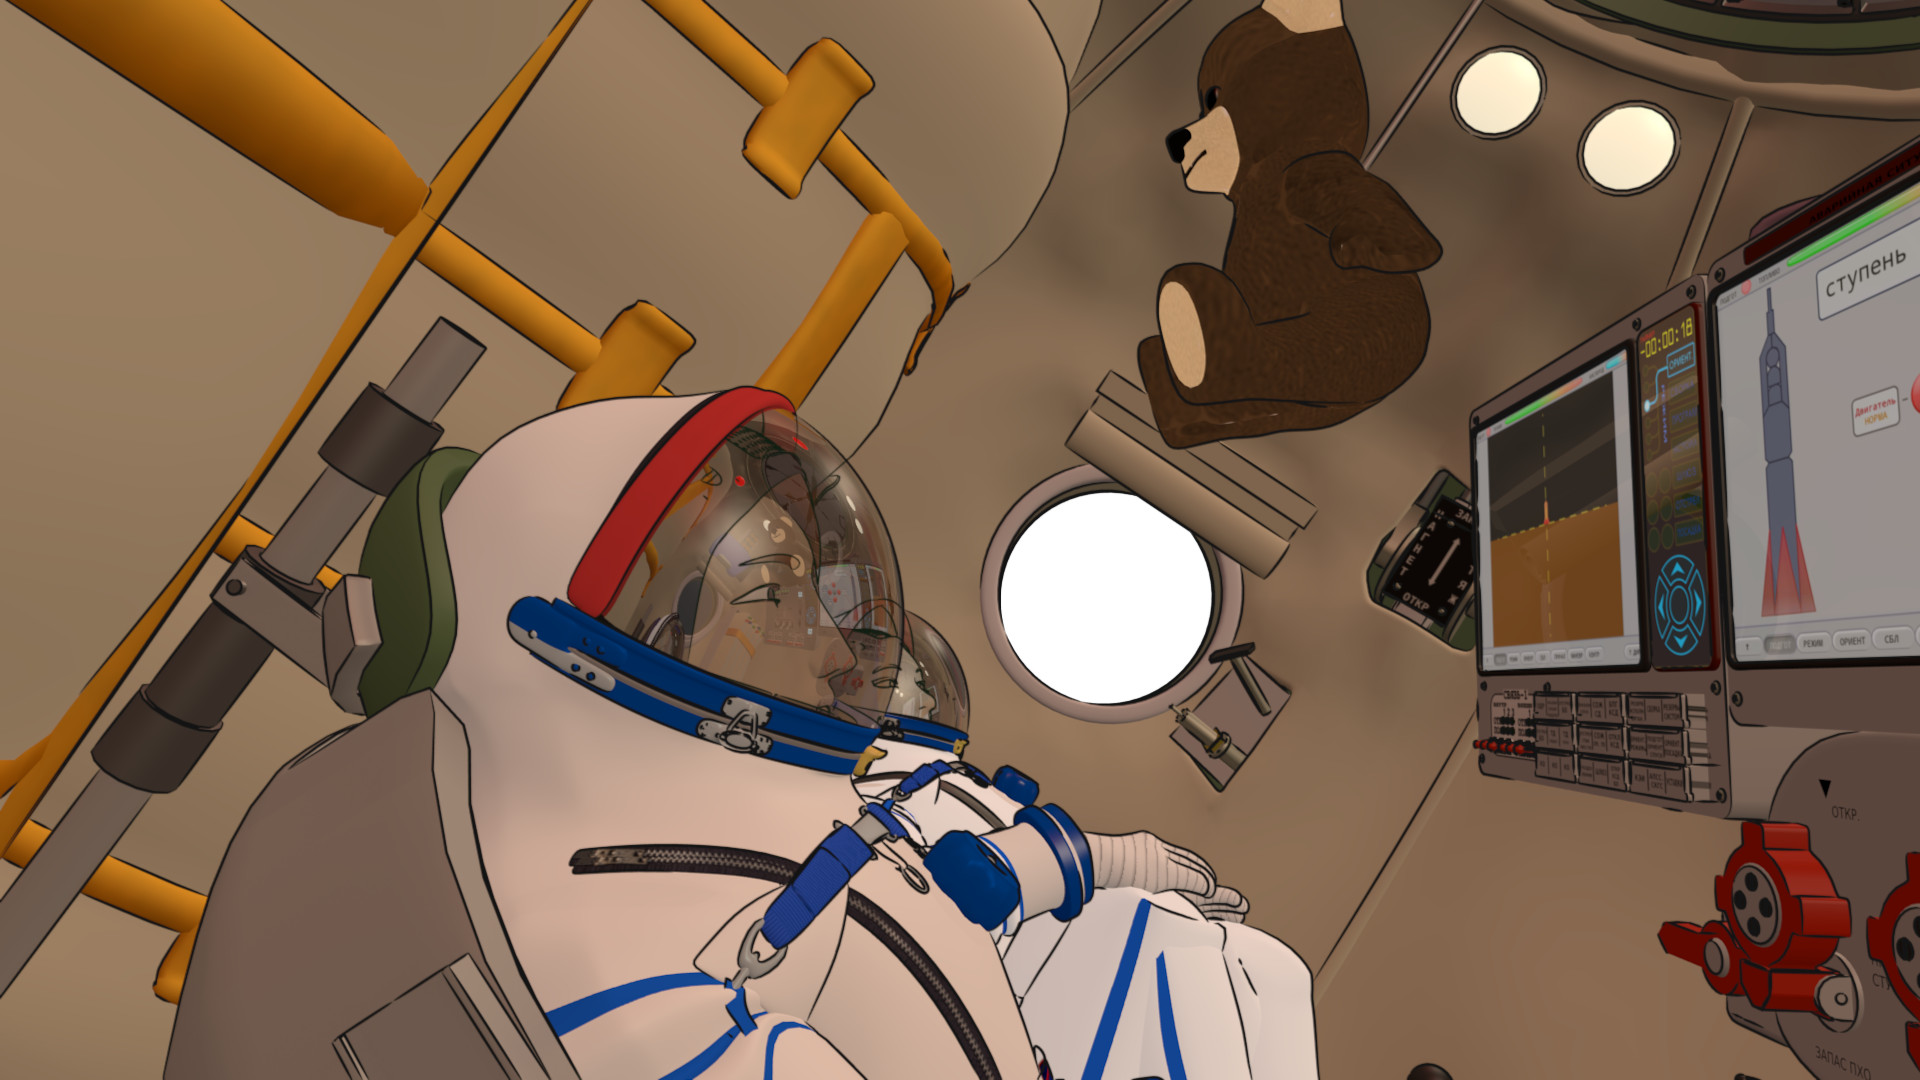
Render Test with EXR Compositing Workflow

Today I’m working on the camera file for the “Soyuz Flight” interiors. This is ink and color, with the full EXR compositing setup that I’m planning to use. It’s basically recreating the default result in Blender, but with the EXR workflow, it will be possible to tweak certain things, like the intensity of the reflections in the helmet visors, in the compositing stage, without having to re-render.
This also provides a natural solution for the the “flickering line” issue with Freestyle that I’ve encountered. If a line is drawn unpredictably, we can animate a mask to delete it. We probably also could use Grease Pencil to add a line, though I suspect deletion is probably enough.
This is because, with the EXR workflow, we can separate components into their own layers for separate processing, and then put them together how we like.
The view outside the window will also be added in compositing — it’s simply an “alpha transparent” hole in this image.
Jun 25, 2019 at 4:01 PM
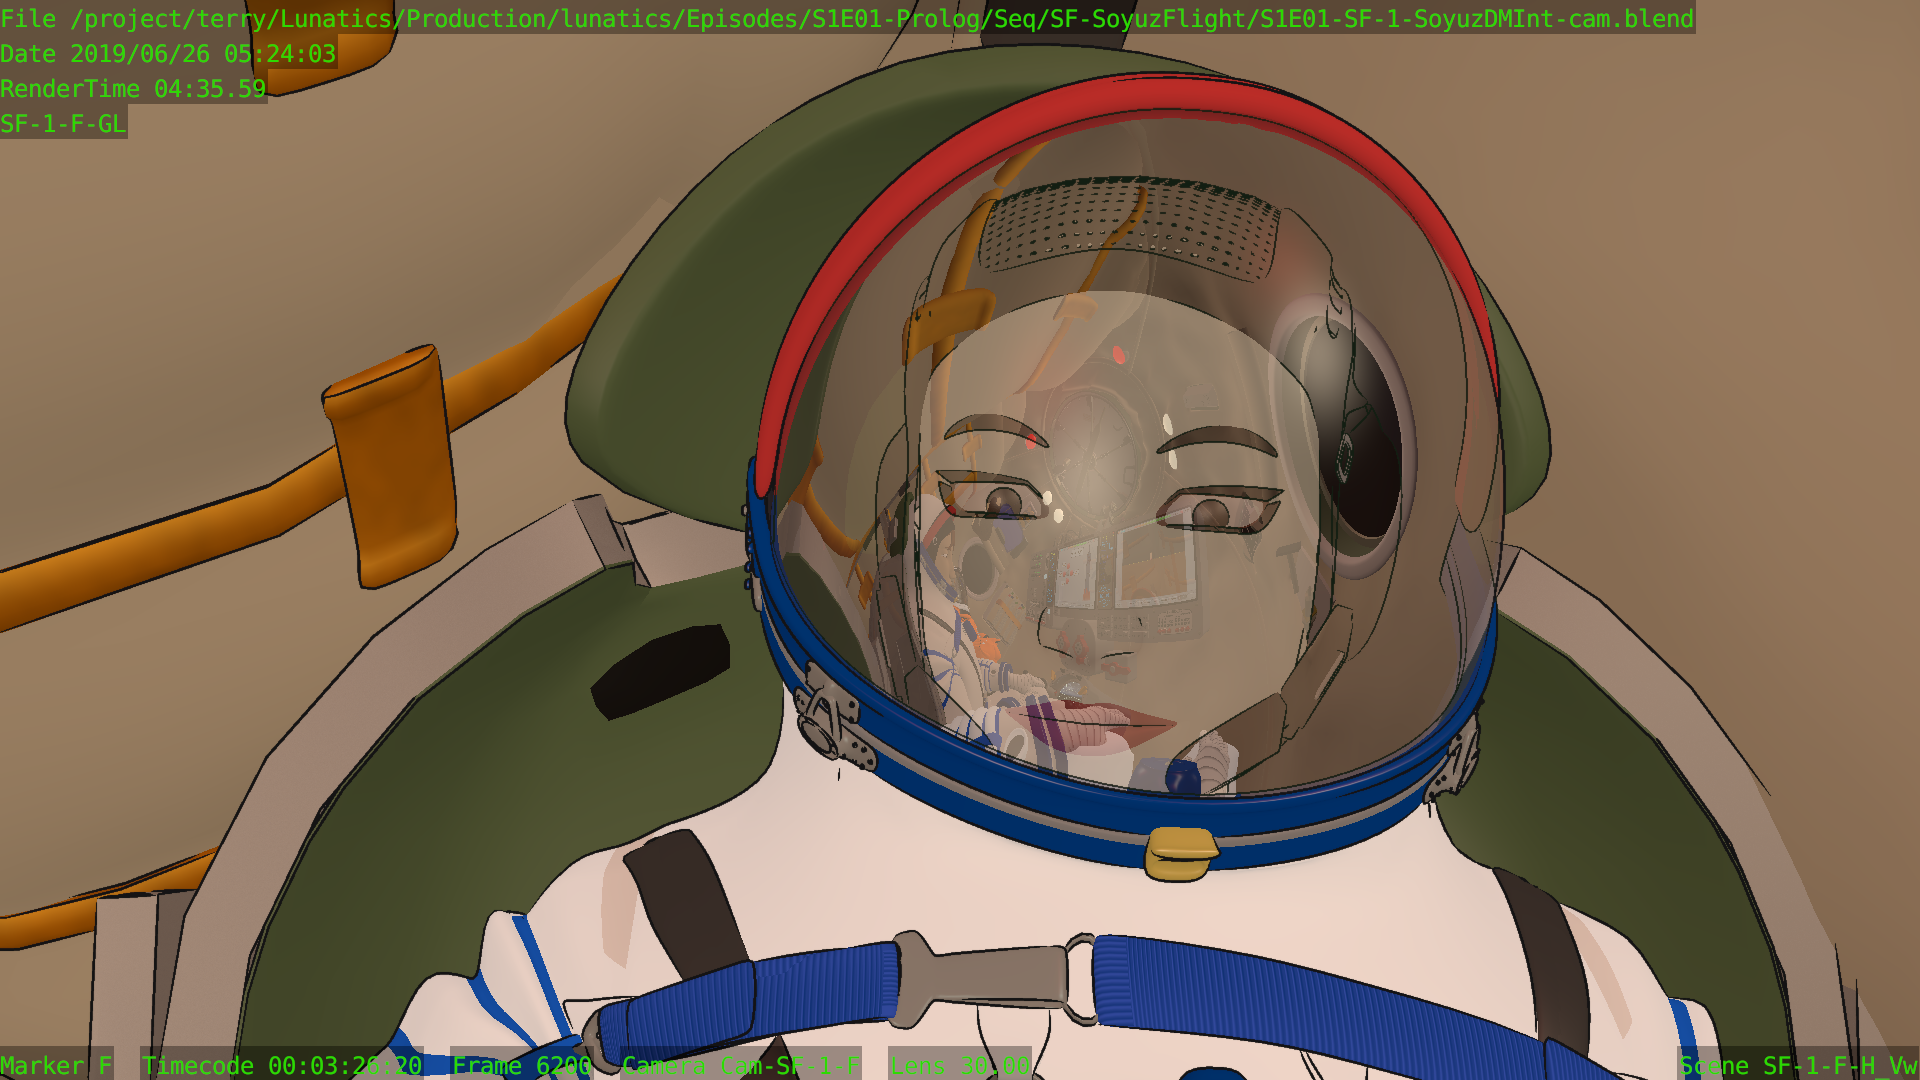
Camera Render File Compositing Node Tree
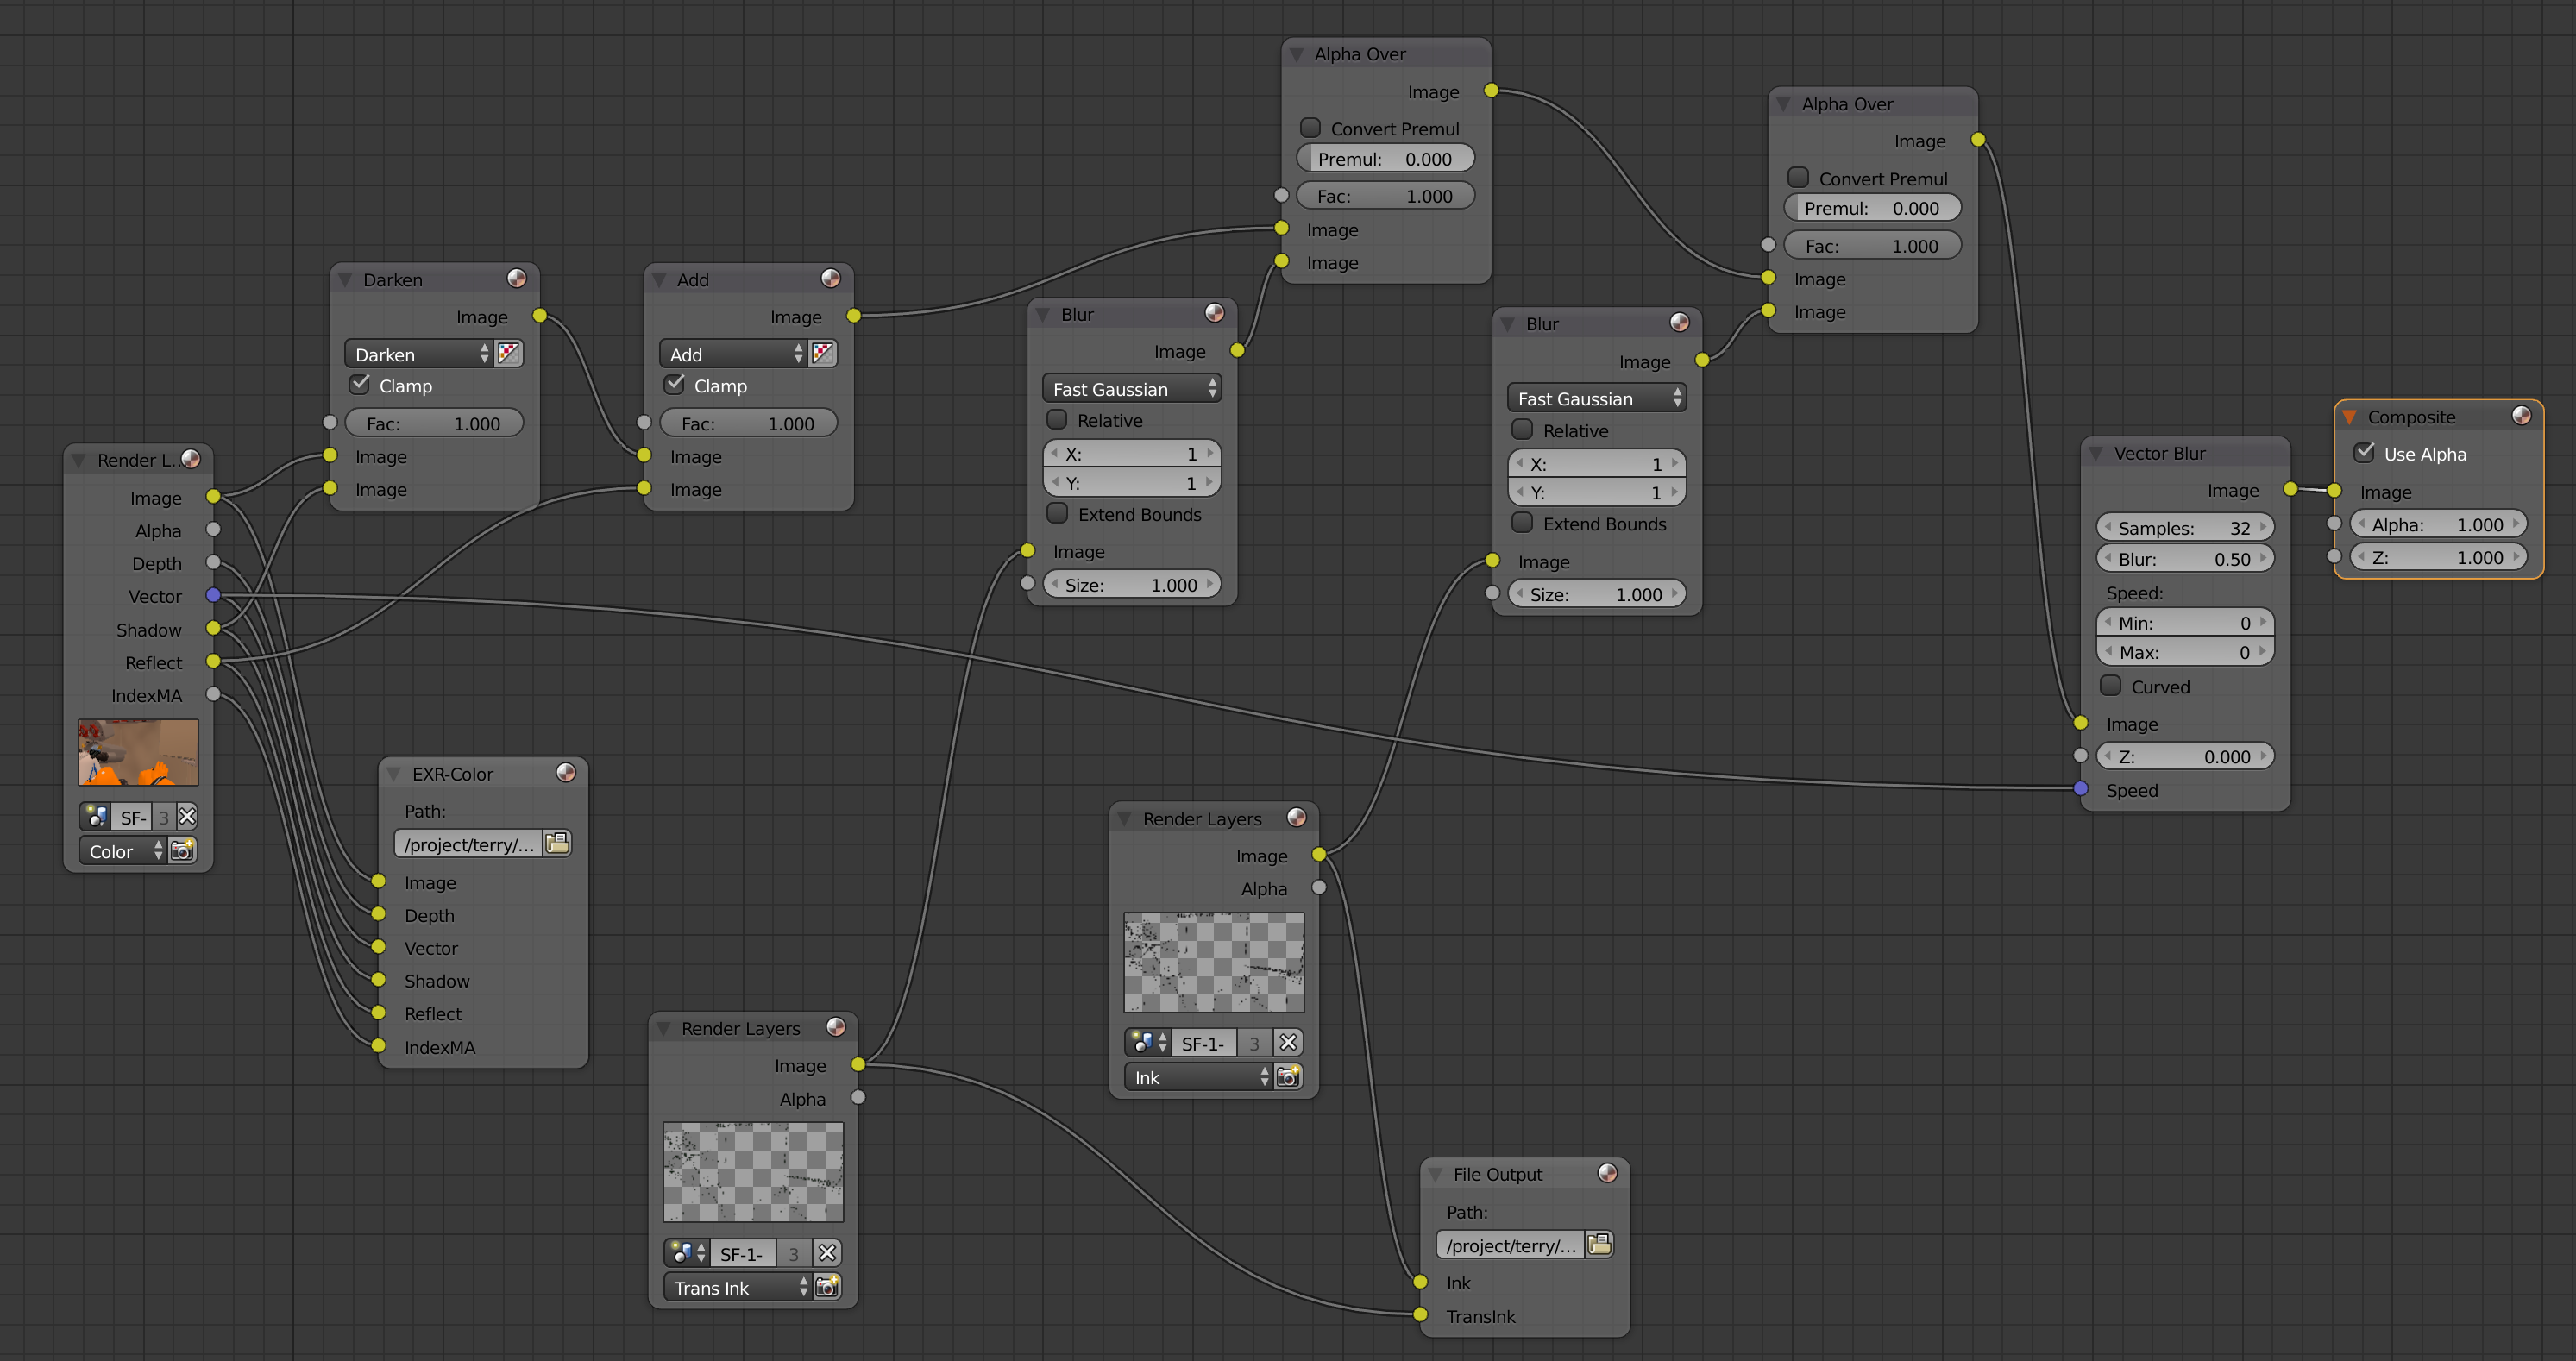
This is the system I came up with for rendering EXR images in my new EXR workflow.
There are three renderlayers: Color, Ink, and “TransInk” (which is the ink line used for objects seen through transparent objects, as described in earlier posts).
These are rendered to two EXR files:
Color
Contains the color image, z-depth, vector (motion information used for motion-blurring effect), shadow, reflection, and material index (used for special compositing effects, though not in this shot).
I’ve removed the “Reflect” and “Shadow” passes from the combined image, so they can be added in the compositing stage, and adjusted for intensity as needed. So if things look a little “too shiny”, I can tone the effect down without having to re-render.
Unfortunately, I also found that my “Shadow” renders are empty, so it seems I probably need to change the lighting to cast some shadows.
Color without reflections:
Reflections-Only:

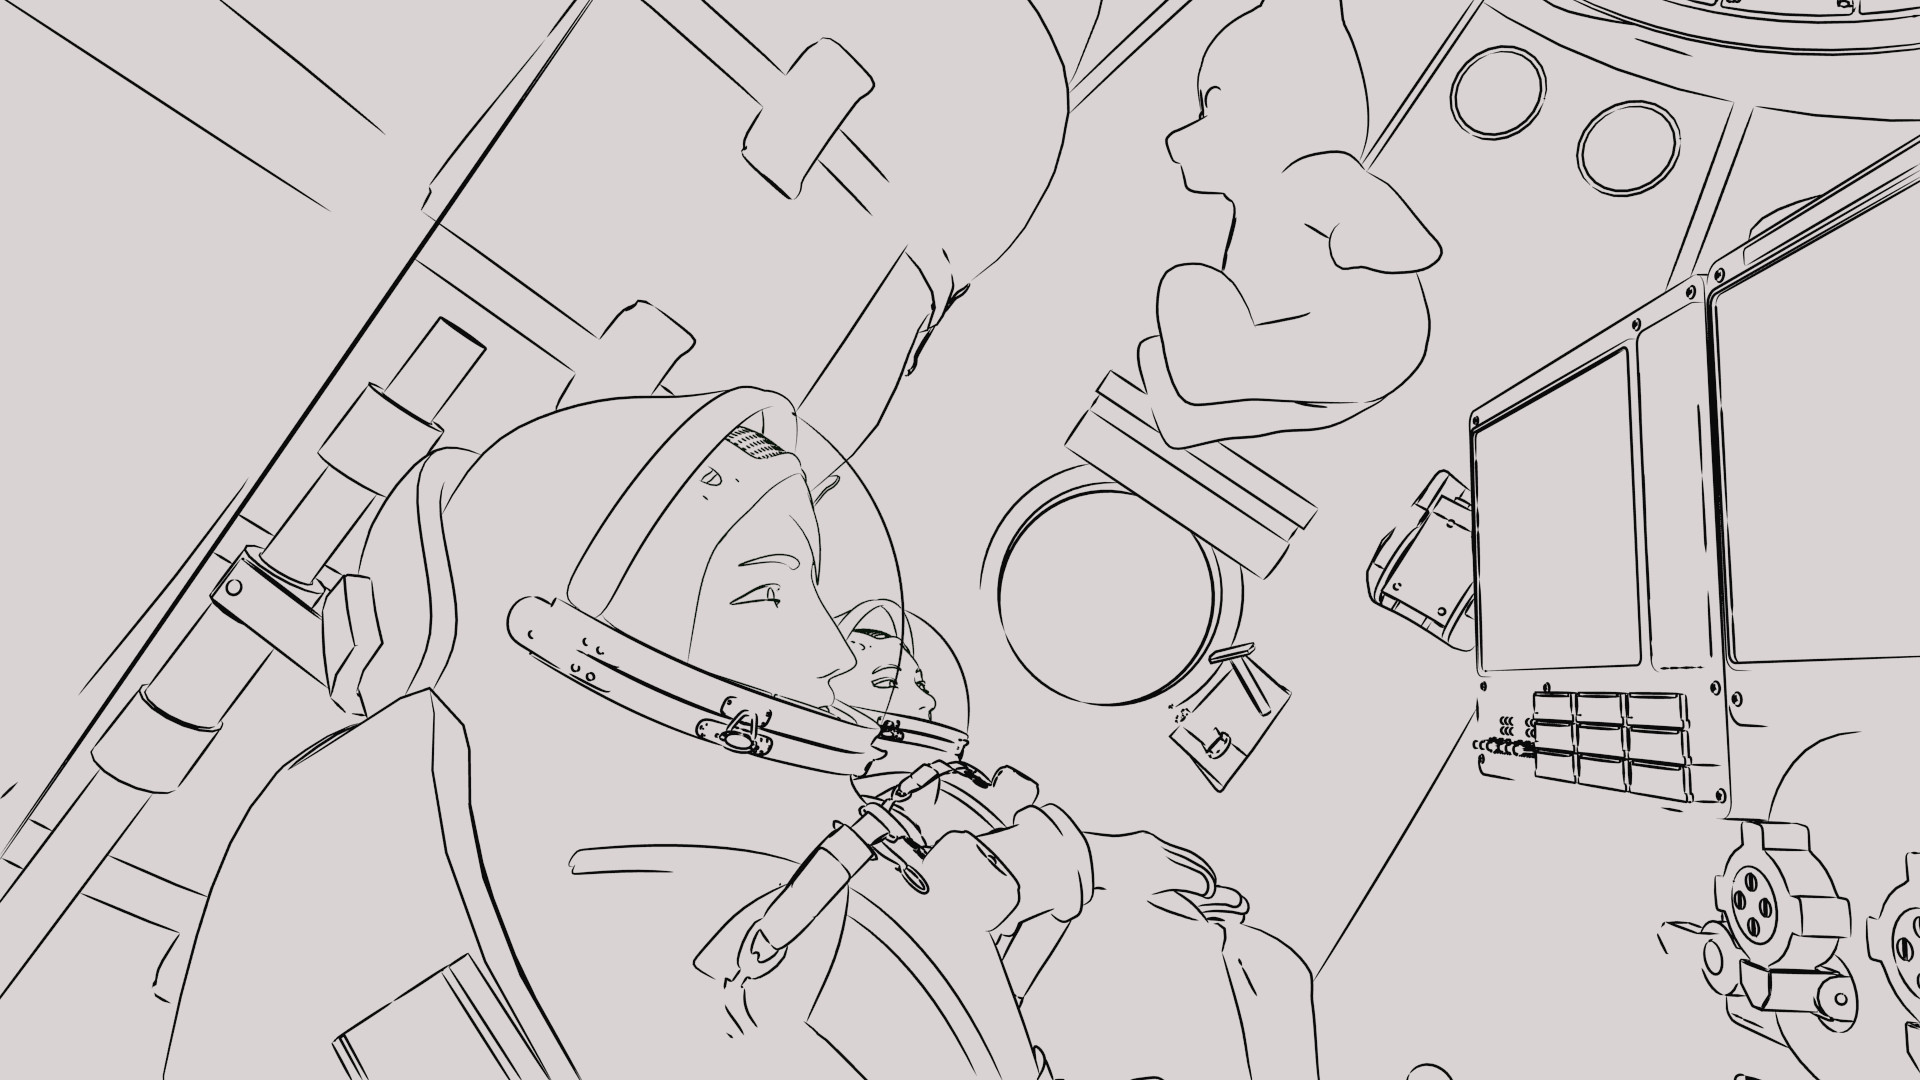
Ink
Contains two layers. One for the direct “Ink” Freestyle render and one for the “TransInk” render.
The rest of the nodes are used to assemble this output into a first-look composited image (and will serve as a model for creating the actual compositor stage).
I considered taking a different approach using the material index pass with transparent objects to create a mask and distinguish direct and transparent ink in the compositing stage. This would speed up the render considerably by eliminating the extra renderlayer.
However, this doesn’t really work, because the transparent objects have to be removed from the renderlayer in order for Freestyle to see the objects behind them, but then they have to be present in order for Freestyle to render the ink lines for those objects (e.g. the edge on the helmet visors in these shots).
So I’d still have to do two ink renders.
Both ink layers together:
And the resulting composite (from the node tree as shown):
(The porthole is actually transparent to allow for compositing with a background shot).
Jun 29, 2019 at 4:00 PM
Fixed the Communications Caps
This has been bugging me for awhile. Earlier, we had the entire helmet following the character’s “head” armature bone, then we changed it to stay with their “chest” bone, but then the communications cap was also changed, which just looked silly:
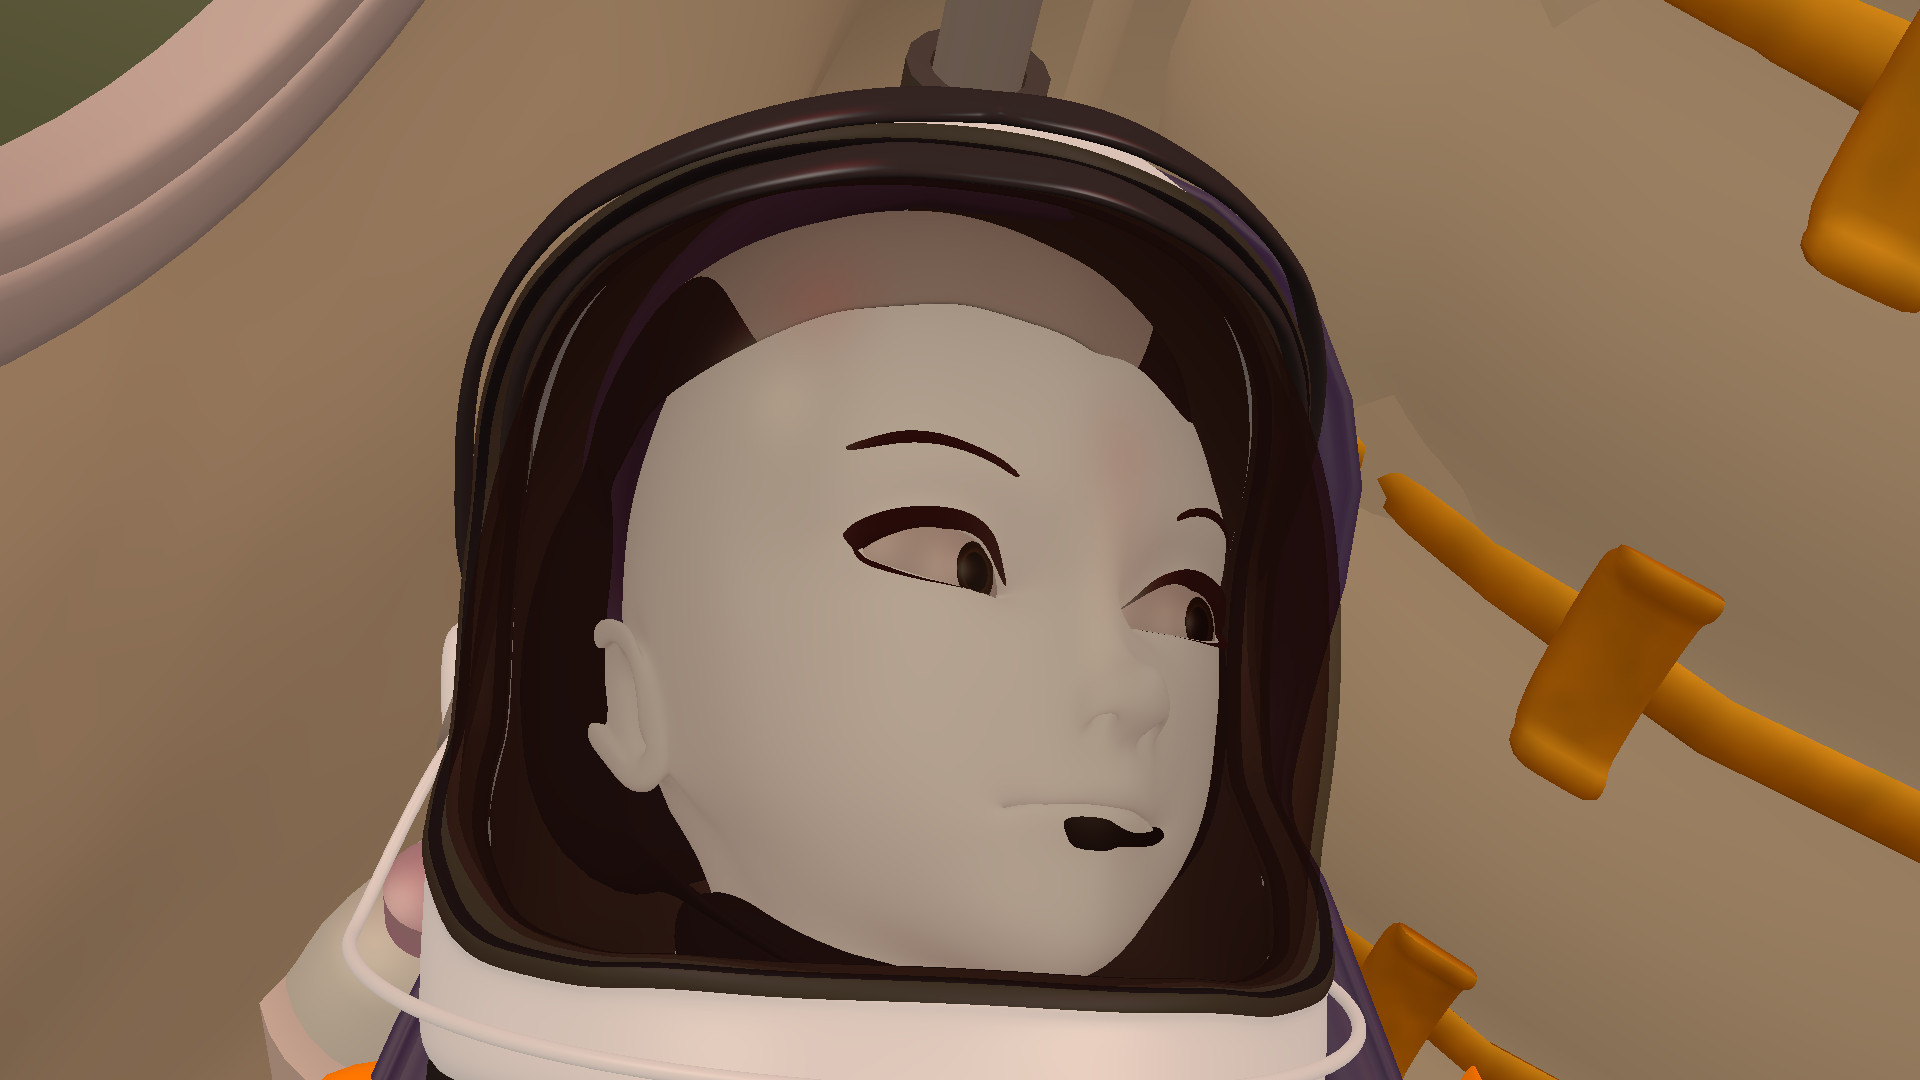
Georgiana’s comm cap, not following her head (note that the microphone is sticking through her face).
I finally dove in to the character model files and fixed this — now the caps are back to following the characters’ heads, while the helmet is correctly staying with their shoulders (which is pretty close to how it really works).
Also: this view of Hiromi’s face was not in my original storyboards or animatic, but I’m reworking the sequence. It had some serious pacing issues towards the end, which I hope this will help with. I also just feel that Hiromi hasn’t gotten quite enough screentime yet, as this episode is just as much her story as Georgiana’s.
It was a useful learning experience for me, as I haven’t done much with weight-painting or skinning armatures and it always kind of seemed like “black magic” to me. But I think I understand it much better, now.
I now have a long list of minor fixes like this that we need to do before we go into rendering. They’ve been relatively low priority, because they didn’t affect blocking or most of the animation, but as we are getting close to “render ready”, it’s time to start cleaning these things up.
Jun 30, 2019 at 4:00 PM
Nice NPR Shader Example in Eevee
I know that, sometime soon, we’re going to have to switch to Blender 2.8, and therefore go from the Blender Internal renderer to Eevee. But I’m concerned about, first of all, breaking a lot of the work we’ve already done, and secondly, making a disruptive change to the visual “look” of our project.
I don’t want to do it in the middle of an episode. So, I’m going to have to not only figure out how to convert models so the change isn’t distracting, and also figure out just when I’m going to switch.
Probably the best is to finish episodes 1-3 with Blender 2.79, and then switch for episode 4, which is a new story arc — and that’s what I’ve been planning on. But I’m still thinking about what to do and when.