Steps to Animation
We’re currently working on developing our animation workflow. This is a pretty complicated problem, which is why I’ve essentially put us on hold on our release schedule until we decide what the process is going to be and how long it will take.
Three Main Workflows to Develop
We’ve talked a lot about innovative rapid-animation workflows, but for the Pilot, we are being conservative, and relying primarily on well-established Blender techniques. There are basically three workflows we need to develop:
- Key Framed Armature Animation
- Action Editor / Non-Linear Action Editor Method
- Lipsync and Expressions Workflow
Although these will interact in any given scene, these are essentially separate workflows we need to develop.
Key Framed Armature Animation
This is the most familiar approach, which involves manipulating character armatures to move characters’ bodies. It’s the one we need to use whenever we are developing unique or new motions for the character. It also allows for greater flexibility, since there are very few constraints on movement.
However, it is a very tedious process which involves making very subtle changes to key frames (frames chosen to represent targets for motion — afterward, Blender computes the in-between positions for us). So it offers the highest quality, but is slowest to do.
Status?
Keneisha Perry and Terry Hancock both have done tests of this kind of animation, and we are gradually learning to do it. However, it should be noted that we don’t really have an experienced 3D animator on the project! So we are a couple of rookies trying to do what the pros do.
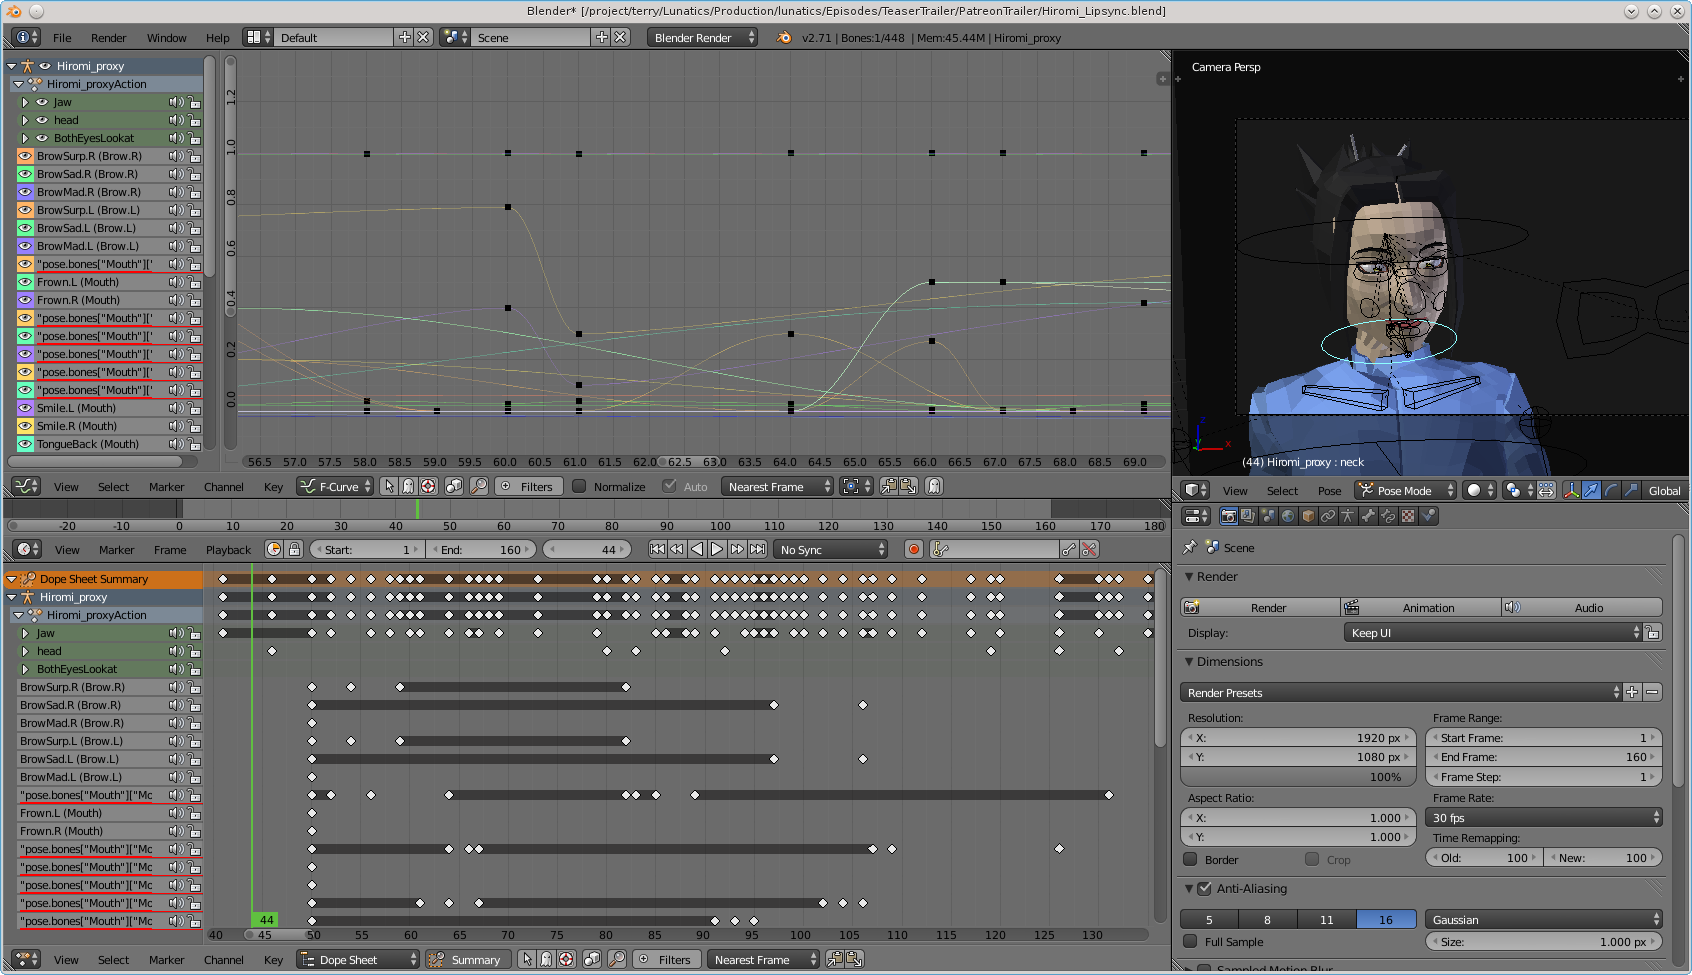
Terry did the lip-sync and facial animation of Hiromi in the Patreon preview, as well as the animation of Georgiana in the train sequence, mostly using this approach (but see also the next section on NLA workflow). Keneisha Perry has been mostly working with this approach to create several short animation tests, like the one you see here. We’re still very much in the learning process, and are not really ready to do production animation yet.
It’s clear that we will be able to learn the animation skills, but it’s not clear how long it is going to take us. Some of the problem is that it’s a very subjective thing to evaluate. When you get it right, you just sort of “know” — it “pops”. But before that comes a lot of lukewarm dabbling in the uncanny-valley.
Action Editor / Non-Linear Action Editor Method
This is a method of animation that is common in games and game design, and allows for a more automated process, once a library has been created.
This method allows us to create common motions for characters in a way that can be relocated to different situations. Examples of this include cyclic animations: walk cycle, run cycle, skip cycle, etc. We may also create set-pieces to be reused, if we have a character frequently doing certain motions.
Because we are defining our characters with standardized armatures, including bone and bone property names, we can actually copy actions from one character to another, although in many cases, we’ll need to tweak them further to fit the character better.
This method does not allow for the full range of motion or flexibility of key-framed animation, but it should allow us to do simple animations quickly. It is similar to the concept of “Machinima-like” animation that I referred to in some of my earlier articles, and it is fortunately, built into Blender already.
Status?
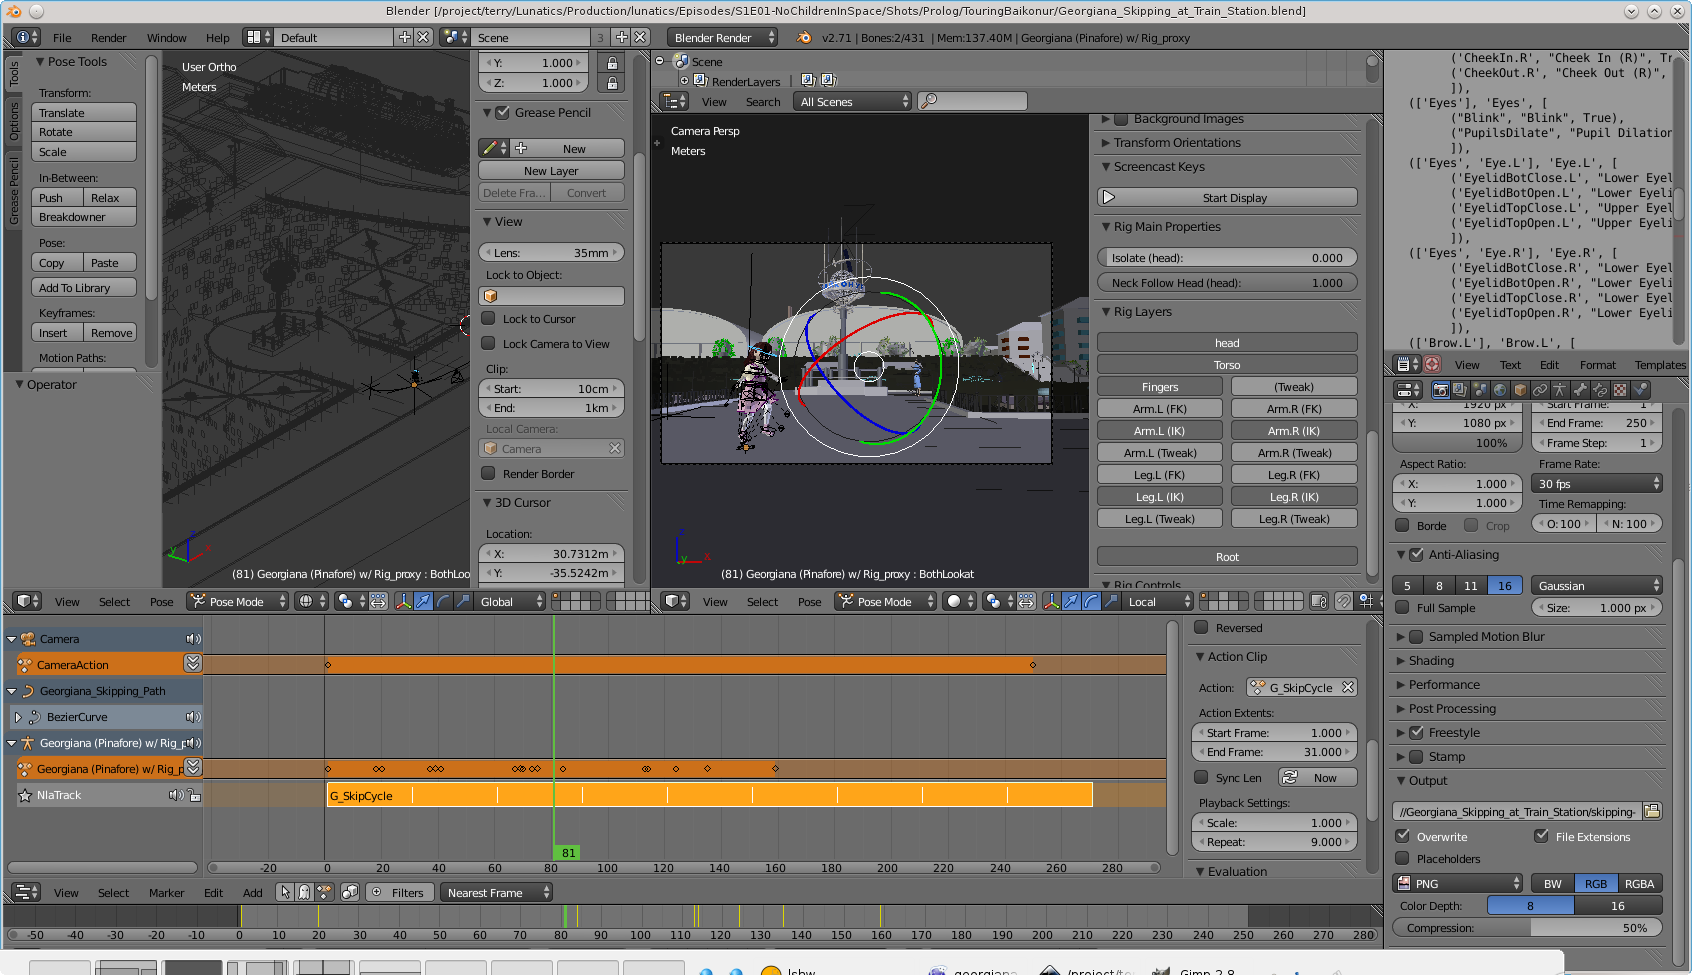
Terry Hancock used this approach to create the skip cycle that appears in the Patreon preview. It’s a tricky thing to get it to look right, as it can seem a bit mechanical. The process of combining actions in the NLA editor can be tricky, and the options are a bit limiting — nowhere near the complex options that we get with other compositing tasks in Blender. There are work-arounds that allow for fairly sophisticated tricks, but it will take a lot of time to get comfortable with these.
The relationship between the various animation panels in Blender (Timeline, Dope Sheet, Graph Editor, Action Editor, and Non-Linear Action (NLA) Editor) is quite complex, though, and none of us fully understands it yet. This is an area we need to train further on in order to be able to keep up.
Cyclic animation test of Georgiana skipping, created by Terry Hancock with the Action Editor and NLA Editor. This cycle was also used for the skipping shot in the Patreon trailer, although additional head and body motions were overlaid on it using the NLA Editor.
Lip-Sync and Expressions Workflow
Finally, we have a system for animating close-up shots of our characters’ faces, which are going to be some of the most import shots for “selling” the character animation as believable to the audience. This is a tricky business, because people are very sensitive to wrong movement, and even with our somewhat stylized characters and NPR rendering, we’re still skirting the “uncanny valley” with our facial animation.
We hope that, to some degree, people will simply get used to the animation style, and they’ll hopefully warm up to it, even if it seems a little uncanny at first. But we also want to do this as well as we can manage.
One of the rapid animation helpers we’ll be using is “Papagayo” (described in last month’s newsletter), which allows us to mark up recorded lines and generate a sequence of phoneme targets to animate to.
We’ll then be importing the resulting sequence into Blender using a special script, which translates the phonemes into character poses (of the mouth) using a pose library defined for the character.
After this, of course, we’ll use the facial rig UI control sliders to adjust expression to match the conversation. The result should be similar in quality to the brief snippet of lip-sync for Hiromi in our preview trailer — except that it will go much faster with the help of Papagayo, and possibly be a bit more accurate, because we’ve improved the rig slightly since then.
Status?
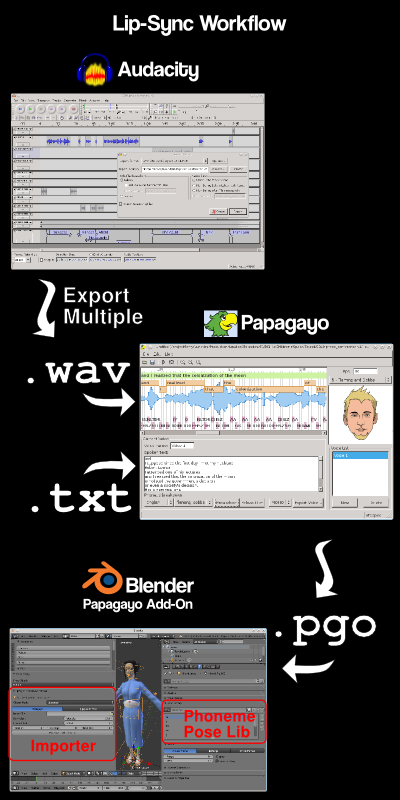
We are just getting started. We’ve tested exporting line audio in WAV format, importing the WAVs and text into Papagayo, and generating PGO files from them. We’ve created phoneme pose libraries. And we’ve installed the Papagayo-Blender extension, but have not yet attempted to use it. Clearly we need to do full cycle tests of this technique. Also, we will probably need to learn to do the WAV line output from Ardour as well as Audacity, since we’ll moving more of our audio workflow to it.
Lipsync Workflow (right): From the Audacity audio mix (later we will probably be using Ardour for this part), we label the voice tracks to export, then “export multiple” to create WAV files to annotate. These are loaded one by one into Papagayo; the text for the line is typed in; and then the phonemes are fitted to the sound. The cartoon head or mouth gives us a preview of the voice match. In the future, we might create our own preview faces for this. Then the Papagayo output file is exported (PGO file) and then imported into the Papagayo-Blender add-on in Blender, where it will be used to drive speech through the character rig’s “Phoneme” pose library.
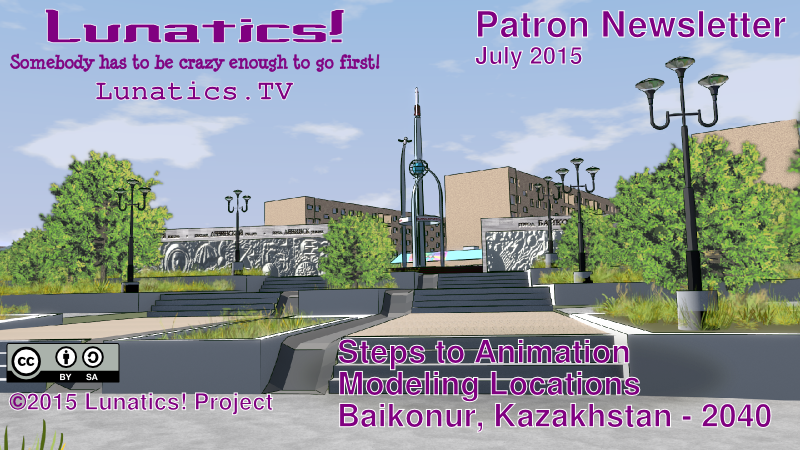
Modeling Locations
One of the challenges on this project has been modeling places we’ve never been. I have never visited Baikonur, or any place in Kazakhstan, and so I’ve been having to meticulously reconstruct locations from available photography. What’s more, there isn’t much of it!
The Russian space program has never been well-photographed, owing perhaps to its secret military origins in the Cold War, or simply due to different attitudes of Russian engineers and planners about their program. Whatever the reason, good pictures have always been scarce. In all honesty, the challenge of this was one reason to set our story there — as serious space geeks, it’s enjoyable research.
But it does mean reconstructing locations on the basis of online satellite imagery and tourist photos. We’re at the mercy of what’s available, since we can’t afford to send a photographer there to scout the place out. No doubt there will be some errors in our models, and the only excuse I can give for that is, “Hey, it’s 2040, it might have changed!”
However, since Toronto frequently plays New York and Utah frequently plays Texas in movies, perhaps we’ll get some slack!
Techniques for Modeling from Satellite Imagery and Photographs
This is a tedious, but not necessarily hard process, and I want to share some of the process we use to do it.
First of all, the key thing is to get a plan view and accurate scale. The satellite imagery is usually the best way to do this, although the resolution can be frustratingly poor. But it is very close to being an orthographic view, and a plan for the set can be created in Inkscape, and then exported to a “plain” SVG format for import into Blender.
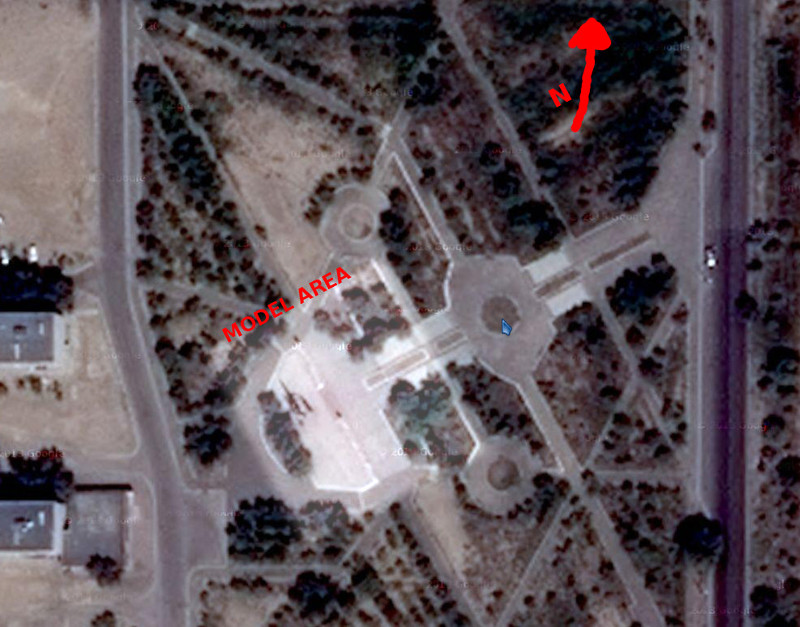
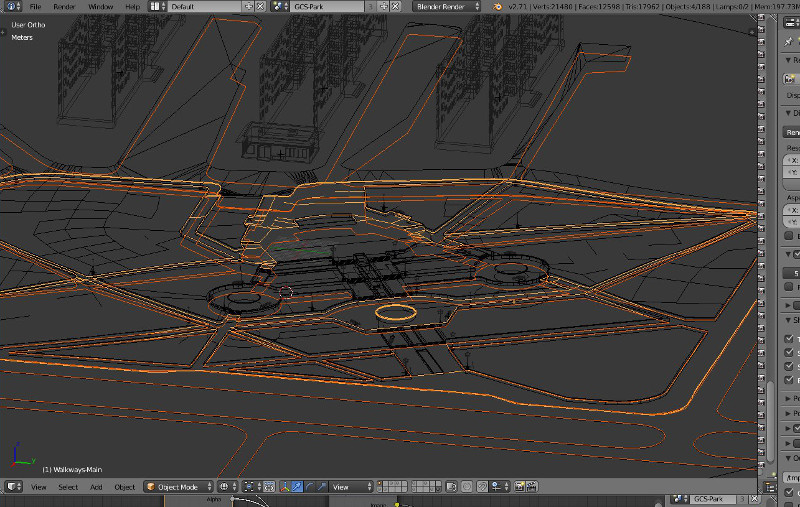
Exporting maps of roads and other plan structures as SVG is very helpful, because, unlike background image references, the SVG curves exist in space, and can be viewed from different angles while working on the model.
I have not found the curve-to-mesh conversion in Blender to be practical in most cases, though. It’s generally easier to simply create the mesh manually, using the curve objects as a guide.
Clues for the third dimension can come from several sources. On satellite images, this can sometimes be determined from shadow lengths, or slightly oblique views in the images. This can a practical way to estimate the height of buildings, for example.
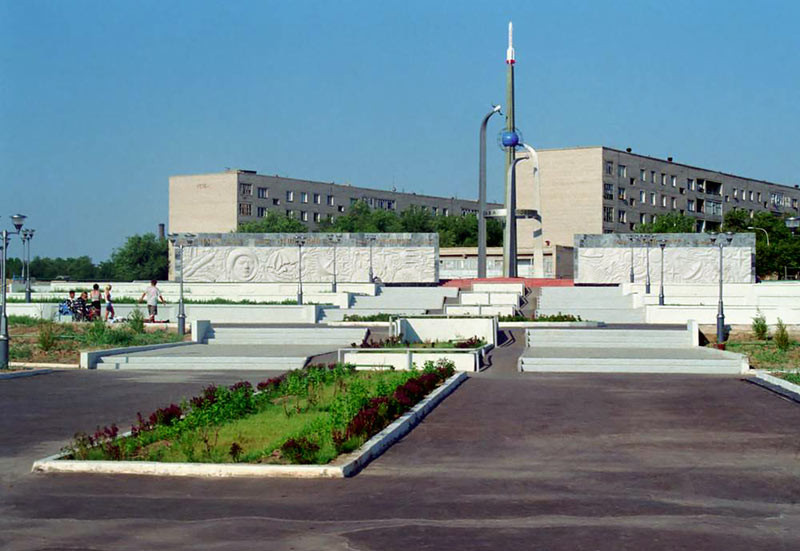
But for the most part, this is where photos from the ground become useful. Common architectural features — doors, steps, floors of buildings, windows, etc — and people or animals of approximately known size, combined with a good sense of perspective projection, can be used to interpolate or extrapolate scale data in the image to approximately the correct scale.
Baikonur, Kazakhstan – 2040
Part 1 of our pilot is set in and around Baikonur, Kazakhstan in April of the year 2040. We decided on this time period mainly because it seemed like the soonest that our story could realistically be set, and we chose Baikonur because of the Soyuz launch system, and also because it is the place where the first human left to go into orbit. Today, this launchpad is called “Gagarin’s Start”.
The town of Baikonur has gone through a number of names. It used to be called “Tyuratam”, which is a Kazakh name meaning “Tore’s Tomb”, refering to a descendant of Ghengis Khan, who one presumes is buried nearby (I’ve never found out if this is really true). The site was little more than a railroad stop back in the 1950s, when the Soviet Union started developing the site in secret for their space program. The Soviets named their new development site “Baikonur” and referred to it that way in communications, partly to confuse American observers, since it also refers to a town in Kazakhstan, some 200 km away from the site. It was also briefly called “Leninsk”, after Lenin, obviously. Since the space program has long sense become the major industry for the town, it is now known by the name “Baikonur” for most purposes.
It’s a very odd town. The old city (Tyuratam) is to the West and North of the new city, which is essentially a massive complex of housing, museums, monuments, hotels, and government buildings. This complex exists to serve the Baikonur Cosmodrome, which is actually located out in the desert (or “steppe”) a few dozen kilometers to the North.
In our story, we have Hiromi and Georgiana Lerner arriving by train, which is traditional, but unusual — most people would fly in, as, despite its small size, Baikonur does have an airport.
We had a number of thematic and plot reasons for wanting to have the Lerners arrive via the train, though, and so that’s what we do.
Of course, we had to decide what Baikonur would look like in 2040. There a number of factors I looked into for this. First of all, would the Russians still control it? It is after all inside a separate country now (Kazakhstan). However, I was able to find out that Russia’s current agreement with Kazakhstan on the Baikonur site will not run out until sometime after 2040, leaving aside the possibility of renegotiation or conflict. In any case, it seems safe to assume it will still be in use, although Russia is building other launch sites.
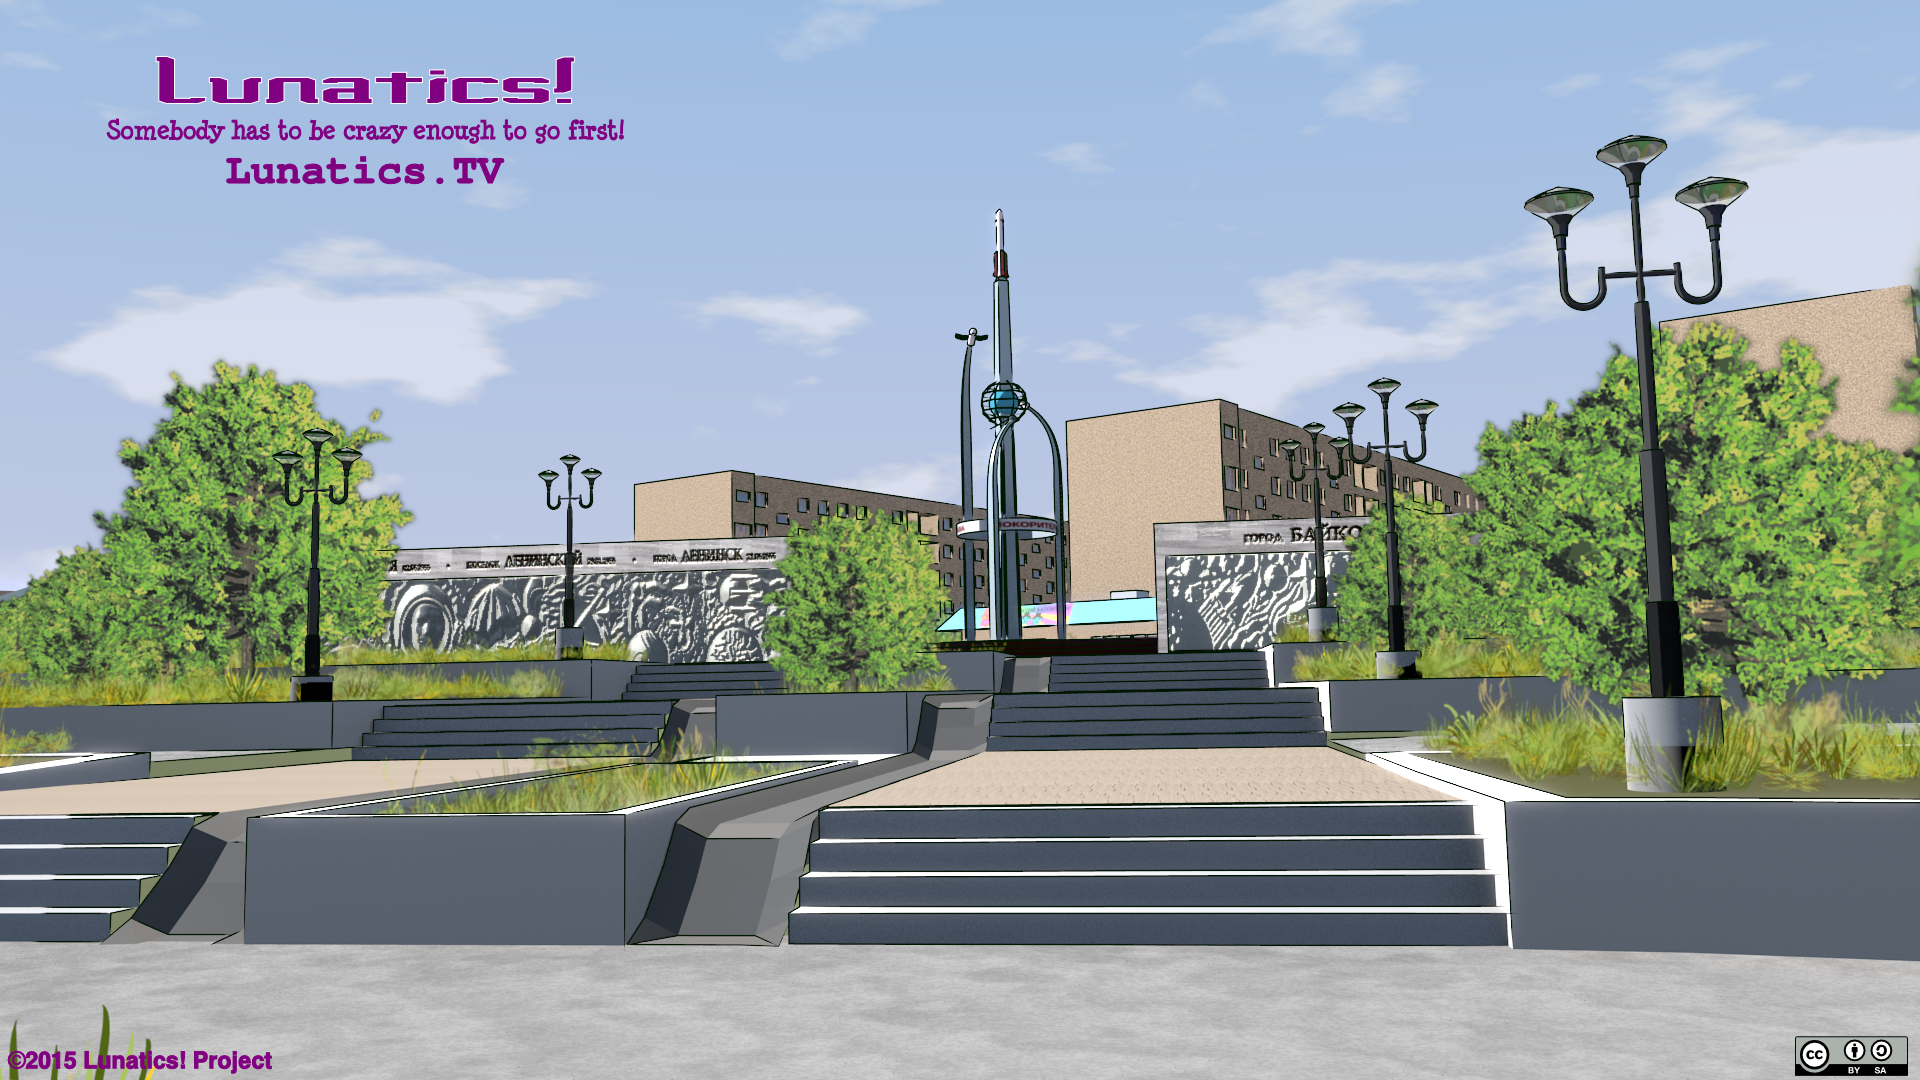
I wanted to imagine what it would be like, especially through the eyes of a little girl on her way to the Moon, to see Baikonur. It would be some of her last memories of Earth, and surely Hiromi would take her to see some sights? So, we have a montage of mother and daughter touring the town. Ideally we’d have lots of monuments on the tour, but for effort reasons, I settled on two main monument sites that I find particularly appealing. One is the “Stele to Science and Space” (SSS) and the other is the “Glory to the Conquerors of Space” (GCS) monument, right on the Northeast edge of the town, overlooking the river valley. The GCS monument is exciting visually, as it includes a large bas relief wall in addition to the “stele” or spire.
Other News
After taking a hard look at our progress on animation tests, I decided to simply abandon our plans of doing any episode releases this Summer. I’m still holding out hope to release all three parts of “No Children in Space” before the year is out, but I don’t feel I can make promises until we get our animation workflow worked out and do enough tests to make projections.
Another factor in this decision is purely technological: our render times are running from 2 to 10 minutes per frame on the hardware I have available. To do a 10 minute “part” episode at this rate will take from 25 to 125 DAYS to render. And of course, this is only considering the final render. In practice, we have to make a lot of guide renders to work with the animation. We have to turn off a lot of the effects (particularly Freestyle “ink” rendering) and/or render at low framerates to get these guides done. Poor guide renders typically will reduce the amount of tweaking we can do to get the animation right.
We essentially have three options for rendering:
- We can rely on free “render farm” rendering (such as renderfarm.fi). But this would be exploiting a free public service, ostensibly for commercial use. There are ethical (and therefore also political) aspects to that kind of choice. Even if these services don’t have rules to prevent this kind of use, our using them might be enough load to make them reconsider. I’m very hesitant to attempt this approach, unless the provider is specifically backing our project.
- We can rent compute server time from a hosting service, such as Amazon Cloud Services. This would, of course, cost a significant amount of money — about $3000 to $4000 for all of the rendering in the pilot episode. The server software would have to be installed and configured for this by us. And the worst thing is, at the end, we’d still have nothing — the next episode would cost us the same amount in rentals.
- We can build dedicated render cluster hardware. Because I have some skills in this area, and because we have a very specific set of requirements, I can do this very cheaply — also for about $3000 to $4000 for the pilot episode. The numbers are about an even split with the money for the rented server approach. The big difference is, once we do one episode, the next one is much cheaper (basically we’re just paying for the electricity consumed after the first setup.
It’s mainly the investment in a permanent capital asset that makes building a dedicated cluster desirable. Faster computers may come along, but having a dedicated cluster would mean having a reliable means to keep cranking out shots. It would also mean that we could freely choose if and when to upgrade the render cluster software, which would reduce the complexity for us.
On the other hand, the dedicated render cluster would have to be on our site, which means a relatively poor internet connection — it might be hard for anyone but me to actually use it to render. However, if we set up a proper auto-build system (possibly using Renderchan), it should be possible to keep a local copy synchronized with the server, trigger builds locally, and then mirror the results back up to the server, within the limits of our office site’s asymmetric DSL connection.
Since we don’t yet have enough funds raised to pay for either compute server time on the cloud, or building a local dedicated render cluster, this is still going to be a handicap on the project. I’m currently considering what sort of options we might be able to find for financing or getting equipment donated to our project.
Nevertheless, we are continuing to make excellent progress on modeling of both sets and characters for the pilot. We are down to making tweaks and checking for overlooked assets for “Part 1”. We’re also now working on models for “Part 2” and “Part 3” in parallel.
