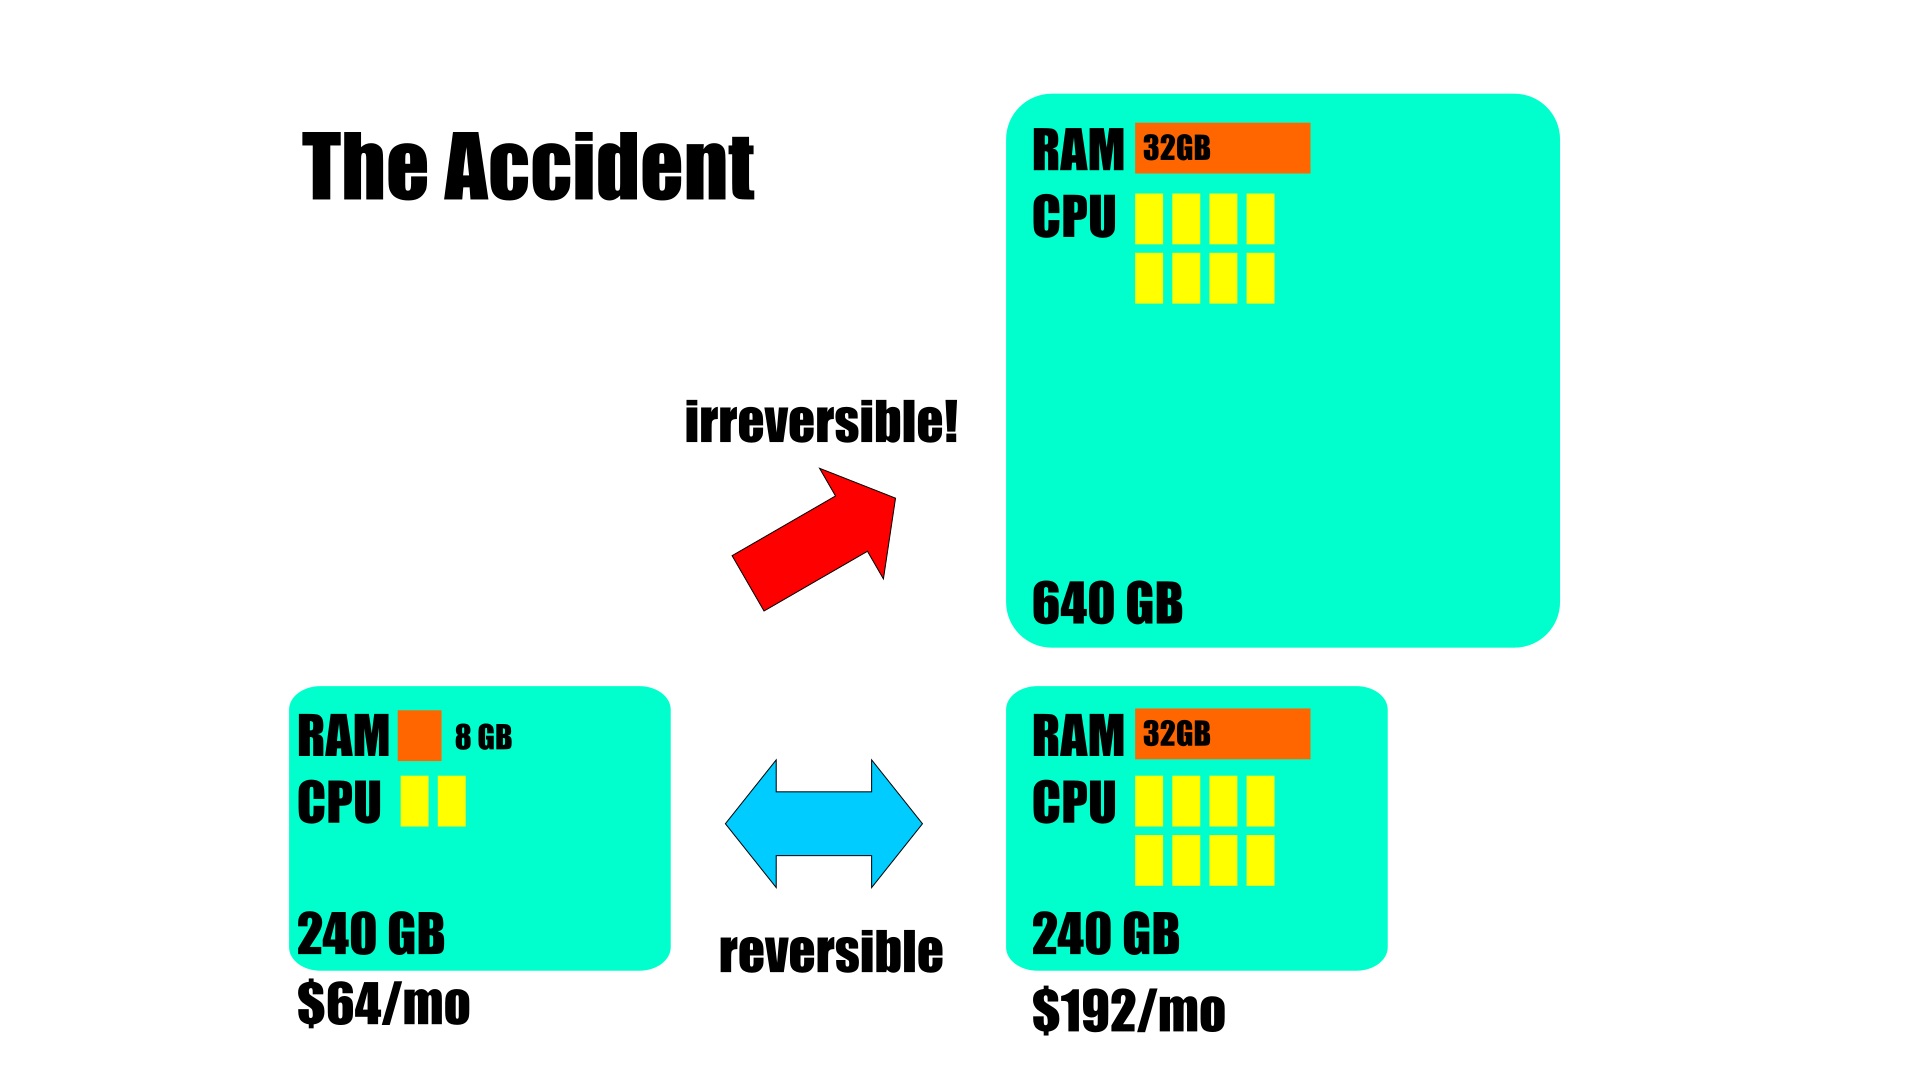
In July 2026, I made a small, but expensive, mistake: I resized my Digital Ocean “droplet” VPS that was hosting our YunoHost-based Virtual Studio platform (which supports this WordPress Production Log, the FilmFreedom PeerTube, our Lunatics Project Pixelfed, and our FilmFreedom Misskey fediverse instance) to accommodate more CPU and RAM to support re-uploading and transcoding a large number of broken videos on the PeerTube site. In so doing, I was supposed to choose the “reversible” option of increasing the RAM and CPU, but not the filesystem. For their own reasons, Digital Ocean does not allow reducing the size of a droplet’s filesystem, even when the extra space is not needed for the system (they make it sound like this is impossible, but I know that tools do exist for shrinking filesystems, so I think they are really doing this to ratchet people up to larger, more expensive services — but in the end it doesn’t matter. That’s their policy and they’re not going to change it for me).
However, I accidentally checked the wrong box during the resize, and could not take it back (or if you prefer, my mistake was not making a snapshot of the smaller system before doing the resize — either way, I missed a step and got irreversibly moved to a larger VPS). The cost went from $64/mo to $192/mo. For me, that’s a lot of money. I definitely could not afford to keep paying that indefinitely.
I have now recovered from this incident, about a month and $200 or so later. So I want to document the process.
False Starts
I made a few false starts on this process, which I want to point out mainly as missteps to avoid in future.
Restore New Droplet from Snapshot of Larger Droplet ✘
I really thought this was possible. The system would definitely fit in a smaller filesystem, and I had assumed the filesystem would be rebuilt as part of restoring the snapshot. However the Digital Ocean tool for creating a new droplet from a snapshot simply does not allow any smaller filesystem to be chosen, just as it doesn’t allow downsizing. Infuriating. But too bad.
Create Fresh Droplet and Copy Entire System ✘
I don’t know for sure that this wouldn’t work, but it does seem pretty fussy. I would have to create a new droplet, and the new system would be at least Debian 13. Digital Ocean no longer provides an image for Debian 12 (or earlier), which is what YunoHost 12 still requires (there is a YunoHost 13 project in beta, but it is not ready, despite Debian 13 being out for over a year now. It’s a volunteer open source project, and not that large, so that’s how it goes.
YunoHost does mention this as a possible migration strategy, though, and does point to:
https://www.man42.net/blog/2017/07/how-to-migrate-a-debian-server/
for instructions.
I chose not to pursue this for several reasons. One is that I think there is much that could go wrong. Another is that I would have to start with a later Debian and do a downgrade, which seems dangerous. And another is that it’s not really a good way to move to a system with any configuration changes. Ideally, it would be nicer to use a method that could be used more generally for migrating the system to an entire new platform, for example.
Create Fresh YunoHost Platform and Migrate by Backup/Restore System ✘
Digital Ocean does not have a Debian 12 image available anymore! So I would again be back to having to install Debian 13 and then forcibly downgrade it by copying a Debian 12 system onto it (or something). Ugly!
However, this is close to the solution I did choose:
Create YunoHost Platform from Earlier Snapshot, Upgrade, and Migrate by Backup/Restore ✔
This is the approach that ultimately worked, which I will detail in the next section.
YunoHost Server Migration Process
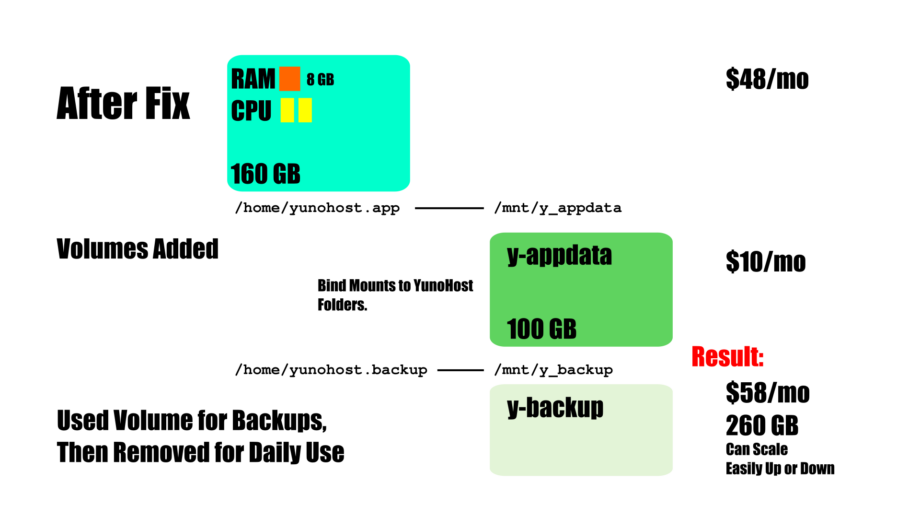
After discovering that Digital Ocean did not provide a Debian 12 image to start from, I was relieved to find that I did still have a post-install snapshot of a bare YunoHost 12.1.35 system from 2025. The filesystem for this one was at 160GB, and a droplet based on this is $48/mo. This is manageable, and probably, I couldn’t really do with a smaller filesystem, anyway. So it’s a good starting point.
The basic procedure is fairly simple, so I will summarize that first:
Create Droplet from YunoHost 12.1.35 Snapshot
I created this in the same San Francisco datacenter as the other “oversize” Virtual Studio droplet (I’ll be calling this the “old server”, from now on). At this point, it would be good to take note of the IP address assigned to the new droplet and also the one the old server is using. At Digital Ocean, they also list a private IP that is used within the data center. This can be useful for transferring data between the machines, since it’s presumably faster to transfer within the same datacenter.
The snapshot was of a server with a 160GB filesystem, which limits what size droplet I can create to anything larger than that. This is actually a little bit small for my needs, but there is a useful trick to avoid the trap of an oversized server.
Create Volume Storages Attached to New Server Droplet
Volume storage is cheaper than the equivalent space added to the droplet’s main filesystem. It also can be removed rather easily. It won’t let you downsize these either, but it’s much easier to copy static data onto a replacement volume than to copy a working server with dynamic and address-specific control files on it.
I made two, corresponding to two major divisions that YunoHost provides: the “app data” folder and the “backup” folder.
I used the default Digital Ocean setup to mount these under /mnt/y_appdata and /mnt/y_backup, respectively.
I then set up a “bind mount” in the /etc/fstab to map these onto the /home/yunohost.app and /home/yunohost.backup folders. If you’ve been following me for long enough, you might remember that I did something like this before and ran into trouble. That was because I simply used a symbolic link to remap the storage. That does not work, because YunoHost can see that it’s a link, and it dereferences it. The bind mount works at a lower level in the operating system and does not show up to YunoHost — or so I have been told. Anyway, I have the expectation that this will work much better than before.
I kept the “y_appdata” volume indefinitely. I used the “y_backup” volume during the migration and then removed it to save money.
Upgrade the New Server to Latest Version
I’m not absolutely certain this step is necessary, as the system restore may do this, but I don’t think it hurts.
Upgrade the Old Server to Latest Version
Hopefully, this means both new and old server are running the same version of YunoHost. As we will see later, this may not be 100% true.
Backup YunoHost System and All Apps on Old Server
Although YunoHost will let you easily make one massive backup, I like to do mine in sections, so the archives can be handled separately for different apps. Typically I do a breakdown like this:
- YunoHost System (~110 MB)
- Utility Apps (Currently includes Adminer, RoundCube, and Squid) (~ 60 MB)
- Pixelfed (~ 5 GB)
- Misskey (~ 4 GB)
- WordPress (~ 20 GB)
- PeerTube (~ 60 GB)
I.e. one backup archive for each major platform application, plus one for small utilities, plus the system backup. Since the old server is very oversized, the disk space requirement was not really much concern for making the backups, but it will be trickier on the smaller new server.
Update DNS Settings
Before the outside world can see the new server instead of the old one, you will need to update the DNS settings on your registry. In my case, I have domains on two different registries: One is “Name.com” and the other is part of my “Rose Hosting” service. It’s necessary to change the “A” records to match the IP address of the new server. Notice also that the records have a “TTL” (“time to live”) setting which determines (in seconds) how frequently the record needs to be checked with the DNS. This is a rough estimate of how much “settling time” you need to give the DNS system to update where domains are located.
Note that even after you have changed this, you can still log into the old server by simply using its IP address. This can be useful to do anyway when you are working with two very similar systems, since it’s easy to get confused about which is which if you don’t call them by their IP addresses.
Once you change over the domain used for the YunoHost server’s through-the-web UI, you will of course lose web access to the controls for the old server. But you can still do things with the CLI interface (the “yunohost” command) through the terminal. It is possible to do backups, restores, and upgrades all using this interface. In fact, in some cases, it offers you more options.
Restore System Backup on New Server
Installing this will update all the domains and users that were on the old YunoHost site. I’m less clear on whether this upgrades the software. It may do that. But it will be necessary to reboot after this step to see if the new version is being used. Also, this can be subject to breakage, particularly if there have been a lot of intermediate versions. In particular, I have found that the “Sury” repository YunoHost uses for PHP support often needs to have a security key updated before it will work (see “Problems” below for details).
Note that the Let’s Encrypt certificates will most likely all be out of date on the domains. It will be necessary to run the “Diagnostics” tool and then update each of the certificates individually. You can do this through the web interface, or from the command line with the “yunohost” command (type “man yunohost” for details of all the subcommands and options. You can also check the documentation pages on yunohost.org for more detail and usage).
Restore the Utilities and Apps
Next, install the utilities app bundle, and then each of the major apps individually. Each of these is an opportunity for some other things to go wrong, so you’ll need to be on the lookout for that. I will document the specific problems I had in the next section.
Problems and Solutions (and Workarounds)
My first attempt at the restore ultimately failed. I created a 240 GB droplet based on the 160 GB YunoHost 12.1.35 snapshot, but I ran out of space on it during the process, and then I decided I needed to start over again. And it was with this second try that I came up with the idea of going back to using volumes to manage the space requirements. So on this second try, I left the base droplet at the original 160 GB, but then added extra volume storages: one for the /home/yunohost.app folder (used for extended storage for some apps: currently the main use is the locally-stored videos for PeerTube. It is also used by Nextcloud for file shares), and one for the /home/yunohost.backup folder, which is where backup archives are kept.
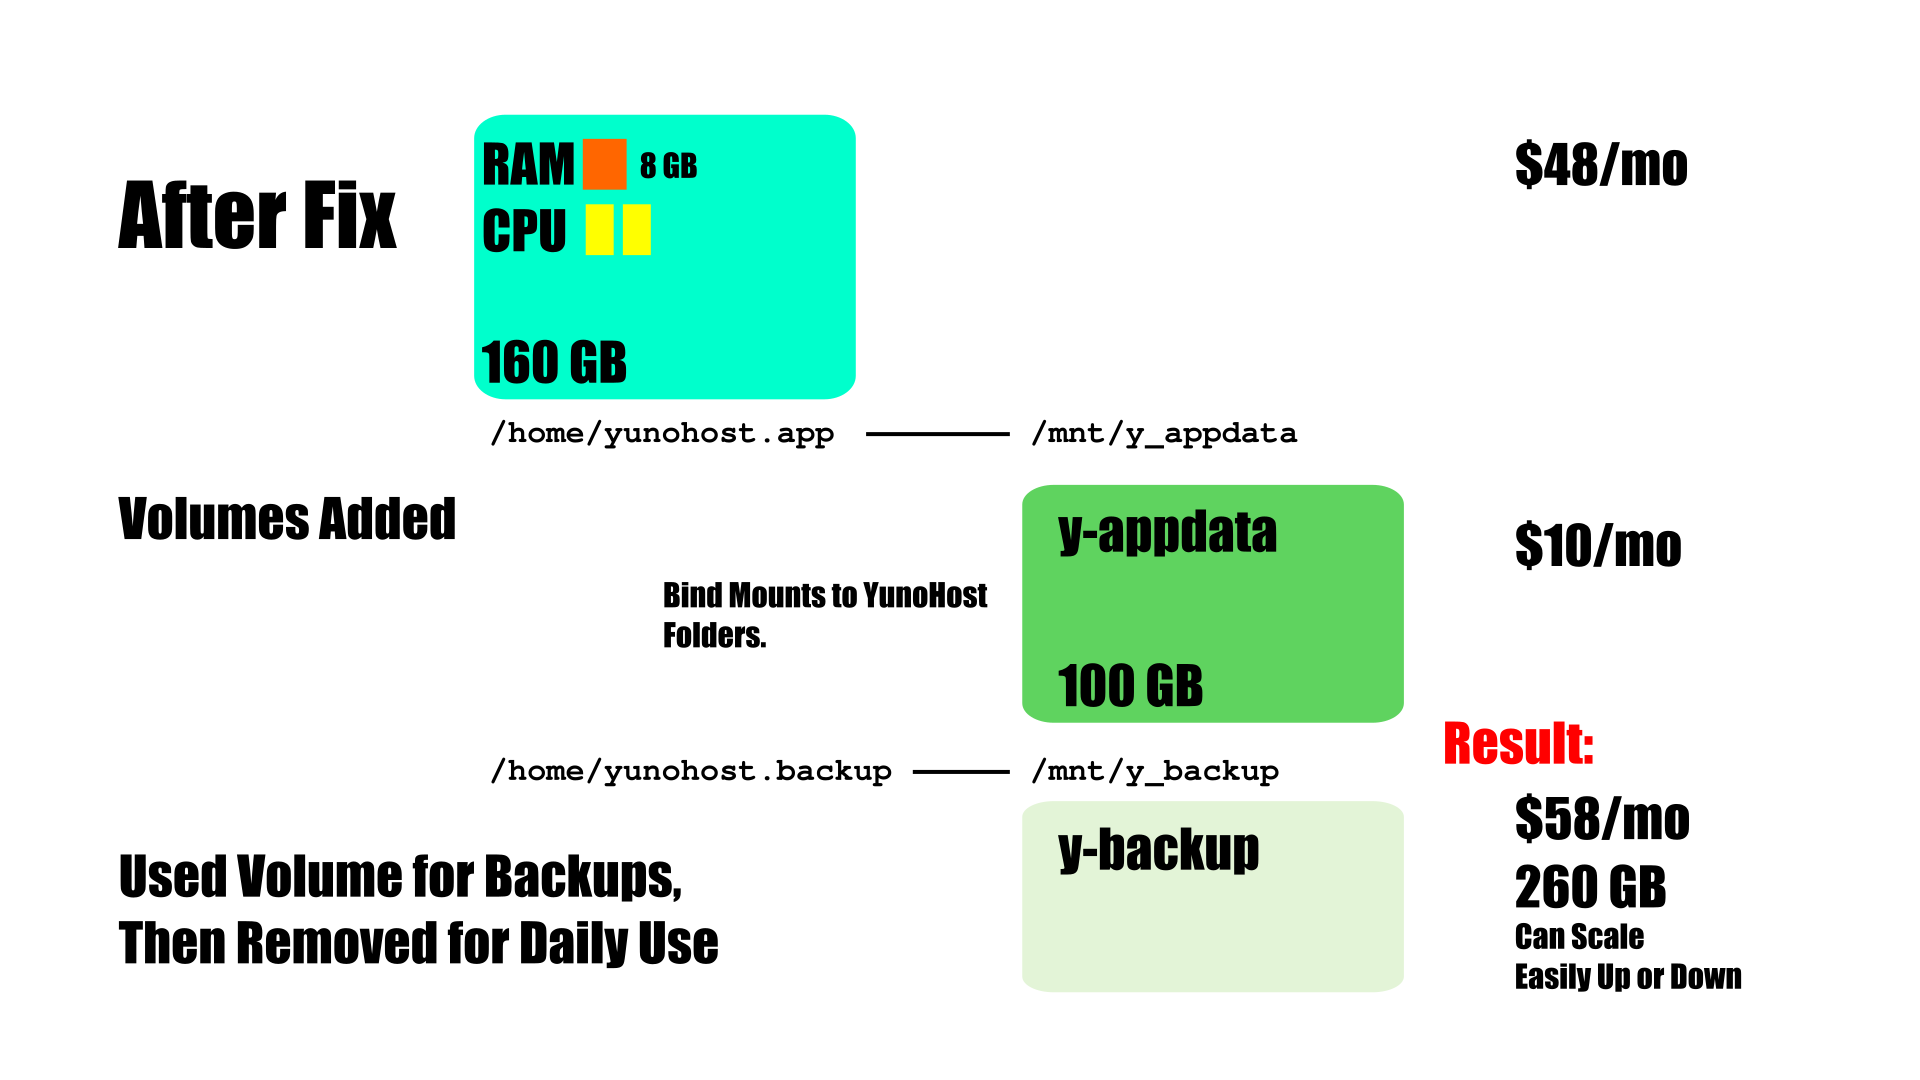
After the process was finished, I eliminated the backup volume to save on monthly expenses (after copying backups to local, on-site storage).
A key difference between my earlier version of this concept and the current one is that I used bind mounts to assign the locations for the two folders, rather than replacing them with symlinks, as I had done before. This was advice I got when I first ran into problems with the symlink arrangement, as bind mounts are apparently more invisible to the application.
The problem with using symlinks is that YunoHost’s backup system sees them. When I backed up my PeerTube system with the symlink arrangement, it dutifully copied the true location of the PeerTube videos (i.e. it dereferenced the symlink), and so when I restored it, it tried to put them in the same place. Which was not what I wanted!
This time, I hope I have resolved this issue, although I suppose I haven’t actually tested that it works, yet.
Node.js Problems
For both Misskey and PeerTube, I ran into problems due to incorrect Node.js versions. I don’t know if it was just bad timing or what, but the newly installed YunoHost on the new VPS did not get the same versions of Node.js installed as the old one. The backed up copy of Misskey relied on a previous version, and so it would not run after installation. I did a lot of testing and checking the logs to figure out what was happening, but ultimately tracked it down to the systemd module for Misskey referencing the wrong version. I ultimately hacked the misskey.service file to reference the correct node.js distribution.
PeerTube simply failed to install, for what seems to be the same reason: it detects a node.js mismatch; fails to install; and then uninstalls itself. I guess, technically, this might be considered better than what Misskey did, since it detects the problem during installation. Interestingly, it is not the same Node.js version that Misskey relies on (24, versus 22). But just like it, it was relying on a slightly earlier bug-patch release version. The newer YunoHost got the updated one, deleted the old one, thus breaking the app.
Probably, the YunoHost Backup Restore scripts should figure this out and trigger an automatic migration, but it doesn’t happen.
I was prepared to hack the PeerTube archive to fix the systemd service file inside of it. I found this as a work-around listed for similar problems.
But as it happened, there was a minor upgrade to the PeerTube app released during the process. When I upgraded the old server and then backed up PeerTube, it apparently incorporated the updated Node.js. When I restored this version on the new server, it just worked.
Misskey Drive Storage Problem
For awhile after the migration, I had failures with uploading images to Misskey’s user “drives”. This really stores data in the /var/www/misskey/files folder on the server, so it is necessary to make sure that folder has adequate permissions.
However, that does not fix the current problem. In a recent upgrade to Misskey’s YunoHost app, there was a security change that broke the access to the files folder, due to a process failing a security check. Modifications had to be made to the systemd. Fortunately, Issue 218 on the bug tracker for the Misskey YunoHost App provides a work-around:
Create a systemd override file at
/etc/systemd/system/misskey.service.d/override.conf:[Service] PrivateTmp=no ProtectSystem=no SystemCallFilter= SystemCallArchitectures=And ensure the files directory has correct permissions:
chmod 755 /var/www/misskey/files
chown -R misskey:misskey /var/www/misskey/files
I did this, and it solved my problem. So at this point, both Misskey and PeerTube are working correctly.
Snapshots and Cleanup
Now that I have a fully-working Virtual Studio base, I made a droplet snapshot on Digital Ocean. I also backed up the volume storage. Naturally, I shut down and deleted the over-sized server that was costing so much to keep running.
Afterwards I combed through the droplet snapshots I had left and deleted all the unnecessary intermediate steps.
I did keep an early snapshot of YunoHost, because it includes Debian 12. Digital Ocean no longer supports this — they only list an image for Debian 13 “Trixie”. Which is fine for many purposes, but YunoHost does not have a version compatible with Debian 13 yet. So I have to use Debian 12 until that changes!

This was kind of an expensive mistake. I felt pretty bad about it. But I was particularly stressed when I couldn’t figure out how to get it migrated, while the bills were racking up. I think I blew about $200 with this mistake (the oversize server was up for about a month total, I think). I am fairly disappointed with the inability to downsize a filesystem on Digital Ocean. I know that it is technically possible to downsize a Linux filesystem, so this is clearly a business choice on their part.
Yet another reason to move the server to colocation, but I still have a lot of work to do to make that happen.
Eliminated Object Storage
I eliminated object storage from my setup. There was extra overhead involved in keeping it working, and separate services to pay for. Of course, it was cheaper than local storage on Digital Ocean, but at a cost of complexity. This was the reason for the 140 broken PeerTube videos, requiring the workaround of re-uploading them, breaking links to the originals, and yet more complexity (I still have not searched for all the bad references in the Production Log: there must be many bad links or video embeds now).
I had been using two different object storage providers: Backblaze (“B2”) and Amazon (“S3”).
Part of the reason I had problems was that I had gotten locked out of my Amazon Web Services account due to a policy change, which required me to setup Multi-Factor Authentication (MFA — note the escalation past “2FA”. This bodes ill for the future!). I didn’t know how to do this, and I was under the impression that there was no free or open way to get past this.
It turns out that this is not true. The Debian distribution has a package that works fine for the “TOTP Authenticator App” option, called “otpclient“. This is a small GTK app that provides a simple authenticator that is fully open source, that I can just run on my workstation. No dependency on Android or any other non-free software. It took me quite awhile to discover this, but in September, I installed the package; got past the challenge to log into my AWS account; and then proceeded to shut it down and close my account.
I emptied all the object storage buckets on Backblaze, but I kept that account open. If I decide to use object storage again, I will probably use Backblaze. They have been a lot less hassle.
 Share this post on social media.