Starting Principle Animation
After many months of preparing library assets we are finally starting to get all the materials together for animating. This is really exciting for me as the director and as the principal animator for the pilot, because this is where I get to do a lot more hands-on work.
Shot 01-01-01
There actually were a few shots that were already in a more-or-less final state, which includes shot “01-01-01”. This is the “cosmic zoom” shot that goes from the Moon to the Earth, which you can see at the beginning of the “No Children in Space” animatic on YouTube. I plan to do some tweaking on that shot before calling it final, specifically:
- I want to orient the initial view of the Moon to more closely match the Moon in the Lunatics medallion logo — this way it will fade more smoothly into it. The idea is a bit like the beginning of “Raiders of the Lost Ark” where the Paramount logo mountain becomes a “real” mountain in the opening scene of the movie.
- Since we are using a more “non-photorealistic” style in our production, I’m going to try running an “oil paint” filter over the Earth and Moon color textures to see if maybe that looks better/more-consistent with the rest of our style — I’m undecided on this at the moment.
- Finally, the camera track may be a little uneven, and I’ll try to smooth it out more.
Shot 01-02-01: Artistic Goals
However, the first shot I’m working on is “01-02-01” — which is the next shot in sequence, where the Earth dissolves into the wheel of a train, which then pans to Georgiana’s face on the train. This is one of the more complex shots in the episode, and it’s one I’ve been planning for about four years now.
The shot is meant introduce some thematic content for the episode: the ongoing visual theme of circles, rotation, and mechanisms representing the story theme of the massive technological juggernaut that has to be set into motion to accomplish the seemingly simple task of carrying a seven-year-old girl to the Moon. The centered composition at the beginning of the shot (matching the end of shot 01-01-01) is meant to emphasize this formal, mechanical aspect, while the final “thirds” composition with the character “Georgiana” brings in a more natural, human feeling.
It’s also a long moving shot — about a minute long by my present estimation. This is another theme in the episode, which is about continuity. And it’s something we can do more easily because we’re working with 3D models rather than 2D cels.
Finally, of course, we also have the ongoing visual theme of reflections, and the observation and interpretation of reality. In the pilot, we are largely viewing things through the point of view of a child, and so it’s important to reveal the world as she perceives it, as well as to reveal the adult themes that she would only come to understand later in life (and that we will explore further in later episodes). The episode is constantly juxtaposing this childlike fairytale vision with the underlying cold realities that make that vision possible.
Like the opening sentence of a novel, the opening shot of a movie has a heavy burden of setting tone and catching your eye. And it’s this shot that I think of as the real opening shot for “No Children in Space”, and for the Lunatics! series as a whole.
Here’s a render of an early version of this shot. The first part of it is very close to my plan for the final look (except for the hub reflections — see the discussion below), although the end is much less complete:
Shot 01-02-01: Technical Challenges
This shot is also meant to show off our technical capabilities, and hopefully gain the audience’s confidence in both the story and our project.
Technically, this shot raises the following issues:
- NPR rendering styles for the mechanical train elements, the plants, rails, and backgrounds — avoiding the ‘uncanny valley’
- Smooth and pleasing Freestyle line-inking of the elements
- Smoothly combining modeled elements, rendered billboards, and painted billboards
- Compositing reflections — because the built-in ray-trace reflections do not support Freestyle or “non-traceable” elements (which in practice, includes the billboards)
- Balancing the need to clearly reveal motion and to preserve the symmetry of the wheel shot at the beginning (obviously if it’s too stylized, you won’t see that the wheel is turning!)
- A smooth transition between the stationary and moving coordinate systems, and accurately tracking reflected and direct images with the camera
Animation is always an art of illusion. For many technical reasons, we can’t simply build everything (even virtually) and just shoot. Some objects are simply too complex, and rendering them for every shot would take days per frame, and possibly use up the RAM and crash the computer.
In this kind of situation, it’s possible to “cheat” by pre-rendering some elements and then inserting the rendered “billboards” into the scene. This is particularly useful when the object is going to be repeated many, many times through a particle system. These “billboards” are just planes in the model, with a texture mapped onto them. They also have a “look at me” constraint — so that as the camera moves, they follow it, always showing their flat image rather than being foreshortened.
This works fairly well as long as the angle doesn’t become distractingly far-off (eventually you would notice that you aren’t seeing the sides of the objects). In fact, if you have multiple billboards in one moving shot, the eye tends to focus on the shifting parallax between them, and ignore the fact that the individual billboards aren’t showing any.
I was honestly surprised at how well this technique works. Here’s the result in a test animation I did using the railway set that appears in 01-02-01 (and many other shots in sequence 01-02 as well):
In this shot, all of the plants and rocks you see on the railway escarpment are billboards! Yet, they look very “3D” simply because there are so many of them, and they are shifting past each other.
In shot 01-02-01, this background scene will be revealed almost entirely through reflections from shiny surfaces on the train (particularly the windows). But in practice, billboards are not ray-traceable. This is because the billboard planes need to be really invisible, and the “Traceable” option in Blender tends to make them show up as a shimmer or slight refraction through the parts (i.e. you’d see little rectangles around the plants), which would obviously blow the illusion.
Also, some of the elements in this shot (like the windmills in the background) have some Freestyle “inking” on them. Since Freestyle is applied as a post-processing step, and Freestyle does not understand transparency, reflection, or ray-tracing, these will simply be ignored by the built-in reflection processing in Blender.
Left to its own devices, Blender’s “mirror reflection” materials will simply reflect the barren hillside and no ink lines at all.
How can we fix this!?
Well, we’re using two different techniques with different limitations:
For the reflective “hubcaps” on the train wheels, we’re using the mirror reflection, but we’re cheating what the hubcap “sees” — we remove the foreground plants for the rendering pass on the wheels, and we add two large billboards that are rendered from a special orthographic camera view of the background set. These billboards fill the frame, so they can be made “traceable” without creating artifacts. In fact, they’re just “shadeless”, which means no shading calculations are done — in practice, we’ve pre-shaded them by rendering them with the ortho camera.
I made two of these, so that the foreground plants could be rendered on one (which has alpha transparency), while the background plants appear behind this. The result is a simple two-cel animation display with a bit of parallax to help sell it. The hub “sees” this and reflects it.
This works well for the hubs, because they have a complex shape, and we need the ray-tracing calculation to figure out the reflections for us. It has the limitation that it’s very hard for the reflected scene to have any animation (it’s not actually impossible — the billboards can display movies, but that gets very complicated!). It also forces us to simplify the construction of the scene enormously — we’ve reduced many planes to just two.
You can see the hub reflection effect in this month’s cover/wallpaper image. The video below shows it moving (although be aware that the Freestyle lines have been omitted to speed up the render, which is why some things don’t look as well-defined):
So we’re using a different technique for the window reflections. For these, I’m setting up a “reflection camera” to capture what the windows would be reflecting, and then combining this with the original render in the compositor.
To set up the reflection camera, we use constraints to position the reflection camera as an exact mirror image of the location and orientation of the main camera, relative to the plane of the train windows. We then have to “Flip” this image in the compositor to get the mirror image.
Unfortunately, Blender won’t really let you render from two cameras in the same scene at the same time. So I created a “Reflection World” scene in the same file, which simply links all of the objects to be reflected (which is basically everything except the train itself).
I’m also creating a render layer with the windows masked out, and another with the windows removed.
The mask layer will be used to select the reflection image to be composited only where the windows are in the shot. The layer with the windows removed shows the interior of the train — because the windows are also transparent. We’ll use an additional 2D-mask to control the balance between reflection and transmission through the glass, which is partly angle-dependent.
This also allows fine control over the balance, and allows us to “push” the physics a little for dramatic effect (haloing Georgiana’s face to make her more easily seen through the glass, for example).
I can’t show you this reflection technique yet, though, because I’m still setting it up!
Online Collaboration: Theory & Practice
I’d like to say that my plans for collaboration techniques were all going exactly as planned, but it’s not really true. Habits are hard to break, even for me. And expediency often overrides concerns like transparency.
So even though I’ve set up a Production Forum for direction and discussion, I’m still doing a lot of direction via private emails, or even through social media channels. Everybody has slightly different things they are used to, and I find that as a director of such a loosely-organized project, I often need to adapt to the different channels. I am feeling a bit “spread thin”, as I’m active on several social media channels (Facebook, Google+, Diaspora, Twitter, and even Ello) for both directing and marketing purposes. But I do think it’s important to remain available.
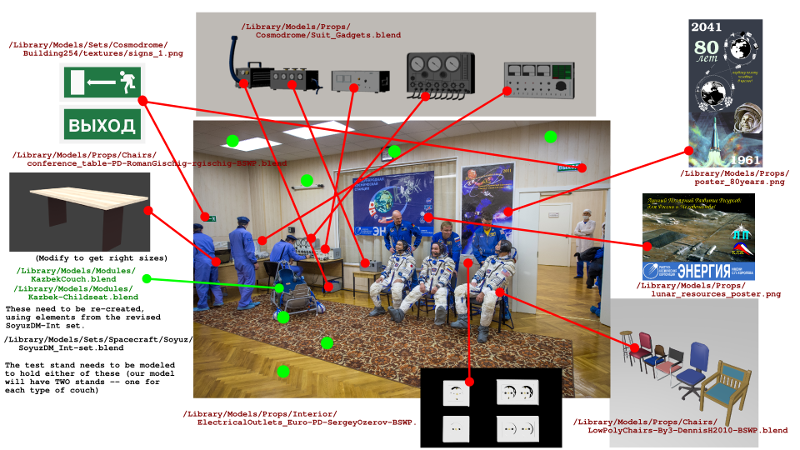
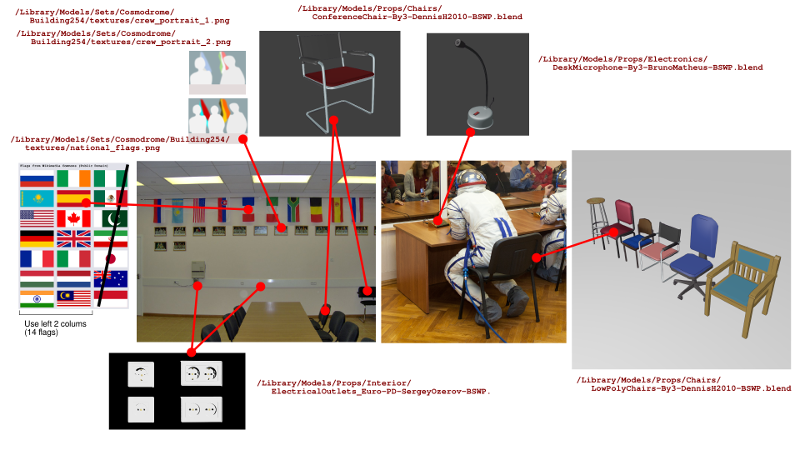
A lot of direction takes the form of me creating marked-up drawings and photo reference sets — at least for the sets where we are dealing with real places and things. The pictures below, for example, are ones I created for Sathish Kumar, who is doing set modeling. It shows a photo of the real “Aquarium Room” at the Baikonur Cosmodrome, and stock-models and props we’ll be using for set-dressing:
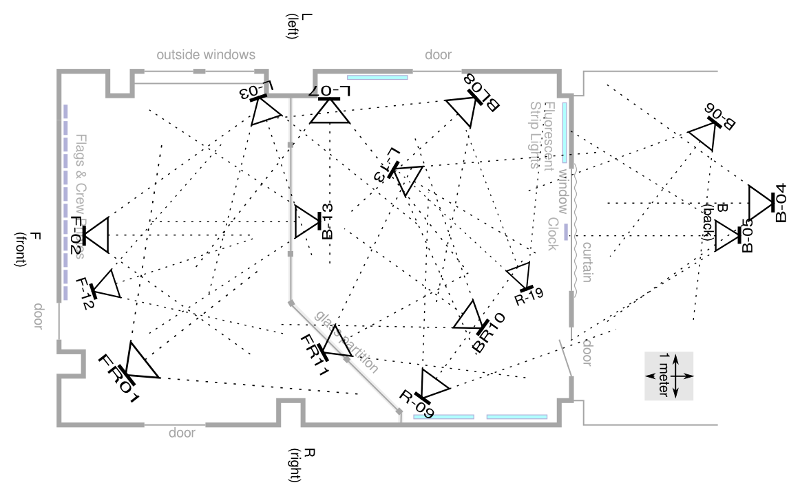
And I also created a floor plan, including a key to my guesses for where various reference photos were taken. The idea is to given enough orientation to make following the photo references easy. And of course the floor plan provides the basic model for the set:
So far this method has worked pretty well, but effective collaboration will likely be a continuing challenge on this project.
Other Progress
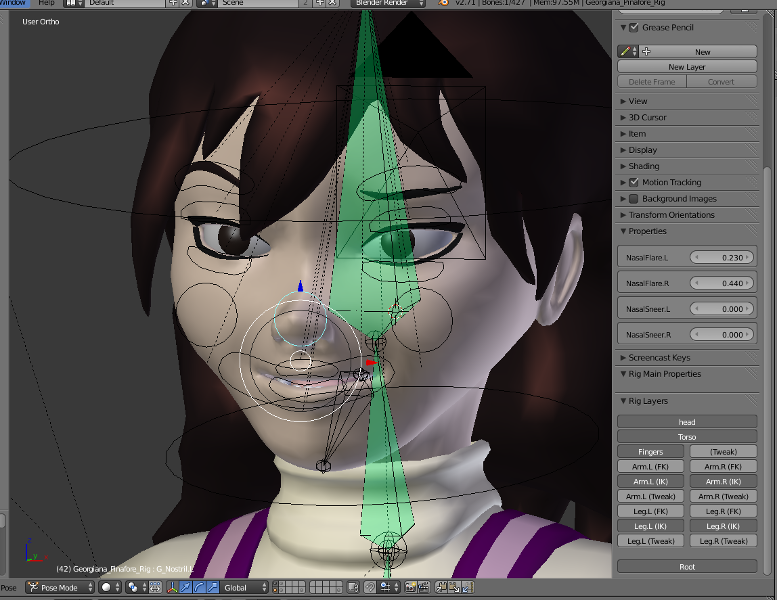
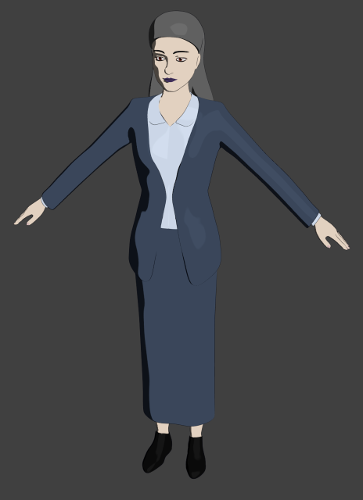
Keneisha Perry has also been pretty busy this month. She’s finished the face rig for the “Georgiana” Character (which is one of the last elements that was need for the shot described above — although I still haven’t added her to the shot yet. That’s coming up soon).
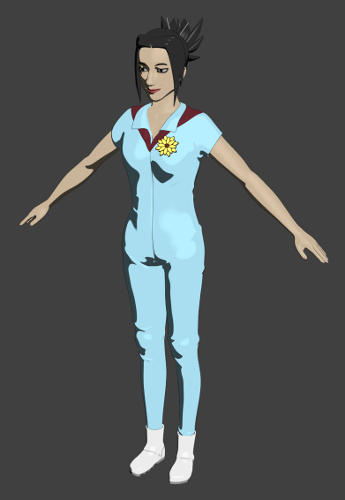
She’s also begun work on additional characters, and is finishing up the “flightsuit” version of “Hiromi”:

(Converted from October 2014 Patron Newsletter, 2025-10-23)
